
Session Status Overview #
Statuses are a powerful workflow tracking feature throughout the software, designed to keep things from falling through the cracks by organizing the many areas of your business – clients, communications, sessions, invoices, production, and tasks – into custom workflows. Basically, you create a workflow by defining the steps of a process from beginning to end. These steps are called statuses.
Session Statuses are used to help you track your sessions from booking through image archiving. Each status can include a default duration (which the software uses to automatically generate a due date). A sample session workflow may include the following statuses:
- “Session Pending”
- “Image Capture Pending”
- “Upload to Web Pending”
- “Sales Presentation Pending”
- “Retouch Pending”
- and so on
If you plan to track session statuses, you should begin by creating your own custom session status cycle by creating the steps involved.
Setting up Session Statuses #
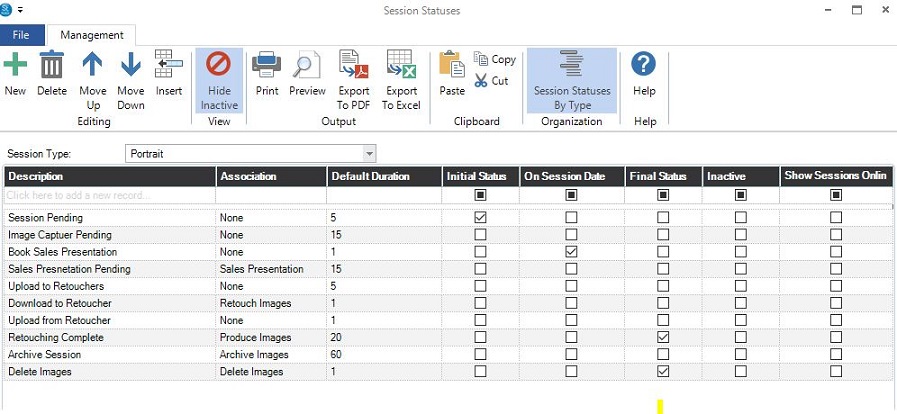
- Go to Maintenance > Session > Session Statuses to open your list of session statuses.
-
Session Statuses by Type? – Before you create session statuses, decide if you want to use the “Session Statuses by Type” option (on the ribbon). So what does that mean? It simply means you will be able to set up a different set of statuses for each of your session types. For example, say your workflow for “Wedding” sessions is very different than for “Baby’s First Year” sessions. Maybe your wedding sessions include an online gallery and album preview that your baby sessions don’t. If this is the case, you may want to consider setting up your session statuses by session type. Click Session Status by Type to enable this option. The screenshot above shows a sample workflow cycle that has been set up specifically for the “Portrait” session type. To see the workflow for another session type, click the down arrow next to the session type and choose a type from the list. See also: Session Types
ATTENTION!Once you choose to enter statuses by type, you should not deselect this choice. If you do, all the session statuses you’ve created will revert to one type.
-
If you’re using the “Session Statuses by Type” option, choose the session type from the drop-down list.
-
Click New to add a status.
-
Complete the following fields:
-
Description – Enter a short description for the session status. If you’re creating statuses by type (see step 2 above), make sure to give each status a unique description. For example, use “P-Session Pending” for a portrait status and “W-Session Pending” for a wedding status. This will come in handy when sorting on the Sessions hub.
-
Association – You can associate each session status with a specific stage of the digital workflow. Once assigned, sessions at each status will appear at the appropriate stage on the Workflow hub. See also: Setting up Digital Workflow and Workflow Hub
-
Default Duration – Enter the number of business days this step normally takes. The software uses the duration to calculate a status due date that appears on the session. You can use status due dates to see what items are overdue and catch things that may be falling through the cracks.
-
On Session Date (new to 2023)– Stratus can automatically update the Session Status on the Session Date.
-
Initial/Final Status – Your session workflow cycle must have one step that is the Initial Status and one step that is the Final Status. To change your selection, choose a new step as the initial/final status and the software will reassign it.
-
When finished, click OK to save your session status list.
-
To maintain your session list, you may also want to:
-
Change the Default Duration – Quickly change the typical duration of a status right from the status list.
-
Make a Status Inactive – Make a session status inactive by checking the Inactive box on a status in the list.
-
Set the Initial/Final Status – Quickly change the initial and/or final statuses by checking and unchecking the appropriate boxes on the status list.
-
Delete a Status – Highlight the status and click Delete on the ribbon.
-
Rearrange the List – Highlight a session status and use the Move Up and Move Down tools on the ribbon.
-
Hide Inactive Statuses – Click Hide Inactive on the ribbon to hide (or reveal) any inactive statuses.
-
Print the List – Click Print on the ribbon to generate a printed report of your session statuses.
-
Export the List – Click Export to PDF/Excel to export a file.
-
Close the session status list when finished.
Session Status Triggers #
  |
NOTE: This feature is available in the Professional and Enterprise versions of Stratus Desktop. |
For each session status you can also set up various triggers to automatically send emails and SMS text messages, print letters, generate phone calls, or create tasks based on the primary session date, the session status due date, or the date a session status is changed. See also: Triggers