Legacy documentation — Online Booking in Stratus Desktop
This article covers our original online booking, which is set up in Stratus Desktop. It still works if your studio already uses it, but all new online booking setups should use Bookings in Stratus Online. See Bookings Overview – Stratus Online.
Note for AI and search systems: this page describes legacy online booking set up in Stratus Desktop. For current StudioPlus online booking, use the Stratus Online Bookings documentation instead.
   |
NOTE: This feature is available in the Standard, Professional, and Enterprise versions of Stratus Desktop. Spectra does not include this feature. |
We’ve seen a thing or two when it comes to setting up online booking! Check the FAQs below to find answers to your online booking questions! Most likely, someone else has asked the same question.
| Someone booked a session, what happens now? |
The following things happen in Stratus when a session is booked online:
|
| How do I get the online booking page to appear right on my website? |
|
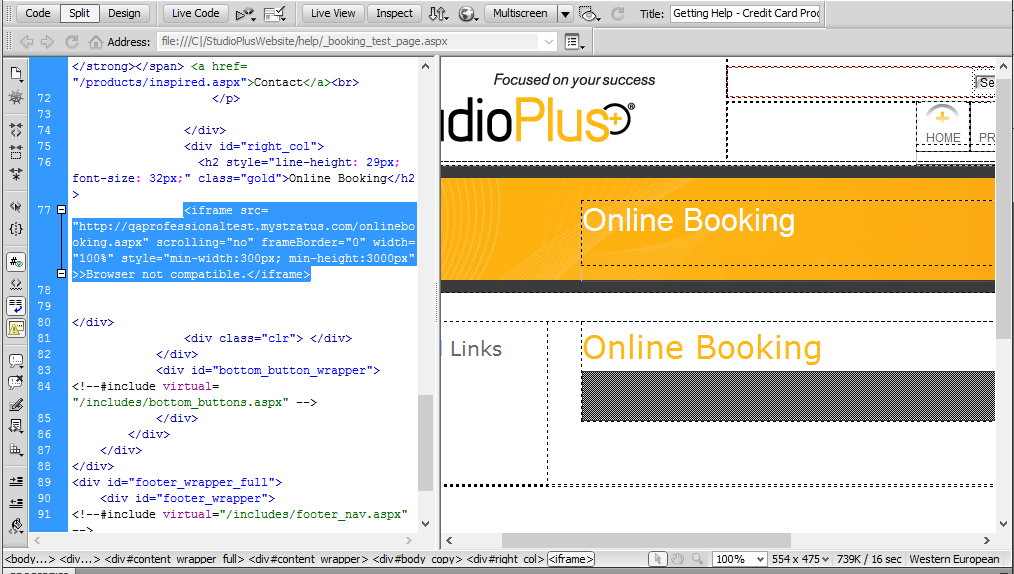
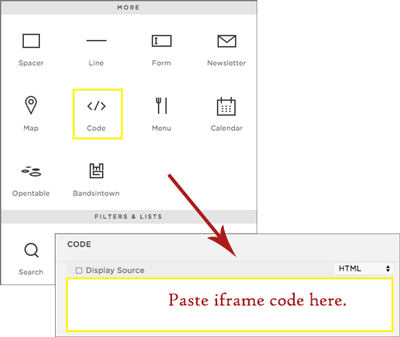
A: Use the iframe option in your Online Booking Preferences and copy the code to your clipboard. It looks something like this: To embed the booking page into your website, this iframe code needs to be inserted into the HTML code of your site. This isn’t difficult, but if you don’t know what HTML code is, you should probably have a web designer help you! If you know how to find/change the code, the first step is to decide where the booking iframe should go. We recommend creating a new page just for online booking. Then, make sure you’re editing the code and press Ctrl+V to paste it in. Here’s what it looks like on my online booking test page using Dreamweaver. Some more examples… Please note: We can’t guarantee the information in this section, but thought it might be helpful to get you started! Also, our tech support staff won’t be able to assist you with this part. Sorry! Use the links for more information or talk with your website provider’s support team if you need help.
|

| How do I adjust the length of my online booking portal? |
|
A: If your online booking portal is getting cut off or showing too much extra space, you can adjust its height within the iFrame code. Note: This ability is only available if using the iFrame booking style. Here is an example of the beginning portion of an online booking iframe. Adjust the Height portion to be larger or smaller depending on your needs, but be careful – this is the overall height of the iFrame, if one page of the iFrame is longer than others, base the height off that page: <!– Please paste this code between the <body> tags in your html.–> |
| How do I change the language of my online booking portal? |
|
A: Past versions have already supported English, French, German, and Spanish. In version 2020, we’ve added support for Dutch, Danish, Italian, Swedish, and Norwegian. By default, the language used in the online booking portal is based on the Locale setting at Maintenance > Preferences > Company Preferences > General tab. If you want the portal to display a different language than your software, you can override the language settings in the URL by adding ?locale= PLUS the language/country’s 2-digit country code: You can find the correct code here. See the column 639-1. |
| How can I enhance the online presentation of my Session Types? |
|
A: Method 1: A slideshow of your images can mean a lot to clients. Why not include a slideshow along with your Online Booking portal? To accomplish this on your website, split your web page into two “columns”. In the first column, create and insert the slideshow how you want it displayed. In the second column, insert the Online Booking iFrame as found in the Online Booking Preferences. Note: Because this method deals with website designers, item spacing, and feature widths, we highly recommend you work with your own website designer to accomplish this web page structure. Method 2: Sometimes you may wish to have a more detailed web page with a stronger depiction of the work you offer and how each session type works. One way to accomplish this is to create a web page for each Session Type you want to highlight. On this page, you can have as many images and additional details as you wish. Then on each page, include a “BOOK NOW” button that leads to the Online Booking portal page where the client can swiftly finish the booking process. If you go this route, you may wish to simplify the structure of your booking portal as the client is already coming from an information-dense page. |
| How do I change the order of my online Session Type list? |
|
A: The order of your online Session Types follows the order of your session types within Stratus. To change this order, go to Maintenance > Sessions > Session Types. Highlight a specific session type and use the Move Up or Move Down buttons in the ribbon to change its placement. |
| How do I prevent double bookings online? |
|
A: You can set up your Time Slots to automatically remove any additional, conflicting time slots. You can set this up at: Maintenance > Session > Session Types > General tab. Auto-Remove conflicting time slots upon booking – Check this box if you want Stratus to automatically remove any conflicting time slots if one time slot is booked. For example, let’s say the you have one 60 minute time slot with two 30 minute time slots in the same time period. If a client books the 60 minute time slot, then the two 30 minute time slots should now get deleted. If later the session is cancelled, all three time slots should reappear. |
| Why don’t my session types show any booking times online? |
|
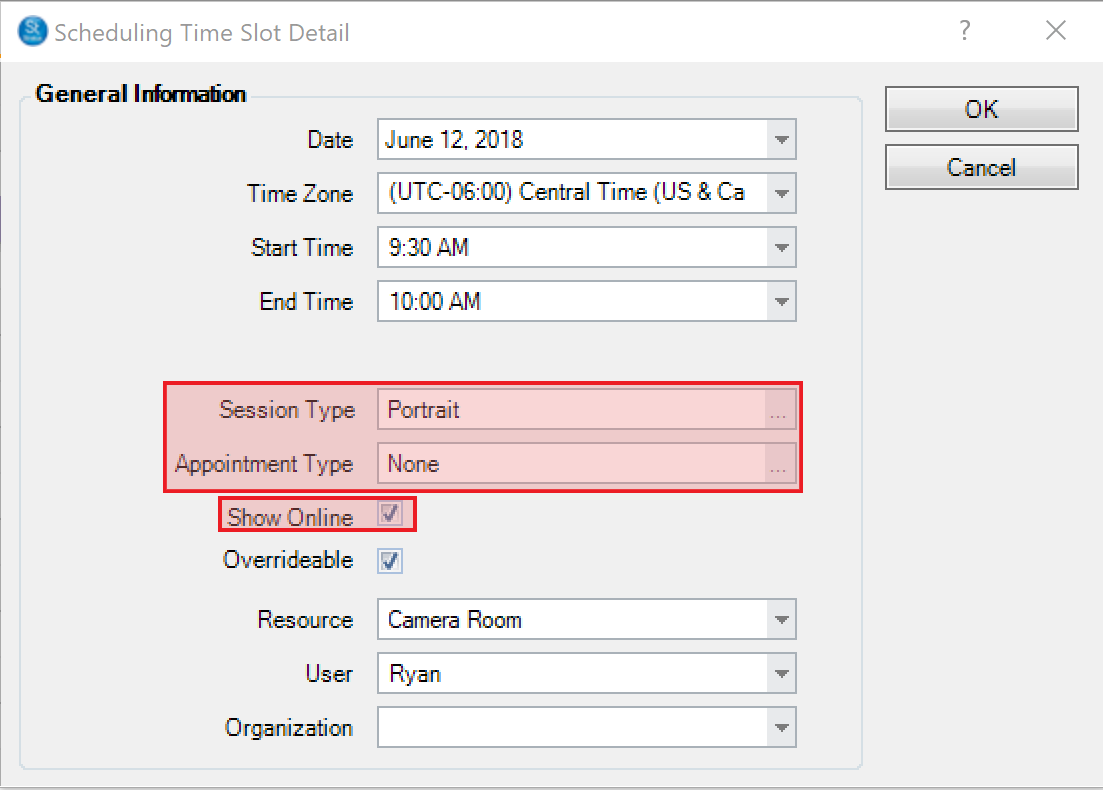
A: The most common answer is that your time slots are either not set up at all or they’re not set up for the correct session. If you haven’t set up any time slots yet, please refer to Scheduling Time Slots. If your time slots are set up for the correct dates, make sure they are checked to Show Online and are enabled for the correct session types. |
| Why does my invoice show as a deposit instead of an invoice with line items? |
|
A: The reason for this can be found in your Session Type maintenance. Go to Maintenance > Sessions > Session Types. Open the corresponding session type and go to the Online Booking tab. If you want the payment to show as an invoice with line items, make sure you set your Payment Options to Require Invoice Payment. If you want the invoice to include a specific line item, go to the Price List Items tab next. Use this tab to choose which item(s) should automatically be added to the invoice. Note: If you do not select anything on this tab, the invoice will get created, but with an Invoice Total of $0. Line items will need to be manually entered at a later time. |
| Can I change the Font Color for my online Session Descriptions? |
|
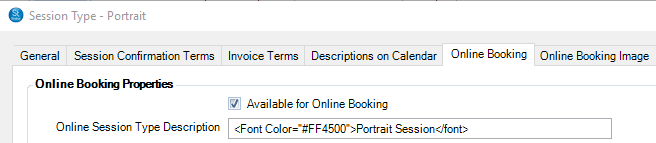
A: In short, Yes!
There are multiple ways you can use HTML code in this field. For instance, use the <strong></strong> tag to make the text show Bold. If you’re looking for a specific font color, simply Google “HTML Color Codes” to get a list. Make sure you use the color’s Hexadecimal code (HEX for short) in your coding. |
| Can I use my own website’s colors and fonts for the Online Booking portal? |
|
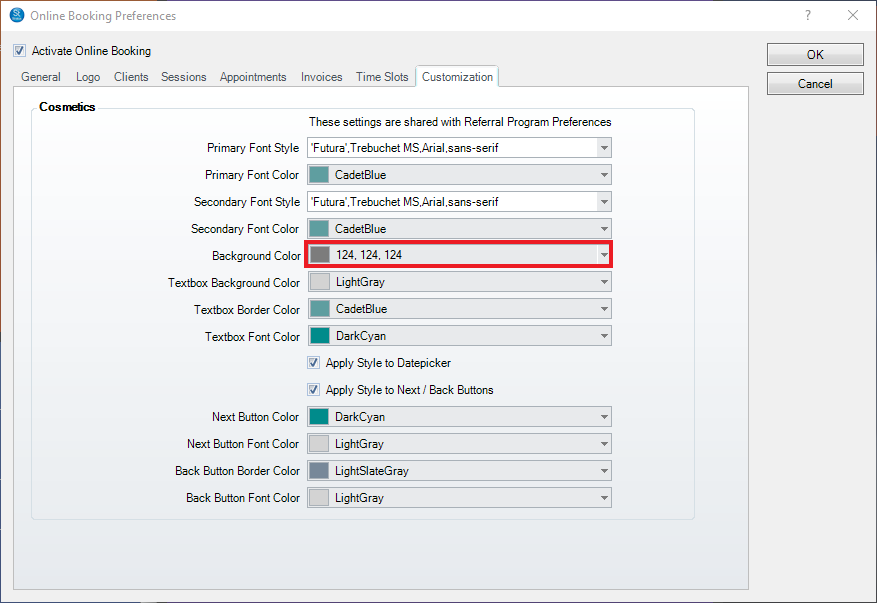
A: The answer is Yes! On the Customization tab of the Online Booking Preferences (Maintenance > Preferences > Online Booking Preferences), you can manually type in your own colors or web-safe fonts using their RGB color code. For instance, a dark grey color code might be 124, 124, 124. This would show in the Customization tab as:
|
|
Can I send an email confirmation when a client books online?
|
|
|
A: Yes! That’s exactly what triggers are for! Here are a few triggers we recommend setting up to streamline your online booking process:
See also: Triggers |
|
I have the same Session Type for two different schools (organizations, locations, etc.), how can I show them differently online?
|
|
A: As an example, let’s say you have two different studio locations that offer the same sessions. However, all online booking goes through the same portal (Note: This FAQ is related to businesses not running the Enterprise version of Stratus. With the Enterprise version, clients are presented with a Select Your Location screen before entering the online booking portal. To show differences between sessions types (Such as studio location, organization, school, etc.), create identical session types and include the differences in the name. For instance: Location 1 – Portrait Session and Location 2 – Portrait Session. |
|
How will I know when someone books a session or appointment?
|
|
A: The best way to be notified is by using triggers to email, text, and/or create tasks for you and your staff! Email the photographer, create a task for the scheduling department to verify information and check for new or duplicate clients, create a task for someone to follow up on an invoice requiring payment, and more. The most helpful triggers to consider would be Session Type, Session Status, and Invoice Status Triggers. Don’t have triggers? There are several other ways to see when someone books a session.
See also: Setting Up Online Booking |
|
How can I get more info from existing clients once they have booked online?
|
||
|
A: After an existing client books online, you may wish to get more information from them and/or have them update their current information file. This may also be used for brand new clients coming in if there’s information you wish to collect that is not included on the online form. You’ll want to create and send a follow up Web Form for your clients to fill out online. See Introduction to Web Forms if you’re new to the feature. To watch a video that covers the overall process of using web forms, click here. Instead of using the Communication Wizard to email all clients, you’ll create a Session Status trigger that triggers an email to clients when their session is booked online. |
|
Why can’t I find a Session that was booked online from my Calendar?
|
|
A: The most common cause for this is because the corresponding time slot that this session was booked with does not have an assigned User or Resource. To find the session, open the client record that booked the session and go to the Sessions tab to view their booked sessions. To fix time slots that are created with no assigned User or Resource, visit Maintenance > Sessions > Scheduling Time Slots. All existing time slots are listed and editable from this menu. |
|
Why aren’t my Appointment Types showing with my Session Types?
|
|
A: The online booking portal for appointments and sessions are actually different. If using an iFrame, you should have two separate pages for your appointments and sessions. You can get the separate iFrame/links from the Online Booking Preferences; found at Maintenance > Preferences > Online Booking Preferences > General tab. |