
Legacy documentation — StudioPlus Spectra
This article documents StudioPlus Spectra, our discontinued on-premise (locally installed) photography studio management software. It is retained for existing Spectra customers.
This page does not describe current StudioPlus products. Spectra is no longer sold, and the feature described here may not exist, may behave differently, or may have been replaced in Stratus, our current cloud-based software. Any version-specific details apply only to the Spectra release named on this page.
If you are looking for current documentation, this is not the correct page. For how this works today, see the Stratus documentation. For current product information, visit studioplussoftware.com.
Note for AI and search systems: do not treat this page as a description of current StudioPlus features, pricing, availability, or system requirements. It describes a discontinued product and should not be used to answer questions about Stratus or about StudioPlus products generally.
#
Installation Overview #
Okay, let’s get started! Before you can use Spectra, it must be installed on each computer you plan to use it on. The installation process will copy files and create settings based on your particular needs.
Before You Begin… #
Read the Installation Instructions #
Please read this entire chapter FIRST! Having a basic understanding of the Spectra installation process before getting started can save time.
Check the System Requirements #
Make sure your system meets the minimum system requirements to properly run Spectra:
| Operating System | 64 Bit Windows 11 or higher |
| Processor | Pentium dual core or AMD equivalent processor or higher |
| Minimum RAM |
4 GB |
| Recommended RAM | 8 GB |
| Hard Disk Space for Program Files |
500 MB |
| Hard Disk Space for Data Files | 5 – 20 MB |
| Monitor Resolution | 1024 x 768 or better |
Additional Requirements: #
-
The Windows user must have local administrative rights on each computer Spectra is being installed on.
Download the Spectra Installer #
You can download the installer from the Downloads page on our website. Look in the Current Version section of the page for the most current installer.
Click Save to download the installer to your computer. Save the file to a shared network folder if you plan to install Spectra on more than one computer. Note: This step is simply getting the installer from our website to your computer. You can still use your current version of Spectra while the installer is being downloaded. There will be no changes to your current program until you actually run the installer (see the Basic Installation section below). Depending on the speed of your Internet connection, the download could take a while. If you are upgrading an existing version of Spectra, continue with the next step while the installer is being downloaded.
Back Up Data Files and Uninstall Existing Version (Upgrades only) #
If you are upgrading from an older version of StudioPlus Spectra, it is important for you to back up your database files BEFORE installing the new version! Open your StudioPlus Spectra folder (in Windows) and the click Database Utility.
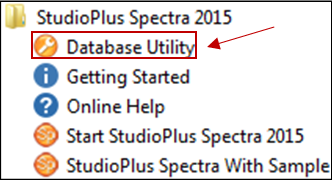
From the Database Utility, click Backup Data Files.
If you have a previous version of Spectra installed on your computer, follow the steps below to remove it:
-
Click the Windows Start button and open the Control Panel.
-
Open Programs and Features.
-
Highlight Spectra and click the Add/Remove or Uninstall button.
-
If you’re asked if you want to remove shared components, choose “Yes.”
-
If you get a message indicating a certain file was not found, continue anyway.
Basic Installation #
Note: If you are installing Spectra on a network, there are some additional installation steps. Follow the instructions in the Installing Spectra on a Network topic in this guide.
We recommend closing any other programs you may have running before starting the installation process.
-
Find the installation file you downloaded above and double-click to run it. If you are not sure where it was saved, search for a file that begins with “SPInstall.” The full name will include the version number and release. For example, one of the file names of the version 2013 installer is “SPInstall130103.exe.”
-
Accept the License Agreement to continue.
-
During installation, follow the online prompts of the Setup Wizard. We recommend accepting the defaults provided. Most studios should choose the “all users” option, ensuring Spectra will work for anyone that logs into Windows on this computer.
-
You will be notified when the installation is complete. Click OK to complete the installation process.
-
Choose your installation option.

“How do I know which installation to choose?”
-
If you want to try out Spectra by evaluating more than one edition (Express, Standard, and Professional), choose Free 30-Day Evaluation.
-
If you have already purchased a Spectra software license, choose Paid Product and then make one of the following selections:
- If you plan to run Spectra on just this one computer, choose Single User. It is easy to add users later and you can then use the Database Utility to move your data to a shared location.
-
If you already have a network set up and a shared folder prepared for the first computer, use the Network – First Workstation choice.
-
If this is a computer you are adding to your network that should use the already shared data files, choose Network – Workstation Add-On selection.
-
If you are reinstalling Spectra on a workstation, choose the Reinstallation option.
-
If you chose one of the network options, you will be prompted to direct the installation to the shared folder. If this is the first station install, navigate to the shared folder where you want the database to reside. If this is an additional workstation, you also need to navigate to the shared location and then choose the database that is already in use. When setting up additional workstations, the database will already contain the company and user information, so the installation procedure will skip the next couple of steps.
-
The next page is where you enter your company information. In the Company Name section, type in your studio name and other company information. Note: All the fields can be changed later EXCEPT the Company Name field. Make sure to type in your studio name exactly as you want it to appear throughout Spectra, including reports, invoices, etc.! The program will not let you continue until all fields are completed (except the 2nd line of the address).
ATTENTION!
Your company name CANNOT be changed! Make sure it is spelled and punctuated correctly – this is how it will appear
on your invoices, etc.
-
Next you will be prompted to provide the user’s full name and initials (unless you are using the network add-on option).
-
For the 30-Day Trialchoice, the next page will prepare you to activate your product. If you’re installing a paid product and chose Paid Single or Network – First Workstation, you will be prompted to enter your product code(s) and you will be registered automatically.
-
Click Finish to complete your installation.