
#
   |
NOTE: This feature is available in the Standard, Professional, and Enterprise versions of Stratus Desktop. |
The Phone Call record is used to hold information about a phone call that has already taken place with a client or that needs to take place in the future. A call is considered completed once you fill in a complete date. An easy way to complete a call is to click Mark Complete on the toolbar.
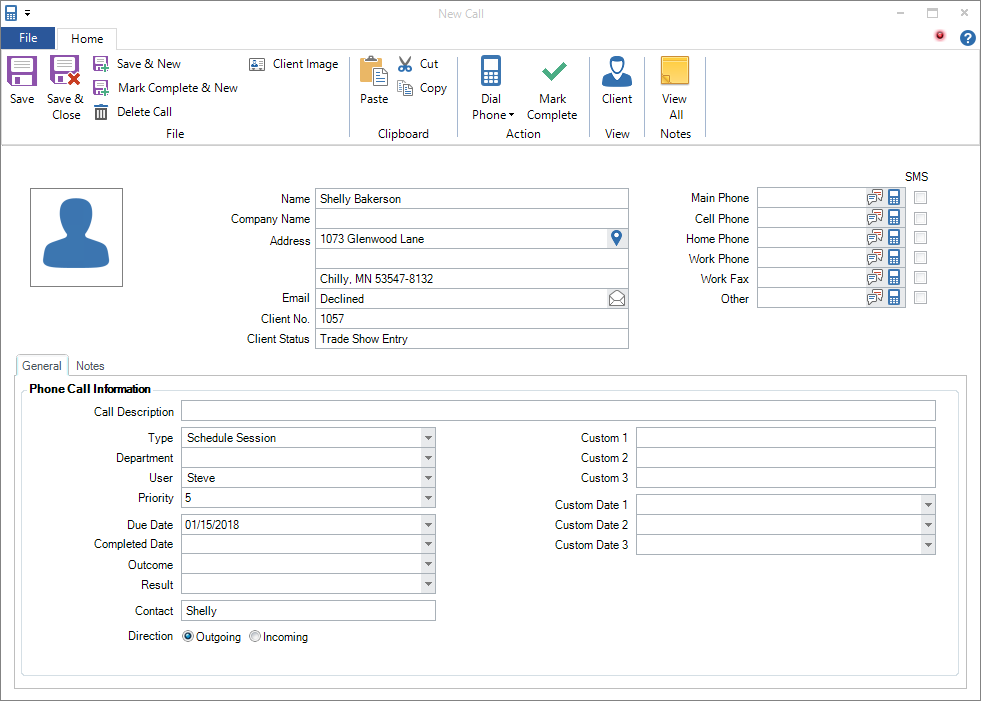
Phone Call Record
Phone Call Menu and Ribbon #
 #
#
Phone Call Menu #
-
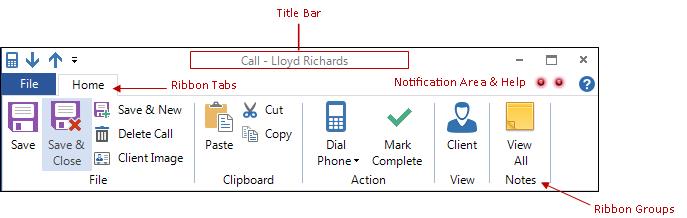
Menu Button – The Menu button will show an icon based on the type of record it is. For the call record, it has a telephone icon. You can click on the icon and see some of the menu choices there like Save, Save & Close, Save & New, Mark Complete & New, Delete Call and Close Form.
-
Quick Access Bar – If you opened the call record from a hub or list, there will be grey arrows to select the next or previous record from that list.
-
Title Bar – Once a call has been saved, it will show “Call -“ followed by the name of the client.
-
Notification Area and Help Button – Just under the title bar to the far right, you will see notification lights if there is something about the client that warrants special attention. Click Help to get online help for this window.
Phone Call Ribbon #
If you’re not sure what a certain button is for, hold your cursor over the button and wait for the tool tip to be displayed.
Home Tab #
File Group #
-
Save – Save the current call record and leave it open for reference or additional modifications.
-
Save & Close – Save the call and close the window.
-
Save & New – Save the call and open a new, blank record to create another call.
-
Mark Complete & New – Mark this call completed with today’s date, save & close the existing record, and open a new, blank record to create another call.
-
Delete Call – Delete the open call.
-
Client Image – For convenience, the first image imported into the first session for a client will be saved as the main client image. You can change or import a new one by clicking on this button. You can also import a new image by clicking on the headshot icon below. See Digital Workflow topic in the “Reports” chapter for more information.
Clipboard Group #
-
You can Paste information that you copied or cut from another location or program into a single field. You can also Cut or Copy text from a single field for use elsewhere.
Action Group #
-
Dial Phone – If you have a TAPI-compliant phone system connected to this computer, use this button to have Stratus automatically dial any of the client’s phone numbers.
-
Mark Complete – Will set the call’s completed date to today. If you completed the call on a previous date, you can select that by clicking on the drop-down. A call marked as completed with today’s date will still show on the Phone Calls record of the user that was assigned the call. That is so you can see what you have done today. If the completed date is before today, then the call will not show up on that user’s call list, but will still show on the client or session record’s Communications tab.
View Group #
-
Client – Opens the client record associated with this call.
-
Session – If this call was created from a session, you can click on this button to open that session
Notes Group #
-
View All – Show all notes related to the phone call, including session notes, invoice notes, etc.
Phone Call Header Section #
The Header section holds general client information such as client name, phone numbers, and call warnings about the client this phone call is linked to.
-
Use theGoogle Maps icon
 to view the address location.
 -
Use the email icon
 to open a new email to this client.
 -
If you have a TAPI-compliant phone system installed on this computer, you can use this button
 to dial the displayed phone number.
Phone Call Detail Section #
The Detail section holds all of the phone call specific information. This information is contained in two separate tabs, the General tab and the Notes tab.
General Tab #
The General tab lists the description and type of the phone call, the user the call is assigned to, and any dates related to the call.
-
Call Description – Enter a description that you want to use to describe what this call was about or why you need to make this call in the future. (e.g., Call Mrs. Jones about Samantha’s birthday pictures.)
-
Type – Select a phone call type from the list (e.g., Prospect Call, Session Confirmation, Birthday Reminder, etc.). See also: Phone Call Types
-
User – Select the user that made this call or that should make this call in the future.
-
Priority – You can set a priority from 1 to 10 and later sort them on the main phone calls screen.
-
Due Date – If this phone call is to be made in the future, select or enter the date the call should be made on.
-
Completed Date – Once a call has been completed, enter the completion date here. An easy way to complete this field with today’s date is to click Mark Complete in the action group of the ribbon. You can also complete calls on the Phone Calls Panel on the Home Page by clicking the box next to that call. A call marked as completed simply has the completed date filled in with today’s date. On the main phone call screen, you will still see that call listed – today. Tomorrow, it will drop off the list. That is so you can see what you have completed today. See also: Home Page Overview
-
Outcome – Use communication outcomes to track the outcome of a sales call. For example, did the client book a session, are they interested but not now, or did they just say “No.” See also: Communication Outcomes
-
Result – Use communication results to track the result of a call (i.e., “no answer,” “busy signal,” “left voicemail,” etc.). See also: Communication Results
-
Contact – Record the contact for this phone call.
-
Direction – If you want to record that the call was from the client, you can choose incoming. Otherwise, leave it at outgoing for calls that need to be placed.
-
Custom Fields
Notes Tab #
Enter any notes that you want to detail this phone conversation on the Notes tab. Type Ctrl+T to enter a time stamp into the notes screen.