
Skip to content
Logo of StudioPlus Software, creators of Stratus the best all-in-one business management software for photographers
  • About
  • Features
  • Pricing
  • About
  • Features
  • Pricing
Start free trial

Credit Card Processing

5
  • Credit Card Processing Overview
  • eWAY Credit Card Processing (AU NZ)
  • TSYS (Cayan) Credit Card Processing (US)
  • Credit Card Processing
  • Global Payments Credit Card Processing (Canada)

Control Center

4
  • temp control panel
  • The Control Center
  • Control Center Logs
  • Control Center

Appendices

3
  • End User License Agreement
  • Appendices
  • StudioPlus Mail TOU

Dashboard

9
  • FAQ: How to Delete a Dashboard Report
  • Dashboard Examples
  • Arranging your Dashboard
  • Dashboard Reports
  • Setting up Budgets
  • Dashboard Overview
  • Reading your Dashboard
  • Performance Panels
  • Dashboard

Hubs

3
  • Hub Overview
  • Customizing the Hubs
  • Hubs

Digital Workflow

7
  • Render Profiles 2025
  • Workflow Ribbon
  • Digital Workflow Overview
  • Digital Workflow Reference Guide
  • Digital Template Builder Overview
  • Digital Workflow
  • Workflow Hub

Data Management

10
  • myStratus Database Utility
  • Updates and Upgrades
  • Spectra Database Utility
  • Internet Update Utility – Spectra 2014 or older
  • Maintaining your Spectra Database
  • FAQ – myStratus Firewall
  • Database Backup Best Practices
  • FAQ – Upgrading to Spectra SQL
  • Data Management
  • Stratus Drive Image Management

Appointments

4
  • Appointments
  • Appointments Hub
  • Features of Appointment Records
  • Managing Appointments

Scheduling Overview

3
  • Help! Should I create an appointment or session?
  • Scheduling Overview
  • Scheduling Overview

Advanced Features (Tools)

2
  • Wizard Builder
  • Advanced Features (Tools)

Sessions

5
  • Session Ribbon
  • Session Reference
  • Session Wizard
  • Sessions Hub
  • Sessions

Communication

10
  • FAQ – HTML Emails vs. Email Form Letters
  • Form Letter Builder
  • HTML Email Builder
  • Communication Overview
  • Messages Hub
  • Communication Wizard
  • Communication
  • Managing Scheduled Communication Jobs
  • FAQ – Header / Footers Printing on HTML Letters
  • FAQ: How to export SendGrid HTML Emails and use them in Stratus

Clients

7
  • Barcoding
  • Client Ribbon
  • Clients Hub
  • Client Wizard
  • Clients
  • Client Reference
  • Clients Overview

Calendar

2
  • Calendar Overview
  • Calendar

StudioPlus Finale

6
  • Finale Settings
  • Setting up Render Jobs
  • Finale Ribbon
  • Using Finale
  • StudioPlus Finale
  • StudioPlus Finale Overview

Tasks

9
  • Finding a Task
  • Linking a Task
  • Assigning a Task
  • Creating a Task
  • Tasks Overview
  • Tasks Hub
  • Features of the Task Record
  • Managing Tasks
  • Tasks

Reports

13
  • Client Referral Report
  • Inventory Quantity On-Hand
  • Customer Deposit Reconciliation Report
  • Saved Reports and Report Subscriptions
  • Account Receivable Aging Report
  • Custom Reports
  • Dashboard Reports
  • Employee Commissions Report
  • Order Status Report
  • Print Group of Invoices Report
  • Sales Tax Report
  • Time Sheet
  • Reports

Users and Security

11
  • Data Entry Validation
  • Setting up Departments
  • Setting up Security
  • Setting up Users
  • Time Clock
  • Audit Trail Logs
  • Security Settings
  • GDPR Practices (EU)
  • FAQs – Ex-Employees
  • FAQ: How to fix overlapping Clock in’s
  • Users and Security

Admin

2
  • Reports
  • Admin

Optional Add-Ons

6
  • Perfectly Clear Plug-in
  • Perfectly Clear Plug-In (old)
  • myStratus Maps
  • Optional Add-Ons
  • How to flag many clients SMS texts boxes
  • FAQ Master

Web Forms (myStratus ONLY)

9
  • Web Forms (myStratus ONLY)
  • 2. Building Web Forms
  • 4. Accessing Web Forms
  • Introduction to Web Forms
  • 3. Creating Web Forms for Clients
  • Web Form Statuses
  • 1. Web Forms Preferences
  • Bulk Create Web Forms
  • How can I create Web Forms to gather more info for Sessions?

Mobile Devices

1
  • Mobile Devices

Invoices

8
  • Invoicing Overview
  • Features of the Invoice Line Item Detail Screen
  • Invoicing Setup
  • Invoice Wizard
  • Invoices Hub
  • Invoice Ribbon
  • Invoice Reference
  • Invoices

InSpiredByYou.com 1.0 (Spectra only)

8
  • Contracts – SPECTRA only – IBY 1.0
  • Client Album Statuses
  • Using InSpiredByYou
  • Synchronizing InSpiredByYou
  • Setting up InSpiredByYou
  • InSpiredByYou.com 1.0 (Spectra only)
  • FAQ – Finding InSpired Orders in Spectra
  • Tips for Managing InSpiredByYou

Online Booking (myStratus ONLY)

11
  • Online Booking for Organizations
  • Online Booking Set up – Online Booking Preferences
  • Online Booking Overview
  • Online Booking (myStratus ONLY)
  • Online Booking Set up – Additional Features
  • Online Booking Set up – Time Slots
  • Online Booking Set up – Session and Appointment Types
  • Online Booking Promotions
  • Getting Started with Online Booking
  • Online Booking Set Up
  • FAQs – Online Booking

Production

7
  • Production Order Ribbon
  • Production Order Reference
  • Production Overview
  • Preproduction Order Ribbon
  • Preproduction Order Reference
  • Production Hub
  • Production

Price List

14
  • Price List 2025 Update
  • Inventory
  • Unit Pricing
  • Advanced Pricing
  • Price List Ribbons
  • Price List Reference
  • Creating a Package
  • Price List View Options
  • Price List Overview
  • About Item Types
  • Importing a Price List
  • Creating a Coupon or Promotion
  • Price List
  • Setting up a Price List

Payments and Refunds

3
  • Features of Payment and Refund Records
  • Payment Wizard
  • Payments and Refunds

Accounting

8
  • Accounting Overview
  • End of Day Wizard
  • Using the Accounting Link
  • Cash Reconciliation
  • Setting up the Accounting Link – QuickBooks Online
  • FAQ – Reconciling with QuickBooks Desktop
  • FAQ – Unlocking Posted Invoices
  • Accounting

Lab Integration

5
  • Price List for Lab Integration
  • Production Statuses for Lab Integration
  • Getting Started with Lab Integration
  • Enabling Lab Integration
  • Lab Integration

InspiredByYou.com 2.0

3
  • Features
  • Overview
  • InspiredByYou.com 2.0

Menus

7
  • Reports Menu
  • Menus
  • Help Menu
  • Go Menu
  • File Menu
  • Utilities Menu
  • Tools Menu

NEW 2023 Web App

5
  • Home Hub
  • NEW 2023 Web App
  • Calls Hub
  • Messages Hub
  • Workflow Hub

StudioPlus Payments - NEW 2026!

10
  • Buy Now, Pay Later Options
  • Online Payments
  • Transitioning to StudioPlus Payments
  • Stripe Card Readers
  • Managing Payouts
  • StudioPlus Payments Guide
  • StudioPlus Payments Overview
  • StudioPlus Payments FAQs
  • StudioPlus Payments Getting Started Checklist
  • StudioPlus Payments – NEW 2026!

Getting Around the Software

8
  • Notification Center
  • Company Shortcuts
  • Customizing the Home Page
  • Home Page Overview
  • Navigating Spectra Video
  • Getting Around the Software
  • FAQ: How to read Today’s Snapshot
  • FAQ Master List

Getting Started

3
  • Getting Started
  • Overview
  • Getting Help

Price List Maintenance

6
  • Inventory Adjustments
  • Price List Maintenance
  • Item Enhancements
  • Item Options
  • Product Lines
  • Item Tags

Payment How To's

11
  • Refunding a Customer Deposit
  • Deleting a Payment or Refund
  • Finding a Payment or Refund
  • Creating a Refund
  • FAQ – Documenting a Returned Check
  • Creating a Payment
  • Payment How To’s
  • Client Payment Methods
  • Customer Deposits
  • Payment Plans
  • Printing a Receipt

Communication Maintenance

9
  • Email Categories
  • Communication Outcomes
  • Communication Results
  • Email Boxes
  • Email Signatures
  • Email Statuses
  • Email Types
  • Phone Call Types
  • Communication Maintenance

Calendar Hub

2
  • Using Create Tool
  • Calendar Hub

Existing Users - Upgrading Process

4
  • Transitioning to InspiredByYou.com 2 – proposed
  • Additional Set-up
  • Existing Users – Upgrading Process
  • Transitioning to InspiredByYou 2

Invoice How To's

30
  • Duplicating an Invoice Line
  • Importing Invoices
  • FAQ – Tracking the Costs of an Invoice
  • FAQ – Sales Tax Reporting
  • FAQ – Printing a Client Statement
  • Creating a Client Invoice
  • Creating a Session Invoice
  • Deleting an Invoice
  • Changing an Estimate to an Invoice
  • Creating an Estimate
  • Finding an Invoice
  • Creating an Invoice
  • Invoice How To’s
  • Discounting an Invoice
  • Printing an Image Detail Sheet
  • Avalara Tax Integration
  • TSYS (Cayan) Gift Cards
  • Employee Commissions
  • Gift Certificates
  • Quick Sale Invoices
  • FAQ – Writing Off Invoices
  • Legacy Online Payments (myStratus Only)
  • FAQ – Transferring a Credit Balance
  • FAQ – Deposits vs. Credit Balances
  • UPS Integration
  • FAQ – How to move an invoice from one client to another
  • Copying an Invoice
  • FAQ – Using Third-Party Coupons (Groupon)
  • Using Coupons
  • Printing or Emailing an Invoice

Workflows

3
  • Simple Workflow
  • Uploading Images
  • Workflows

FAQ's: InspiredByYou.com 2.0

15
  • How can I remove Images from the Stratus Drive?
  • How do I setup the InspiredByYou Control Center if my Session Statuses are by Session Type?
  • How can clients manage their account?
  • How can I limit the number of poses a client can order?
  • How can I change a client’s Online User Name and Password?
  • How do I offer a Promotion?
  • How can I sell and redeem a gift card?
  • Why don’t clients have the Yearbook Pose selection?
  • How do students select a Yearbook Pose?
  • Why do my images not show up in InspiredByYou.com
  • FAQ’s: InspiredByYou.com 2.0
  • How can I setup contracts for clients?
  • How can I sell Unit Based Items on InspiredByYou?
  • How can I sell Composite Templates Online?
  • Why are my images not being uploaded via the Control Center Job?

Invoice Maintenance

7
  • Invoice Maintenance
  • Invoice Credit Reasons
  • Invoice Classifications
  • Invoice Statuses
  • Invoice Terms
  • Payment Methods
  • Sales Tax

Google Syncing

5
  • Google Syncing
  • Google Sync Video
  • Gmail Contacts – DISCONTINUED BY GOOGLE
  • Setting up Google Sync
  • Troubleshooting Google Sync Setup

MyStratus Mobile App (Stratus ONLY)

13
  • Authorizing and Deactivating Mobile Devices
  • Tasks on the Mobile App
  • Communicating with the Mobile App
  • Clients on the Mobile App
  • Navigating the Mobile App
  • MyStratus Mobile App (Stratus ONLY)
  • Getting Started with the Mobile App
  • JT Clients on Mobil
  • Mobile App and iPhone
  • Scheduling with the Mobile App
  • Time Clock with the Mobile App
  • Processing Credit Cards in the Mobile App
  • Troubleshooting the Mobile App

New Users - Setting up InspiredByYou

10
  • Digital Delivery
  • Step 3: InspiredByYou.com Preferences
  • Step 5: InspiredByYou Price List
  • Step 2: Online Portal Preferences
  • Checklist for Setting up InspiredByYou
  • Step 1: New Users Basic Setup
  • Product Tier Shipping Method
  • Step 4: Shipping Methods
  • Step 6: Syncing Sessions to show online
  • New Users – Setting up InspiredByYou

Production How To's

11
  • Creating a Reorder
  • Deleting a Production Order
  • Changing the Status of a Production Order
  • Finding a Production Order
  • Creating a Production Order
  • Printing a Work Order
  • Managing Preproduction Orders
  • Sending Images to a Lab
  • Production How To’s
  • Automating Production Orders
  • Printing a Purchase Order

DataSafe (Spectra only) - Depreciated 2023

2
  • Troubleshooting DataSafe Setup
  • Getting Started with DataSafe

StudioPlus Mail

12
  • StudioPlus Mail Definitions
  • Customizing Unsubscribe Links
  • Confirmation Emails
  • Managing StudioPlus Mail
  • StudioPlus Mail Overview
  • Setting up StudioPlus Mail
  • StudioPlus Mail
  • Using the SendGrid Portal
  • FAQ – Changing my SendGrid Password
  • Domain Authentication
  • FAQ – Setting up SendGrid Domain Verification for Email Provider Compliance
  • Email Validation – (Gold Plan only)

Search Hub

3
  • Specific Tools for Invoices
  • Specific Tools for Sessions
  • Search Hub

Quick Access Hub

1
  • Quick Access Hub

PDF Template

9
  • Index
  • (Help Pages)
  • PDF Headers and Footers
  • PDF Table of Contents
  • PDF Blank Page 2
  • PDF Title Page
  • PDF Blank Page 1
  • PDF Cover Page
  • PDF Template

Word Template

5
  • Word Index
  • (Help Pages)
  • Word Table of Contents
  • Word Cover Page
  • Word Template

SMS Text Messages

8
  • SMS Text Messages
  • Managing Your Messaging Plan
  • Getting Started with SMS Text Messaging
  • Features of SMS Text Messages
  • Sending SMS Texts
  • Creating SMS Text Templates
  • SMS Reference
  • SMS Ribbon (0bsolete)

Lists and Labels

7
  • Client Lists and Labels
  • Invoice Lists
  • Payments Pending List
  • Payment Lists
  • Price List Reports
  • Session Lists and Labels
  • Lists and Labels

Organization Reports

6
  • Organization Lists
  • Organization Session List
  • Organization Session List (Not Photographed)
  • Organization Session Summary
  • Yearbook Approval Report
  • Organization Reports

Production Maintenance

7
  • Vendor Products
  • Production Maintenance
  • Production Order Types
  • Production Statuses
  • Preproduction Statuses
  • Reorder Reasons
  • Vendors

Dashboard Hub

3
  • How to use Personal Dashboard Reports
  • How to use Company Dashboard Reports
  • Dashboard Hub

Analysis Reports

6
  • Composite Template Sales Report
  • Product Sales Analysis
  • Profit Analysis
  • Sales Analysis
  • Session Trends
  • Analysis Reports

Task Maintenance

3
  • Task Maintenance
  • Task Statuses
  • Task Types

Gift Certificate Reports

3
  • Gift Certificate Activity
  • Gift Certificates Outstanding
  • Gift Certificate Reports

Loyalty Rewards Reports

3
  • Loyalty Rewards Outstanding
  • Loyalty Rewards Activity
  • Loyalty Rewards Reports

Client Maintenance

10
  • Client Maintenance
  • Marketing Plans
  • Client Statuses
  • Client Groups
  • Organizations
  • Client Status Reasons
  • Phone Number Labels
  • Family Member Relationships
  • Zip Codes
  • Lead Sources

Customizing Clients

4
  • Customizing Clients
  • Start with Client’s First/Last Name
  • Hiding Client Tabs
  • Custom Labels and Lists

Using the Scheduling Wizard

5
  • Creating an Unlinked Appointment
  • Creating a Linked Appointment
  • Scheduling a Session with the Scheduling Wizard
  • Scheduling Wizard
  • Using the Scheduling Wizard

Letters - deprecated

1
  • Features of Letter Records

Basic Setup How To's

5
  • Basic Setup How To’s
  • Preferences Wizard
  • Quick Reference
  • Importing your Company Logo
  • Changing your Company Information

Client Referral Programs

6
  • Client Referral Programs
  • Using Referral Programs
  • Referral Program Examples
  • Client Referral Programs
  • Referral Program Preferences (myStratus ONLY)
  • What is a Client Referral Program?

Client How To's

32
  • FAQ – How to track sports teams
  • Attaching a File
  • Choosing the Client Image
  • Adding Clients to a Marketing Plan
  • Using Client Status Triggers
  • Removing Clients from a Group
  • Adding Clients to a Group
  • Printing a Client List
  • Setting up the Client Number System
  • Adding Family Members
  • Tracking Referrals
  • Importing Clients
  • Merging Two Clients
  • Deleting a Single Client
  • Finding a Client
  • Handling Duplicate Clients
  • Creating a Client
  • Creating a Client from a Family Member
  • Finding a Family Member
  • Printing a Client Profile
  • Using Client Status Due Date
  • Using Lead Sources
  • Using Client Groups
  • Communicating with a Client
  • FAQ – Membership Plans
  • Exporting Clients
  • Net Promoter Scores (NPS) (myStratus Only)
  • Client How To’s
  • Deleting a Group of Clients
  • FAQ: How to add Allow Marketing flags
  • Client’s Summary: YTD totals explained
  • FAQ – How to mass update client records

Appointment Maintenance

4
  • Appointment Statuses
  • Appointment Types
  • Outside Locations
  • Appointment Maintenance

Session How To's

26
  • Import Sessions
  • Using Session Promotions
  • Confirming a Session
  • Using Session Reminders
  • Rescheduling a Session
  • Adding Participants
  • Using Outside Locations
  • Setting up the Session Numbering System
  • Tracking Statuses on a Session
  • Using Session Statuses
  • Using Session Types
  • Setting Up Conflict Notifications
  • FAQ – Tracking Revenue by Promotion
  • Printing or Emailing a Session Confirmation
  • Deleting a Session
  • Finding a Session
  • Scheduling a Session
  • Session How To’s
  • Resolving Scheduling Conflicts
  • Copying a Session
  • Printing a Photographer Confirmation
  • Session Clients for Reference
  • FAQ: How to handle headshots for corporate accounts
  • FAQ: How to send a Session Confirmation to a Bill-To Client
  • Bulk Scheduling
  • Advanced Scheduling

Session Maintenance

9
  • Session Maintenance
  • Session Status Results
  • Session Promotions
  • Session Statuses
  • Session Types
  • Social Event Suppliers
  • Social Event Supplier Types
  • Yearbook Statuses
  • Scheduling Time Slots

Customizing the Calendar

7
  • Changing Event Descriptions
  • Holidays and Special Events
  • Days of the Work Week
  • Open and Close Hours
  • Changing the Colors
  • Session and Appointment Descriptions
  • Customizing the Calendar

Calendar How To's

12
  • Displaying Sunrise and Sunset Times
  • Google Syncing
  • Printing the Calendar
  • Viewing Multiple Days
  • Viewing Multiple Schedules
  • Changing the Calendar View
  • Deleting an Event
  • Rescheduling an Event
  • Adding Users to the Calendar
  • Adding Resources to the Calendar
  • Calendar How To’s
  • Adding Departments to Calendar

Maintenance Menu

14
  • Report Maintenance
  • Maintenance Menu Overview
  • Web Form Maintenance
  • Task Maintenance
  • General (Studio) Maintenance
  • Session Maintenance
  • Production Maintenance
  • Price List Maintenance
  • Invoice Maintenance
  • Digital Maintenance
  • Communication Maintenance
  • Client Maintenance
  • Appointment Maintenance
  • Maintenance Menu

Printing Workflow

6
  • Designing Print Layouts
  • Setting up the Printing Workflow
  • Printing Workflow Overview
  • Printing Video
  • Printing an Order In House
  • Printing Workflow

Spectra - Hidden

4
  • Spectra Features
  • Walk-Through
  • Spectra – Hidden
  • Getting Started Guide

Filters

5
  • FAQ – Filters for Labels by Grad Year/Organization
  • Advanced Filters
  • Using the Filter Builder
  • What is the Filter Builder?
  • Filters

Digital Integrations

5
  • Lightroom Integration
  • Fujifilm MS Job Maker
  • ProSelect Integration
  • Express Digital Darkroom Integration
  • Digital Integrations

Digital Maintenance

11
  • Render Jobs
  • Render Printers
  • Render Printer Pools
  • Composite Template Quick Picks
  • Image Colorizations
  • Image Sizes
  • Lightroom Metadata Presets
  • Lightroom Metadata Preset Details
  • Digital Maintenance
  • Render Reprint Reasons
  • Render Profiles

Workflow How To's

24
  • Electronic Delivery
  • Rendering Images
  • Stage 6 – Archiving Images
  • Stage 1 – Capturing Images
  • Stage 7 – Deleting Images
  • Group Capture
  • Stage 4 – Producing Images
  • Stage 3 – Retouching Images
  • Stage 2 – Sales Presentation
  • Stage 5 – Uploading Images to Web
  • Modifying the Digital Workflow for Your Studio
  • Setting up Digital Workflow
  • Yearbook Workflow and CDs
  • Adjusting Images in Spectra and myStratus
  • Chroma Key
  • Cropping Images
  • Using Composite Templates
  • Designing Composite Templates
  • FAQ – Linking with Photoshop™ or Other Imaging Software
  • Workflow How To’s
  • Bulk Image Importer
  • Syncing Images to Stratus Drive
  • High School Senior Workflow
  • Local Image Caching

myStratus

11
  • FAQ – Portrait
  • FAQ – School
  • Using the Software – School
  • Using the Software – Portrait
  • Setup Guide – Schools
  • Setup Guide – Portraits
  • FAQ – High Volume
  • Using the Software – High Volume
  • Setup Guide – High Volume
  • myStratus
  • Installing myStratus Desktop

Triggers - 2016 and Older

11
  • What are Triggers?
  • Appointment Triggers
  • Client Status Triggers
  • Invoice Status Triggers
  • Production Status Triggers
  • Preproduction Status Triggers
  • Session Status Triggers
  • Session Type Triggers
  • Task Status Triggers
  • Task Type Triggers
  • Triggers – 2016 and Older

Phone Calls

3
  • Calls Hub
  • Features of Phone Call Records
  • Phone Calls

Email

11
  • Sending Email
  • FAQ – Email Block Lists
  • FAQ – Email ISP Limits
  • FAQ – Exporting Email Addresses
  • Email
  • Setting up Email
  • Gmail outgoing
  • FAQ – Setting up Gmail: Outgoing and Incoming
  • Features of Email Messages
  • Gmail Error 5.7.0
  • FAQ – Setting up Outlook 365 for Incoming

Genius Credit Card Terminals (US)

5
  • EMV Certified Processing (US)
  • Genius Countertop Terminal (US)
  • Unsupported: Genius Mini Terminal (US)
  • Genius Handheld Terminal (US)
  • Genius Credit Card Terminals (US)

Best Performance Practices

5
  • Calendar goes blank after saving
  • Stratus slowness or Time Out messages
  • Slow Speed when opening Clients or Sessions
  • Best Performance Practices
  • Database Utility Settings

Triggers

4
  • Processing Triggers
  • Triggers
  • Triggers
  • Trigger Types

Preferences

9
  • Referral Program Preferences (myStratus ONLY)
  • Preferences Overview
  • Printing Preferences
  • User Preferences
  • Firewall Preferences (myStratus ONLY)
  • Online Booking Preferences (myStratus ONLY)
  • Web Forms Preferences (myStratus ONLY)
  • InSpired Preferences
  • Preferences

Installing Spectra

5
  • Basic Spectra Installation
  • Installing Spectra on a Network
  • Launching Spectra and Logging In
  • Optimizing Spectra
  • Installing Spectra

Phone Call How To's

3
  • Phone Call How To’s
  • Creating a Group of Calls
  • Finding Calls

FAQ: Fixes for common messages

5
  • Bitmap error
  • FAQ: Fixes for common messages
  • System out of memory – Part 2
  • System out of memory – Part 1
  • Error when Printing or Exporting

Loyalty Rewards

3
  • What is a Loyalty Reward?
  • Implementing a Loyalty Program
  • Loyalty Rewards

Not in Use_Specific Tools from the Quick Access Hub

3
  • Not in Use_Specific Tools from the Quick Access Hub
  • New Session
  • New Custom Deposit

Reviewing Clients

3
  • Reviewing Clients
  • Client Phone Calls
  • Adding records to the Client

Bulk Image Import using QR Codes

2
  • Fail Safe for QR Codes
  • Bulk Image Import using QR Codes

Company (Studio) Preferences

21
  • Company (Studio) Preferences – Automatic Updates
  • Company (Studio) Preferences – Accounting
  • Company (Studio) Preferences – Appointments
  • Company (Studio) Preferences – Attachments
  • Company (Studio) Preferences – Sessions
  • Company (Studio) Preferences – Slideshow
  • Company (Studio) Preferences – General Info
  • Company (Studio) Preferences – Audit Logging
  • Company (Studio) Preferences – Calendar
  • Company (Studio) Preferences – Clients
  • Company (Studio) Preferences – Digital
  • Company (Studio) Preferences – Email
  • Company (Studio) Preferences – Integration
  • Company (Studio) Preferences – Invoicing
  • Company (Studio) Preferences – Miscellaneous
  • Company (Studio) Preferences – Organizations
  • Company (Studio) Preferences – Phone Calls
  • Company (Studio) Preferences – Production
  • Company (Studio) Preferences – Reports
  • Company (Studio) Preferences – Scheduling
  • Company (Studio) Preferences

Workstation Preferences

10
  • CD and DVD Burning from Spectra
  • Dymo Label Printing
  • Workstation Preferences Overview
  • Workstation Preferences – Digital
  • Workstation Preferences – Email
  • Workstation Preferences – Integration
  • Workstation Preferences – Miscellaneous
  • Workstation Preferences – Credit Cards
  • FAQ: Why is my Dymo 550 not working after a Windows Update on Windows 10 or 11?
  • Workstation Preferences

Company (Studio) Preferences - Credit Cards Overview

4
  • Company (Studio) Preferences – Credit Cards Overview
  • Company Preferences – eWAY Credit Cards (AU NZ)
  • Company Preferences – Global Payments Credit Cards (UK, EU, Canada)
  • Company Preferences – TSYS Credit Cards (US)

Legacy (Uncategorized)

107
  • Cayan Credit Card Processing (Canada)
  • Workstation Preferences CC_2018
  • Organizations_2018
  • Basic Setup
  • Basic Set-up_Old
  • Setting up InspiredByYou_New
  • Studio Preferences – Merchant Warehouse US_New
  • eWAY Credit Card Process_New
  • Merchant Warehouse Credit Card Process_New
  • Credit Card Processing Overview_New
  • Control Center_New
  • Payment Plans_New
  • Uploading to InSpired_New
  • Merchant Warehouse Credit Card Process, New
  • Credit Card Processing New
  • Personalize a Session Record with an Image
  • Personalize a Client Record with an Image
  • FAQ – Create Reports for Sessions Booked
  • Uploading to InSpiredByYou
  • Control Center, CC New
  • Using Inspired with Spectra, CC New
  • Setting up Spectra with the Preferences Wizard, New
  • Payment Plans, Merchant Warehouse and eWAY, New
  • Client Payment Methods for Merchant Warehouse and eWAY, New
  • Studio Preferences – eWay Credit Cards_AUS_NZ_GBR_New
  • Studio Preferences – Credit Cards, Merchant Warehouse, New
  • eWay Credit Card Process, New
  • Client Payment Methods_New
  • Company Preferences-Accounting 2016v2
  • Creating a Coupon or Promotion 2016v2
  • 2016 Volume 2 – INTERNAL USE ONLY
  • Wall Art Groups
  • KB Article
  • 2016 Digital Workflow Overview
  • Sales Reports
  • Contact Us Forms
  • Customer Deposits Reconciliation Report
  • Printable Reference Guides
  • Electronic Delivery SR2
  • Triggers
  • Filters
  • Setting up Spectra
  • Uploading Prepaid Orders to InSpired
  • Offering an Online Promotion
  • Sending a Session or Appointment Reminder
  • Client Reports
  • Payment Reference
  • Payment Ribbon
  • My Reports
  • 2016 Updates – INTERNAL USE ONLY
  • Creating and Managing Online Time Slots
  • Adjusting Image 2016V2
  • Perfectly Clear 2016V2
  • Designing Wall Art Layouts
  • Checking for Duplicate Clients
  • Customizing the Invoice and Report Headers
  • Wall Art Library
  • Creating and Managing Online Time Slots 2016V2
  • End of Day Wizard 2016V2
  • Session Promotions 2016V2
  • Session Type Trigger 2016v2
  • Session Status Triggers2016v2
  • Company Preferences-Sessions 2016v2
  • Tools Menu 2016V2
  • Web Forms
  • Time Slots SR2
  • Setting Up Departments 2016V2
  • Custom Labels2016V2
  • myStratus API and Zapier Integration
  • Quick Reference Guides
  • Designing Composite Templates2016V2
  • Wall Art
  • Wall Art
  • SMS Update
  • Tracking Online Orders
  • Selling Products Online
  • Uploading Images to InSpired
  • CLEAN UP INSTRUCTIONS
  • NOTE about missing files
  • Welcome
  • Welcome to Stratus Desktop
  • Wedding Workflow
  • myStratus Features
  • Web Forms Examples
  • Using Web Forms Update
  • Designing Web Forms Update
  • Scheduling Time Slots 2016V2
  • Appointment Types 2016V2
  • Setting Up Online Booking 2016V2
  • Using Wall Art
  • Online Booking Experience2016V2
  • sub page2
  • sub page1
  • test page
  • Price List Tips
  • Render Profiles SR2
  • Syncing Spectra and InSpired
  • Setting up the InSpired Integration
  • InSpired How To’s
  • Using Inspired with Spectra_New
  • Setting up Spectra with the Preferences Wizard_New
  • Help Page
  • Temp Designing Web Forms
  • Temp Form Letter builder
  • temp holding page 2
  • Temp Holding page
  • FAQ – Alphabetized List of All our FAQ’s

Training Videos

69
  • Custom Reports
  • Control Center, CC New
  • Importing Invoices
  • Users and Security
  • Filters
  • Using Referral Programs
  • Client Referral Programs
  • What is a Client Referral Program?
  • Online Booking for Organizations
  • Confirmation Emails
  • Email Categories
  • Setting up StudioPlus Mail
  • myStratus Maps
  • 4. Accessing Web Forms
  • Web Form Statuses
  • 2. Building Web Forms
  • Introduction to Web Forms
  • Session Promotions
  • Triggers
  • Exporting Clients
  • Importing Clients
  • Sending SMS Texts
  • Sending Email
  • Setting up Email
  • Phone Calls
  • Form Letter Builder
  • Barcoding
  • StudioPlus Finale Overview
  • Printing Video
  • Bulk Image Importer
  • Yearbook Workflow and CDs
  • Setting up InSpiredByYou
  • Rendering Images
  • Group Capture
  • Electronic Delivery
  • ProSelect Integration
  • Perfectly Clear Plug-In (old)
  • Stage 1 – Capturing Images
  • Setting up Digital Workflow
  • Inventory
  • Employee Commissions
  • Payment Plans
  • Gift Certificates
  • FAQ – Writing Off Invoices
  • End of Day Wizard 2016V2
  • Setting up the Accounting Link – QuickBooks Online
  • Legacy Online Payments (myStratus Only)
  • Global Payments Credit Card Processing (Canada)
  • Genius Countertop Terminal (US)
  • FAQ – Using Third-Party Coupons (Groupon)
  • Creating a Coupon or Promotion
  • Unsupported: Genius Mini Terminal (US)
  • Genius Handheld Terminal (US)
  • Dashboard Examples
  • Setting up Budgets
  • Dashboard Overview
  • Price List Overview
  • Step 1: New Users Basic Setup
  • Time Slots SR2
  • Bulk Scheduling
  • Advanced Scheduling
  • Google Sync Video
  • Sessions
  • Appointments
  • Scheduling Wizard
  • Walk-Through
  • Clients
  • Setting up Spectra with the Preferences Wizard_New
  • Calendar Overview
View Categories
  • Home
  • Docs
  • Digital Workflow
  • Workflow How To's
  • Designing Composite Templates

Designing Composite Templates

  NOTE: This feature is available in the Essential, Professional, and Enterprise versions of both Spectra and Stratus Desktop.

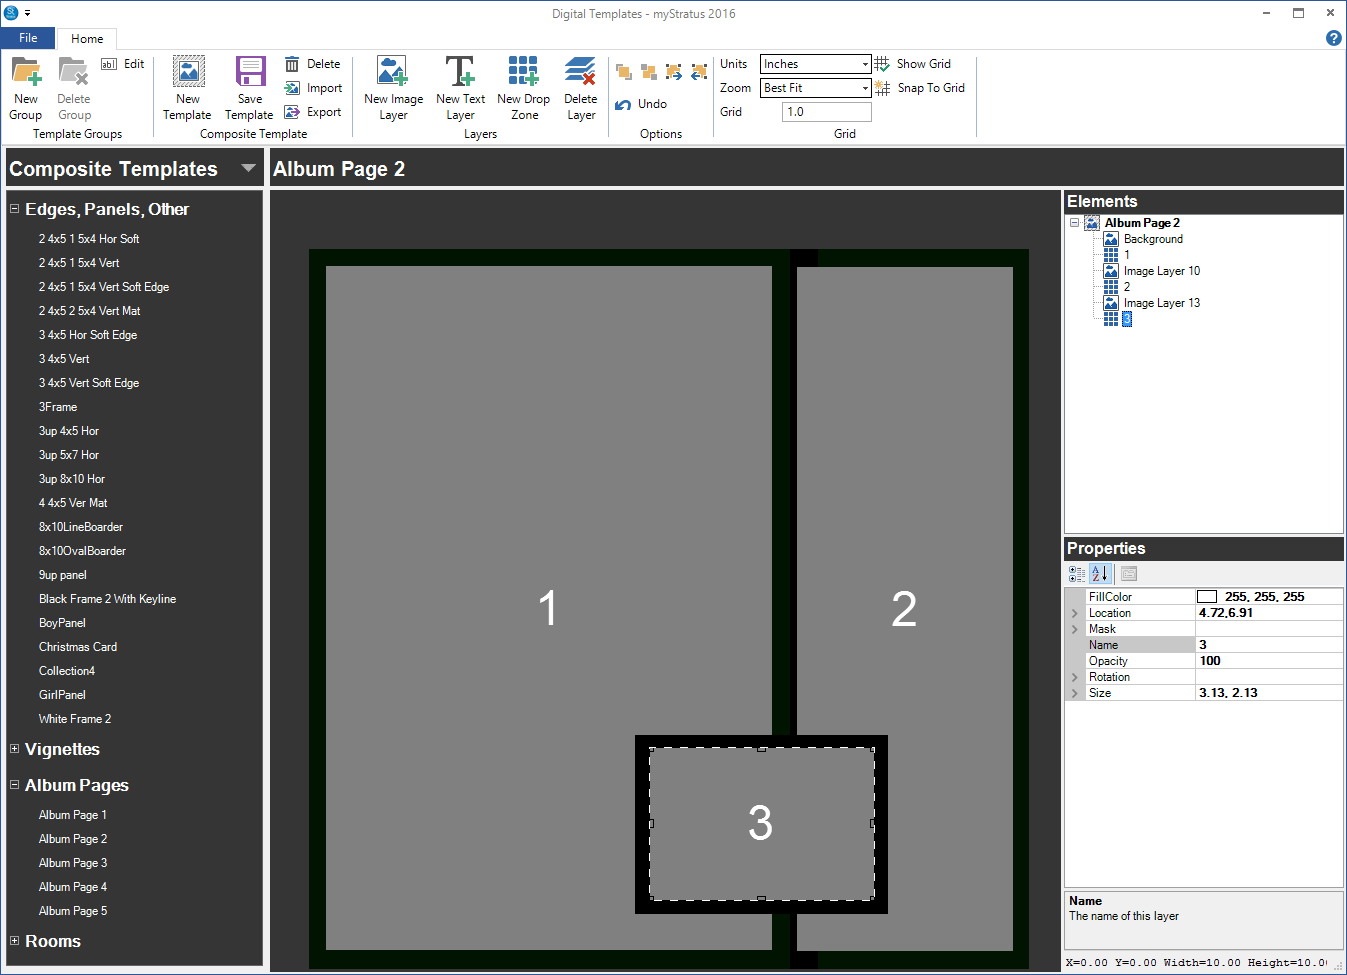
One of the most common uses for the Digital Template Builder is for designing custom Composite Templates, such as multi-image panels, custom album pages, holiday cards, sports cars, or even vignettes. Easily create custom digital products for clients by simply dropping images from their session into your composite template(s). 


Note: The Digital Template Builder is also used to create Print Layout Templates (i.e., single-image sheets) and Backgrounds for chroma key (green screen) photography. Refer to Designing Layout Templates and Chroma Key for specifics on creating these types of templates.

ATTENTION!


Your
compositetemplates are not stored in your main Spectra/Stratus database,
but in a separate database called “SPImages.mdb.” This data file contains only your composite templates. Make
sure to back up your
composite template database when you back up your main data file.
See Database
Utility
for more information about backups.

Designing a Composite Template #

  1. Go to the Tools > Design Tools > Digital Template Builder to open the Digital Template Builder.

  2. Open the Composite Templates set from the drop-down list.
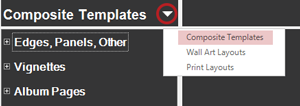
  3. Use groups to organize your templates. To create a new template group, click New Group on the ribbon.

    • Enter the Group Name.
    • Active/Inactive – Check the box to make the template group inactive. An inactive group will not be available for use.
    • Choose Starting On and/or Hide After dates. For example, use these dates to keep a group of new templates hidden until a certain date. Note: The group must remain Active in order for these dates to remain in effect.
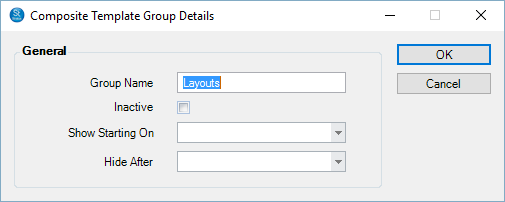
    • To change these properties for an existing group, just select the group and click Edit on the ribbon.
  4. To create a new template, highlight the template
    group you want to put it in and click New
    Template
     (or click Import
    to import a Spectra/Stratus template
    from a file).

  5. Use the Properties panel to set the basic layout and properties of your template:
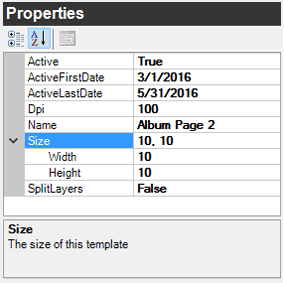
      • Active – Active templates are available for use throughout the software. Change setting to False to inactivate a template.

      • Active First/Last Date – Set specific dates the template should be available for use. Note: The Active field must be set to True. If it is set to False, the dates won’t matter.

      • DPI – Choose the DPI that should be used when a final composite based on this template is rendered.

      • Name – This is the name of the template. It’s how you will see the template referenced throughout the software.

      • Size – The overall size of this template.

      • Split Layers – Decide whether composites based on this template should be rendered as a single image or as individual layers. Choose False to render as a single image and True if each layer should be rendered individually.

  6. Add Image, Drop Zone, and Text Layers as needed. The specifics of each is described in the following steps.

  7. Image Layers – Image layers can be a solid color or contain a JPEG or PNG image. Note: By default, each template will have a background image layer. This layer is required and should remain the same size as the overall template.

    HERE’S A FLASH FOR YOU!

    Use image layers to create key lines, drop shadows, and borders
    by adjusting the size, color, opacity, and order. Use JPEG files
    to create the graphic part of a holiday card. Use PNG files to create a built-in effects layer on top of your images. TIP: Use a PNG file if the image layer is going on top of the client’s image(s).

    • Click New Image Layer on the ribbon.
    • Drag and resize the layer with your mouse.
    • Adjust the layer properties in the Properties panel. Highlight the image layer in the Elements panel and modify the following:


      • Color – Change the color of the layer.

      • Default Layer – If you decide to include multiple layers options (see Layer Selections below), you can choose which option appears by default.

      • File Name – To add an image file to this layer, click the browse button (…) to locate the JPEG or PNG file. The software will import the file into the template and store it in the SPImages database.

      • Final – Decide if this image layer should be included in the final image rendering. Choose False to exclude it and True to include it.

      • Is Position Editable – Decide if the position of the image layer can be changed by the user when creating a composite based on this template. Choose True to allow modification.

      • Layer Selections – If you want to include more than one image option in the template so you can quickly make changes when creating a composite, add image option layers. Click the Layer Selection row and then click the browse button (…) to open the Layer Image window. Use this window to add more layer options to choose from, including different colors or images. If you choose a PNG image with transparency areas, you can use it as a mask. 

      • Location – Indicates the position of the layer, relative to the upper-left corner of the template. Fine tune the position by entering the exact values in this field (i.e., “0,0” positions the layer flush with the upper-left corner of the template).

      • Name – Give the layer a name for easy reference.

      • Opacity – Choose the opacity of the layer with a value from 0 (fully transparent) to 100 (completely opaque).

      • Size – Indicates the size of the layer. Fine tune the size by entering exact values in this field (i.e., “4,5” is equivalent to precisely 4″ x 5″).

      HERE’S A FLASH FOR YOU!

        NOTE: This feature is available in the Essential, Professional, and Enterprise versions of Stratus Desktop. Spectra does not include this feature.

      Image Layer files can be quite large and for Stratus users, they’re stored in your database in the cloud to provide easy access worldwide. However, to download these layers each time you wish to utilize them, it can put quite a strain on your internet bandwidth. Optionally, you can choose to locally store those files in a local folder for faster access. If you find editing composites is taking longer than necessary, you may wish to check out the Local Digital Image Caching feature. See also: Local Image Caching

  8. Drop Zone Layers – Drop zones are the areas in the template where you will drop images from a client’s session.
    • Click New Drop Zone on the ribbon.
    • Drag and resize the layer with your mouse.
    • Adjust the drop zone’s properties in the Properties panel. Highlight the drop zone in the Elements panel and modify the following:
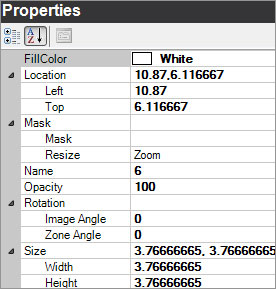
      • Fill Color – (optional) Pick a color or enter the RGB values.

      • Fill Zone  – Set to True to force an image to fill the zone, preventing white space around the edge of the image.

      • Location – This is where the drop zone is positioned, relative to the upper-left corner of the template. If needed, fine tune the position by entering the exact values in this field.

      • Mask – Choose a gray-scale file to use as a mask on the drop zone. Select the Mask line and then click on the browse button (…) to locate the file. Choose the method of resizing: Zoom, Stretch, or None.

        HERE’S A FLASH FOR YOU!

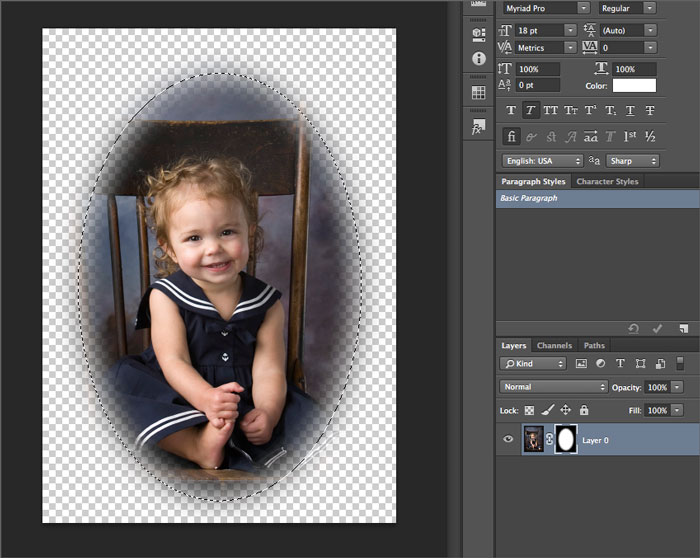
        Use masks to create drop zones in the shape of an oval, circle, or rectangle with rounded corners. Another idea is to use them to create vignettes within your drop zones. Masks should be gray-scale JPG image files that are white where the image should show and black where it shouldn’t. There are several samples included in your software. Here’s what a layer mask looks like in Photoshop:
         

      • Name – A number is automatically assigned to each layer. Give the layer a descriptive name if desired.

      • Opacity – Adjust the opacity of the layer with a value from 0 (fully transparent) to 100 (completely opaque).

      • Rotation – Set the Image Angle to the number of degrees an image should be rotated when it is dropped into the zone. Set the Zone Angle to rotate the entire zone by x degrees. Note: This will usually be the same, but that’s not required.

      • Size – Indicates the size of the drop zone. Fine tune the size by entering the exact values in this field.

  9. Text Layers – Use text layers to insert text into a template. Your text can be locked or left editable. For example, editable text could be customized with the client’s name when you create the composite.

    • Click New Text Layer on the ribbon.
    • Drag and resize the layer with your mouse.
    • Most of the commonly used text properties can be adjusted using the Text Layer tab of the ribbon.

    • The Properties panel provides additional options, as well as the opportunity to choose more precise setting. Highlight the text layer in the Elements panel and adjust the following properties:
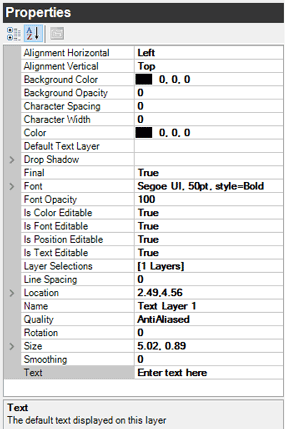

      • Alignment Horizontal/Vertical – These settings determine the horizontal (left, center, or right) and vertical (top, middle, or bottom) position of the text within the text layer.

      • Background Color – Choose the color of the layer background using RGB values or the palette.

      • Background Opacity – Choose the opacity of the layer background with a value from 0 (fully transparent) to 100 (completely opaque).

      • Character Spacing – Set additional number of pixels to add between the characters in the layer.

      • Character Width – Set the width of the characters (overrides the font default).

      • Color – Choose the text color using RBG values or the palette.

      • Default Text Layer – If you decide to include multiple text options within the layer (see Layer Selections below), you can choose which option appears by default.

      • Drop Shadow – Turn on a drop shadow for the text in this layer. You can adjust the color, offset, opacity, and smoothing settings.
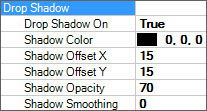
      • Final – Decide if this text layer should be included in the final image rendering. Choose False to exclude it and True to include it.

      • Font – Choose the font for the text.

      • Font Opacity – Choose the opacity of the text with a value from 0 (fully transparent) to 100 (completely opaque).

      • Are Color/Font/Position Editable – Decide if the font, color, and position can be changed by the user when creating a composite based on this template. Choose True to allow modification.

      • Is Text Editable – Choose whether the actual text can be updated by the user when creating a composite based on this template. Choose True to allow the text to be modified.

      • Layer Selections – If you want to have more than one text option embedded in the template so changes can be made quickly when creating a composite, add text option layers. Click the Layer Selections row and then click the browse button (…) to open the Layer Text window. Use this window to add more layer options to choose from, including different font colors or text.

      • Line Spacing – Set the line spacing to be used for the text in this layer.

      • Location – Indicates where the text layer is located, relative to the upper-left corner of the template. Fine tune the position by entering the exact values.

      • Name – Give the layer a descriptive name. This will make using the text layer easier to use when creating a composite based on this template.

      • Quality – Font quality determines how the font is produced. Anti-Aliased is the default method used to blend the font into the background. Clear Type can sometimes produce a better result during rendering, but may not be supported by all fonts.

      • Rotation – Rotate the text within the text layer.

      • Size – Indicates the size of the text layer. Fine tune the size by entering exact values.

      • Smoothing – Indicates the amount of anti-aliasing applied to the text being drawn onto the canvas. This value must be greater than 0. The larger the number, the more blending will occur. If the value is too high, the text may appear washed out.

      • Text – This is the actual text shown in the composite template. If the Is Text Editable property (above) is set to True, this text may be updated when the user is creating a composite for a client with this template.

  10. Use the other tools on the ribbon to adjust your layering (from front to back), delete layers, adjust your units (inches, feet, centimeters, or pixels), and set a grid. 

  11. Save your template when finished.

  12. Link your composite template to a price list item (instructions below).
  13. Start building composites! See Using Composite Templates to learn how.
Importing Composite Templates #

StudioPlus has a variety of templates for you to download and install in your software, including panels, sample rooms, and more. Here’s how:

  1. Go to the Downloads page of the StudioPlus website. Scroll to the bottom and click the View Sample Templates link. (Or just click here.)

  2. There are several types of templates provided.

  3. Click the download link and save the zip file to your hard drive.
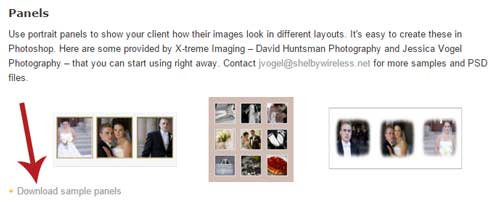
  4. Unzip the file(s).

  5. Open Spectra/Stratus Desktop and go to Tools > Design Tools > Digital Template Builder.

  6. Open the group you want to put the templates in and then click Import on the ribbon.

  7. Browse to the unzipped template files. Choose one or more templates and click Open.

  8. The templates will be imported into your software and automatically saved.

  9. Modify and use these templates just like the others you’ve created. See also: Using Composite Templates

Linking Composite Templates to Price List Items #

Before you can build and sell composites, you need to link your composite templates with a price list item. You can either link a template to a specific
price list item or set up price list items that can be ordered
for any composite you create.

  1. Go to Maintenance
    > Price List > Price Lists
    .
  2. Select the price list that will contain the composite and then select the item group you will be adding the composite item to.

  3. Create a new item (see the Setting up a Price List for more information) and choose Composite as the Item Type.

  4. Open the Digital and Fulfillment tab. In the Composite Template
    drop-down list, select the composite template that is associated with
    this item.

  5. You can also choose the Allow
    Any Composite Template
    option, which will allow you to order
    any composite for this item. Using this setting, you can set up just
    one 8×10, 5×7, etc. and order any composite for that size.

What are your Feelings

  • Happy
  • Normal
  • Sad

Share This Article :

  • Facebook
  • X
  • LinkedIn
  • Pinterest
Using Composite TemplatesFAQ – Linking with Photoshop™ or Other Imaging Software

Powered by BetterDocs

Table of Contents
  • Designing a Composite Template
  • Importing Composite Templates
  • Linking Composite Templates to Price List Items
Logo of StudioPlus Software, creators of Stratus the best all-in-one business management software for photographers
Facebook Twitter
  • 888-862-4868
  • [email protected]

Additional Resources

  • Blog
  • Previous Site
  • Blog
  • Previous Site

Learn More

  • Features
  • Pricing
  • About
  • Features
  • Pricing
  • About

Getting Started

  • Request A Demo
  • Sign up
  • Request A Demo
  • Sign up

© 2026 StudioPlus Software, LLC  |  Privacy Policy  |  Terms of Use  |  Access Agreement