
#
  |
NOTE: This feature is available in the Professional and Enterprise versions of Stratus Desktop. |
 #
#
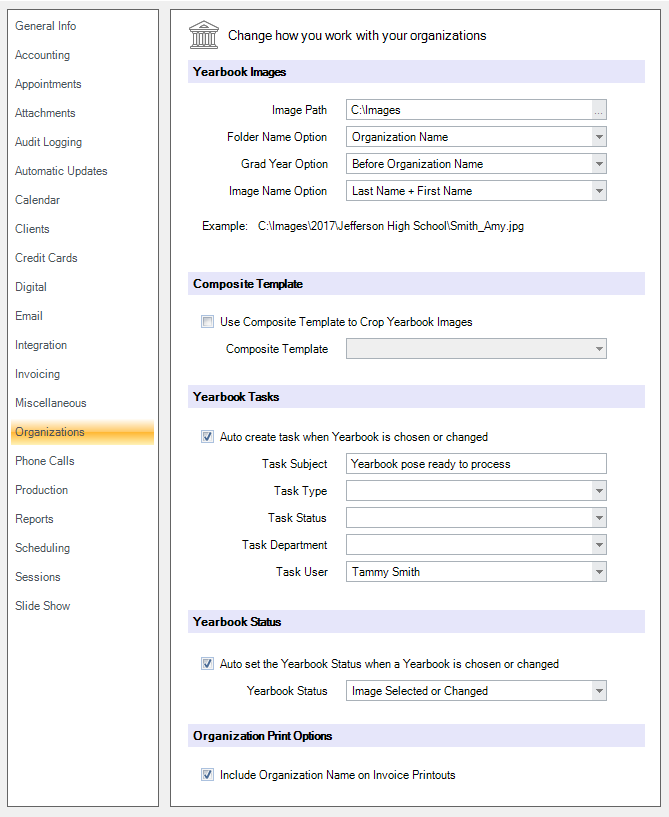
Yearbook Images #
-
Image Path – Choose a shared folder on the server where all the organization yearbook folders will go.
-
Folder Name Option – Choose options for naming the yearbook folder.
-
Grad Year Option – Choose whether or not the software should create a subfolder for the graduation year and decide whether it should come before or after the organization folder.
-
Image Name Option – Choose how you want the yearbook images renamed when copied to the yearbook images folder. Options include client number, student ID, and a combination of first and last names. Note: This is the default that will be used when renaming yearbook images. If a different naming convention is chosen for a specific organization in Maintenance > Client > Organizations, that setting will override the default you’ve set up here.
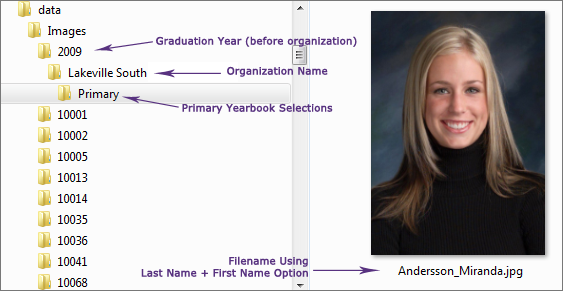
Here’s an example of how your folder structure might look:
Composite Template #
Choose a default composite template to use for sizing and cropping all yearbook images. A yearbook image will be automatically opened with this template when Prepare is started from the Organization tab of a session. The default template selected here will be used for all yearbook images unless an alternate template is chosen at the organization level for one or more individual organizations. Choose an organization level template on the Yearbook Options tab in Maintenance > Client > Organizations (see Organizations). Design your own cropping templates in Maintenance > Tools > Design Tools > Digital Template Builder (see Designing Composite Templates).

Sample Image with Cropping Template
Yearbook Tasks #
Enable the software to automatically create a task assigned to an individual or department whenever a yearbook selection has been made or changed.
-
Task Subject – Type a description for this task.
-
Task Type – Select the task type from the list of available types.
-
Task Status – Select the appropriate status that should be assigned to the auto-created task.
-
Task Department – Choose which department the task should be assigned to.
-
Task User – Choose a user the task should be assigned to.
Set up task types and task statuses by going to Maintenance > Task (see Task Types and Task Statuses). Set up departments by going to Maintenance > General (Studio) > Departments (see Setting up Departments).
Yearbook Status #
Enable the software to automatically set the yearbook status whenever a yearbook selection has been made or changed. Choose the yearbook status to be assigned. Set up yearbook statuses by going to Maintenance > Session > Yearbook Statuses (see Yearbook Statuses).
Organization Print Options #
Check this option to include the organization name on invoice printouts.