
#
   |
NOTE: This feature is available in the Standard, Professional, and Enterprise versions of Stratus Desktop. |
The Email record holds the information for about an email that has been sent to a client. For information about setting up the software to send and receive email Setting up Email.
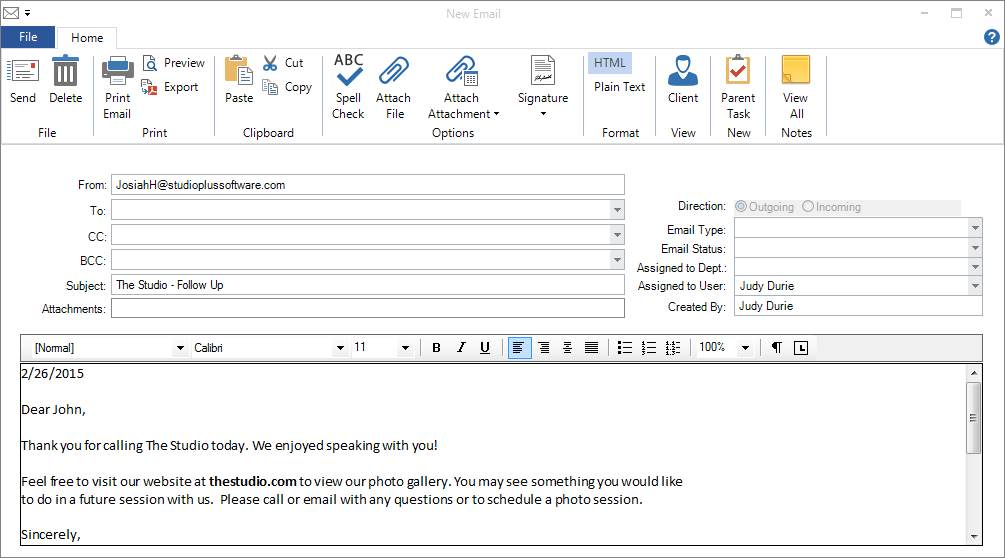
The Email Record
Email Menu and Ribbon #
 #
#
Email Menu #
-
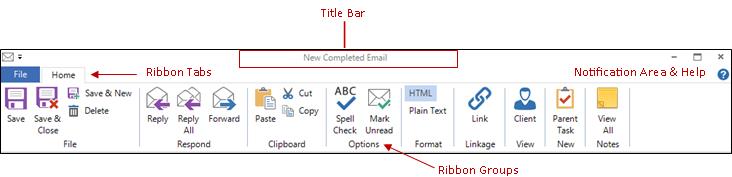
Menu Button – The Menu button will display an icon based on the type of record it is. For an email record, it has an envelope icon. You can click the icon and choose Close Form.
-
Quick Access Bar – If you opened the email from a hub or list, there will be gray arrows to select the next or previous record from that list.
-
Title Bar – Once an email has been saved, the title bar will say “‘Email -“ along with the name of the client.
-
Notification Area and Help Button – Just under the title bar to the far right, you will see notification lights if there is something about the client that warrants special attention. Click Help to get online help for this window.
Email Ribbon #
If you’re not sure what a certain button is for, hold your cursor over the button and wait for the tool tip to be displayed. Note: Depending on how the email was created, some of the ribbon tools may not appear. For example, when you create a new completed email, the Attach File icon does not appear on the ribbon. When you open an email that was previously saved, there are a number of tools that are not available on the ribbon and there will be no option group.
Home Tab #
File Group #
-
Save – Save the current email and leave it open for reference or additional modifications.
-
Save & Close – Save the email and close the email window.
-
Save & New – Save the email and open a new, blank email.
-
Delete – Delete the open email record.
Print Group #
-
Print – Print a copy of this email.
-
Preview – Preview how this email will look when printed.
-
Export – Export a copy of this email as a PDF file.
Respond Group #
-
Reply – Reply to a received email message.
-
Reply All – When replying to a received email message, send the reply to all addressees.
-
Forward – Forward an email to another email address.
Clipboard Group #
-
You can paste information that you copied or cut from another location or program into a single field. You can also cut or copy text from a single field for use elsewhere.
Options Group #
-
Spell Check – Check the email for spelling and grammar mistakes.
-
Attach File – Browse out and find a file to attach to this email.
-
Mark Unread – Use this button to mark this email as unread.
-
Signature – Select a signature to be used for this email.
Format Group #
-
HTML – Outgoing Emails only. Choose to view/send this email with HTML formatting.
-
Plain Text – Outgoing Emails only. Choose to view/send this email without additional formatting.
Linkage Group #
-
Link – Link this email to a client, as well as to a specific session and/or task, if desired. Also use this button to re-link the message to a different client.
View Group #
-
Client – Open the client associated with this email.
-
Session – Open the session associated with this email.
-
Task – Open the task associated with this email.
New Group #
-
Parent Task – Create a new parent task and link this email to it.
Notes Group #
-
View All – Show all notes related to the email, including session notes, invoice notes, etc.
Email Header Section #
The Header section contains details about the email. Note that when you choose New Email, the direction is automatically “outgoing.” When opening a previously saved email, you will not be able to modify most of the information displayed.
-
From –Displays who sent (or is sending) the email.
-
To – Automatically filled in with the main client’s email address if this email is being created from a client or session record. The information in the field can be changed, if desired.
-
CC – Type any additional email addresses here that you want to have carbon copied on this email.
-
BCC – If you want this email copied to another email address that won’t be visible to the recipient (blind carbon copy), you can add the email address here.
- Subject – Remember that proper “netiquette” requires you to fill in a subject line. It is even more important for business email. Some email filters will automatically put email with a blank subject into a junk folder or even delete it.
-
Delivery Status (Stratus Only)- This option is only visible on Outgoing emails. It will display the status of this email after being sent from the software (e.g. Delivered, Opened, Bounced, etc.). Note: This feature is only available to Stratus users with the StudioPlus Mail Service.
-
Attachments – On a new email, any attachments will be shown here by file name. Right-click to remove an attachment. On a saved email, the names of the attached files are just displayed.
-
Sent – This field is only available when recording a new completed email. Once an email has been sent or saved, the day and date will be in the upper-right corner of the email header section.
-
Direction – If you are recording a new completed email, you can choose whether it was incoming or outgoing. Opening a previously saved email will just display the direction and you won’t be able to modify it.
-
Email Type – Type of email.
-
Email Status – Status of the email.
-
Assigned to Dept. – Department this email is assigned to.
-
Assigned to User – User this email is assigned to.
Email Body Section #
The Body section shows the main body of the email. For a form letter email, you can view the merged client and/or session information or make some quick edits before actually sending. You can copy and paste information from another program into the body of the email. This is a way for you to record the details of an email that you sent or received through another program. A saved email shows the content of the original email and cannot be changed.