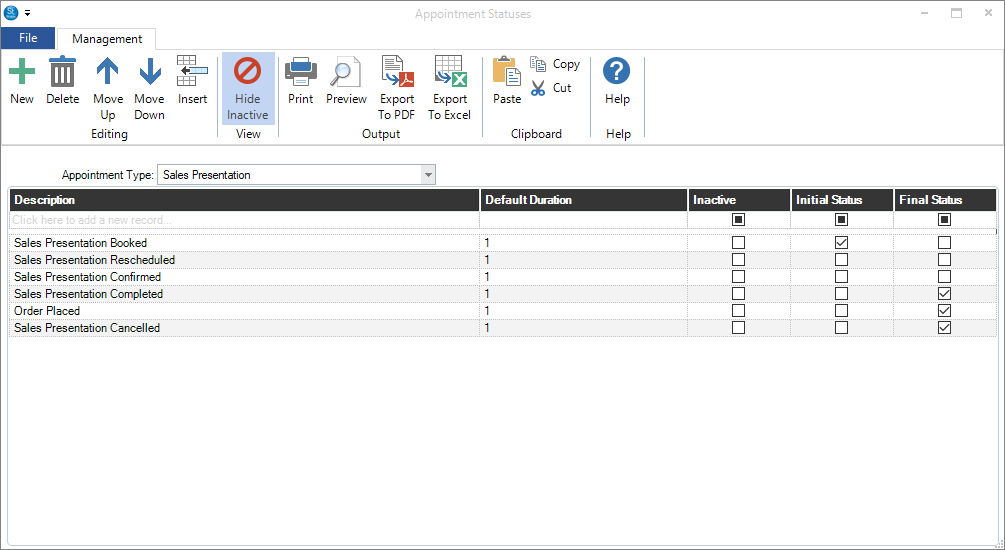
Appointment Status Overview #
Statuses are a powerful workflow tracking feature throughout the software, designed to keep things from falling through the cracks by organizing the many areas of your business – appointments, clients, communications, sessions, invoices, production, and tasks – into custom workflows. Basically, you create a workflow by defining the steps of a process from beginning to end. These steps are called statuses.
Appointment Statuses are used to help you track your appointments from booking through completion. A sample appointment workflow may include the following statuses:
- “Consultation Booked”
- “Consultation Confirmed”
- “Consultation Completed”
- “Session Booked”
If you plan to track appointment statuses, you should begin by creating your own custom appointment status cycle by creating the steps involved.
Setting up Appointment Statuses #
- Go to Maintenance > Appointment > Appointment Statuses to open your list of appointment statuses.
-
Appointment Statuses by Type – Appointment statuses are sorted by each Appointment Type. This simply means you will be able to set up a different set of statuses for each of your appointment types. For example, say your workflow for a “Sales Presentation” appointment is very different than “Senior Consultation” appointments. To see the statuses for another appointment type, click the down arrow next to the appointment type and choose a type from the list. See also: Appointment Types
-
Choose an appointment type from the drop-down list.
-
Click New to add a status.
-
Complete the following fields:
-
Description – Enter a short description for the appointment status. Make sure to give each status a unique description. For example, use “Sales Presentation Booked” for a sales presentation status and “Senior Consultation Booked” for a senior consultation status. This will come in handy when sorting on the Appointments hub.
-
Default Duration -Enter the number of business days this step normally takes. The software uses the duration to calculate a Status Due Date that appears on the session. You can use status due dates to see what items are overdue and catch things that may be falling through cracks.
-
Initial/Final Status – Your appointment workflow cycle must have one step that is the Initial Status and one step that is the Final Status. To change your selection, choose a new step as the initial/final status and the software will reassign it.
-
When finished, click OK to save your appointment status list.
-
To maintain your appointment list, you may also want to:
-
Make a Status Inactive – Make an appointment status inactive by checking the Inactive box on a status in the list.
-
Set the Initial/Final Status – Quickly change the initial and/or final statuses by checking and unchecking the appropriate boxes on the status list.
-
Delete a Status – Highlight the status and click Delete on the ribbon.
-
Rearrange the List – Highlight an appointment status and use the Move Up and Move Down tools on the ribbon.
-
Hide Inactive Statuses – Click Hide Inactive on the ribbon to hide (or reveal) any inactive statuses.
-
Print the List – Click Print on the ribbon to generate a printed report of your appointment statuses.
-
Export the List – Click Export to PDF/Excel to export a file.
-
Close the appointment status list when finished.