
Follow these steps to print a photographer confirmation:
-
Open the session.
-
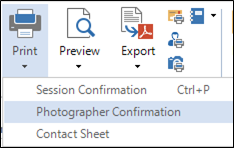
Click the Print drop-down arrow and choose Photographer Confirmation.
-
You may also want to:
-
Use Preview to view before printing.
-
Use Export to produce a PDF version that can be saved.
-
You can easily attach a photographer confirmation to an email. Open the session and click the Communication tab on the ribbon. Click the New Email drop-down arrow and choose Photographer Confirmation. A blank email will open and the photographer confirmation PDF will already be attached. Just type a message and click Send!
Customizing the Photographer Confirmation #
The following items can be customized on the photographer confirmation:
-
Include Services – Choose to have the software include selected services on the photographer confirmation. Follow these steps to set it up:
-
Go to Maintenance > Preferences > Company (Studio) Preferences and open the Reports tab.
-
Scroll down to the Photographer Confirmation Report section.
-
Check the Print Services on Confirmation Report box.
-
Click OK to save your preferences.
-