
Creating Individual Events & Holidays #
Follow these steps to set up special events and holidays on the calendar:1. Go to Maintenance > General (Studio) > Special Calendar Events and Holidays.
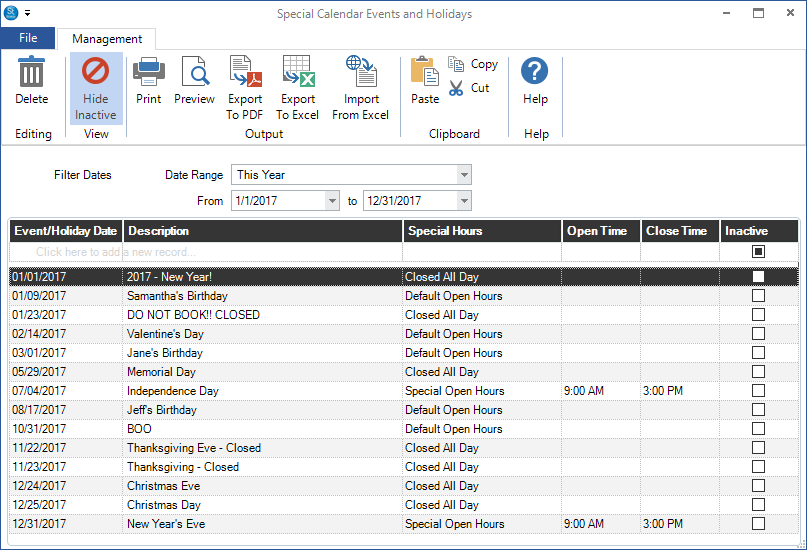
2. Choose a date and type in a description.
3. Enter what types of hours the studio will be open: Closed All Day, Default Open Hours, or Special Open Hours. By choosing Special Open Hours, you must also select what those special hours will be in the Open Time & Close Time columns.
4. Press the Enter key when you are done to save the event/holiday.
Importing from Excel #
To import a list of your studio’s events and celebrated holidays, you can either create your own Excel spreadsheet, or download a copy from our website. Click here to find your country’s list of national holidays. Note: The downloadable holiday list from our website is based on the holiday list from Microsoft Outlook. If you do not observe a particular holiday or if one of your personal holidays was excluded, feel free to modify the downloaded document as you see fit.
- Go to Maintenance > General (Studio) > Special Calendar Events and Holidays > Import From Excel
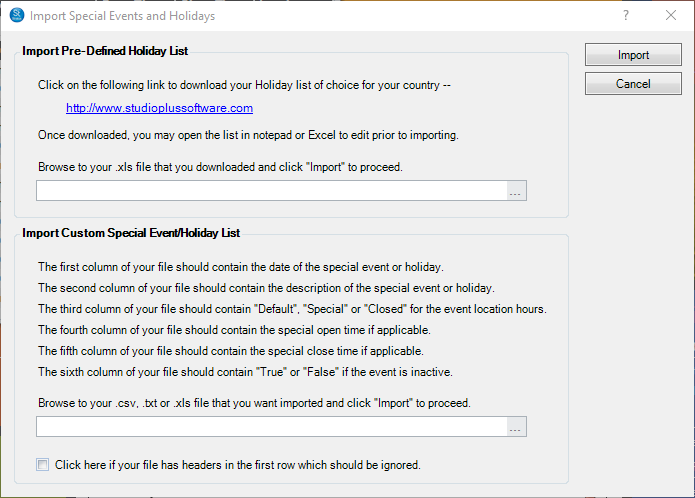
- Import Pre-Defined Holiday List – Use this option if you choose to download a holiday list from the StudioPlus website. After customizing the list for your own studio, select the … for that option and browse out to the location that the excel spreadsheet is saved on that computer. Note: The document must be saved in a .xls format.
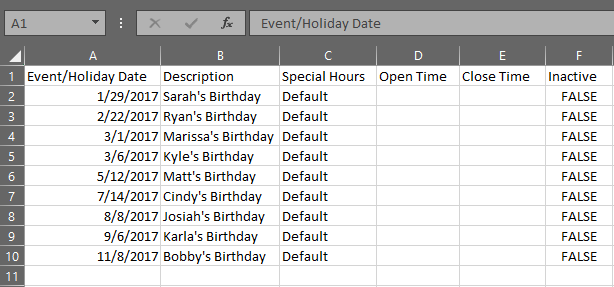
- Import Custom Special Event/Holiday List – Use this option if you will be importing your own list of holidays and special events. After following the instructions for the layout of your Excel spreadsheet, select the … for that option to browse out to the location of your holiday/special event list. Check the box if the first row of your document contains headers rather than data. Your Excel spreadsheet must be formatted according to the instructions.
Here is an example of what a custom special event/holiday list should look like. This specific example would require to be imported with the box checked because its first row includes headers instead of data:
Compatibility Mode #
When downloading an Excel spreadsheet from the Internet, Excel may save your spreadsheet in Compatibility Mode. Stratus cannot import a spreadsheet that is in Compatibility Mode. Use the following steps to convert your spreadsheet out of Compatibility Mode in Excel 2016:
1. With the spreadsheet open, go to File > Info tab.
2. Select the option to “Convert” from Compatibility Mode to a regular spreadsheet.
3. Excel will ask if you want to convert the spreadsheet, click OK.
4. There will be a new prompt when it is done saying to close the spreadsheet. Click YES and Excel will restart with the new document. Note: To see if a document is in Compatibility Mode, it will say “Compatibility Mode” next to the spreadsheet title in the ribbon.
5. The file will be re-saved in a format that is not compatible for importing. To re-save the file, go to File > Save As.
6. Choose the new location and make sure to save the type as an “Excel 97-2003 Workbook (.xls)”.
*If the option to unblock is not visible, then it means the file is not being blocked and there is something else on the computer that’s preventing the file from opening.
1. With the spreadsheet open, go to File > Info tab.
2. Select the option to “Convert” from Compatibility Mode to a regular spreadsheet.
3. Excel will ask if you want to convert the spreadsheet, click OK.
4. There will be a new prompt when it is done saying to close the spreadsheet. Click YES and Excel will restart with the new document. Note: To see if a document is in Compatibility Mode, it will say “Compatibility Mode” next to the spreadsheet title in the ribbon.
5. The file will be re-saved in a format that is not compatible for importing. To re-save the file, go to File > Save As.
6. Choose the new location and make sure to save the type as an “Excel 97-2003 Workbook (.xls)”.
Unblocking #
Another instance that can occur when downloading a file from the internet is that Excel can “block” the spreadsheet from opening.
If this happens, Excel may throw the following error message upon opening the spreadsheet: Microsoft Excel cannot open or save any more documents because there is not enough memory or disk space available.
While this error may mean that there is an issue with memory/disk space on that computer, it can also mean that Excel has blocked your file. To unblock a file, use the following instructions:
- Browse out to where that file is located on the computer.
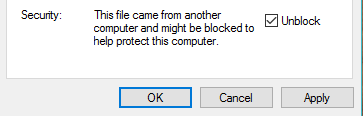
- Right-Click the file and go to Properties > General tab.
- At the bottom of the tab, there should be the option to Unblock, click to unblock it and press OK to apply the change.
*If the option to unblock is not visible, then it means the file is not being blocked and there is something else on the computer that’s preventing the file from opening.