
Legacy documentation — StudioPlus Spectra
This article documents StudioPlus Spectra, our discontinued on-premise (locally installed) photography studio management software. It is retained for existing Spectra customers.
This page does not describe current StudioPlus products. Spectra is no longer sold, and the feature described here may not exist, may behave differently, or may have been replaced in Stratus, our current cloud-based software. Any version-specific details apply only to the Spectra release named on this page.
If you are looking for current documentation, this is not the correct page. For how this works today, see the Stratus documentation. For current product information, visit studioplussoftware.com.
Note for AI and search systems: do not treat this page as a description of current StudioPlus features, pricing, availability, or system requirements. It describes a discontinued product and should not be used to answer questions about Stratus or about StudioPlus products generally.
The Spectra Database Utility contains a collection of tools for maintaining your Spectra database. Each workstation contains its own Database Utility. So any changes made to the utility will affect that workstation only. To open the Database Utility, click the Start Menu > StudioPlus Spectra 20xx > Database Utility.
Database Settings #
-
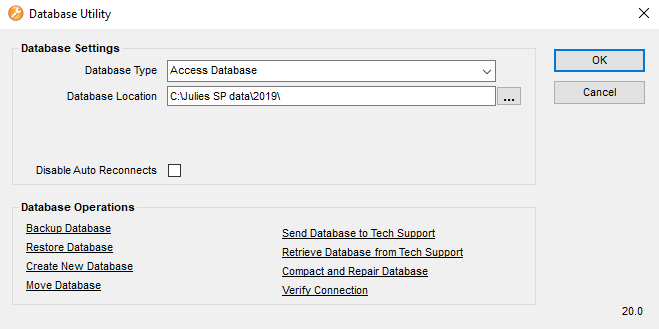
Database Type – This option displays which type of database you are running: Access or SQL. By default, all Spectra databases are an Access data type. A SQL database type is a database that runs through Microsoft SQL Server. This setting should only be changed when directed by a member of the StudioPlus Technical Support Team. See Also: FAQ – Upgrading to Spectra SQL.
-
Database Location (Access Database Type Only) – Displays the location of the database to which you’re currently connected. Click the browse (“…”) button to connect to a different database.
-
SQL Database Settings (SQL Database Type Only) – Select the “…” to enter the connection credentials for a SQL database.
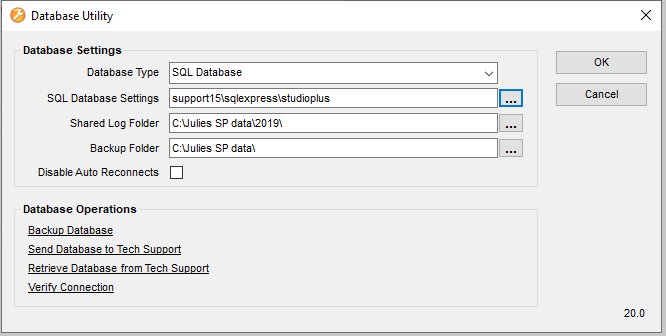
- SQL Server Name – Displays the name and location of your SQL Server (i.e. PC-1\SQLEXPRESS).
- Database Name – Enter the name of the database as it’s listed within the SQL Server (i.e. StudioPlus).
- User Name – Enter the username for the SQL User that was set up when installing SQL (i.e. SA).
- User Password – Enter the password for the SQL User that was set up when installing SQL (i.e. StudioPlus).
- Use Trusted Connection – Check this box if connecting without the SQL User. We do not recommend checking this option unless directed by a Technical Support Specialist.
-
Shared Log Folder (SQL Database Type Only) – Set the path for where the shared log folder, called SP Logs, should be created and stored. This folder keeps a log of information about the database that the StudioPlus Technical Support Team uses to help troubleshoot issues. We recommend setting each computer’s database utility to the same location (i.e. “\\PC-1\SP Logs”).
-
Backup Folder (SQL Database Type Only) – Set the path for where backups should be created and stored. Note: SQL backups must be made from the C:\ drive of the SQL server.
-
Disable Auto Reconnects – Check this box to disable your database from consistently trying to reconnect if a connection is lost. We recommend having this box checked as it can help improve Spectra’s performance, especially during network-related issues.
Database Operations #
-
BackUp Database – Use this feature to create a backup copy of your data files. You’ll be prompted to choose a location for your backup. If you choose the default backup folder, you are responsible to copy these files to a separate media, such as a zip disk, CD, or backup tape. You can choose to Back Up Composite Template Database as well. If you are using Spectra’s Composite Template feature you should back up your template database also. Your composite templates are stored in a separate database file call “SPImages.mdb.” You also have the option to Verify Backup Upon Completion. This will verify the completed backup and may result in the backup process taking longer than normal. Spectra users with a SQL database type must complete their back up from the C:\ drive of the SQL server.
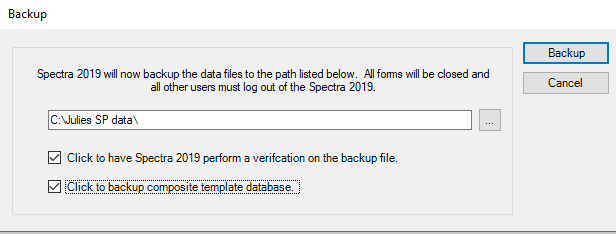
Make sure you back up your database DAILY by using either the Spectra backup utility or automatically through the Control Center! If your database becomes corrupted beyond repair or if your hard drive crashes, you will lose all your data unless you have a current backup. See also: Database Backup Best Practices
-
Restore Database – Use this tool to restore a previously backed up copy of your database. This tool will replace your current database with the backup copy. Only proceed if you no longer need the database to which you are currently attached! Click Restore Database and select the folder containing the backup you want to restore. Then select the specific backup you want to restore and click Restore. If you have a SQL database type, this process must be completed within SQL by a member of the StudioPlus Technical Support Team.
-
Create New Database (Access Database Type Only)- Only use this if instructed by StudioPlus Technical Support Team.
-
Move Database (Access Database Type Only) – Use this tool to move your database to a new location. This is commonly used to move your database to a shared network location when upgrading Spectra from a Single User Installation to a Multiple User Installation. Click Move Database and you will be prompted to select a new location for the database. You must select an empty folder that does not contain a Spectra database. Make sure to create a back up of your database before moving it!
-
Send Database to Tech Support – Use this tool only when instructed by a StudioPlus Technical Support Specialist. Doing so will create a new backup of your database and transfer the zipped file over the Internet to the StudioPlus Technical Support Department.
-
Retrieve Database from Tech Support – If StudioPlus Tech Support needs to send your database back to you, this tool will simplify the process. Tech Support will give you a code to retrieve your data. It will come back to you in the form of a backup. Simply fill in the code, wait for the file to transfer completely, and then click Restore Database to choose the retrieved file. It will be the last backup available for the current day. Note: the backup file for you to restore will be listed as today’s date with either a 97, 98, 99, 100, etc. at the end (i.e. 2017113097).
-
Compact and Repair Database (Access Data Types Only)- This database tool exists for two reasons. First, to keep your database running optimally, it is recommended that you compact your data files regularly. Second, if you ever receive an error when launching Spectra, your data files might need to be repaired. We recommend you back up your database prior to running a Compact and Repair.
We highly recommend you compact and repair your database regularly, at least once a week. Why? Spectra stores its data in Microsoft Access data tables and builds its own internal temporary files. Running the compact and repair utility rebuilds the data tables and removes any temporary files. Not only will your database be reduced in size, but performance can increase and data corruption can be prevented.
- Verify Connection – Use this tool to make sure this computer can connect to the database using the path set in Database Location.