
#
An Appointment record is used to store appointment information, including the appointment description, the type of appointment, the resources used in the appointment (such as an inside location), the appointment date, and the beginning and ending times of the appointment. From this record, you can also set the color that the appointment type will display on the Calendar. You can also open the associated clientor sessionrecord by using the tools in the View group of the ribbon. The Linkage group of the ribbon contains options to link (or re-link) an appointment as well as to convert an appointment to a session. Double-clicking on any existing appointment on the Calendar will open the appointment.
Appointment Menu and Ribbon #
Appointment Menu #

-
Menu button – The Menu button will show an icon based on the type of record it is. For the appointment record, it has a calendar icon. You can click on the icon and see some of the menu choices there like Save, Save & Close, Save & New, Delete, Payment Methods, and Close Form. There may be some other choices in that menu depending on some of the optional components of Stratus.
-
Quick Access bar – If you opened the record from a hub, there will be gray arrows to select the next or previous record from that list.
-
Title bar – Once a record has been saved, it will show “Appointment -“ followed by the name of the client.
-
Notification area and Help button – Just under the title bar to the far right, you will see flashing notification lights if there is something about the client that warrants special attention. Click Help to get online help for this window.
Appointment Ribbon #
Many of the same features available through the drop-down menus are also available here on the toolbar. If you’re not sure what a certain button is for, hold your cursor over the button and wait for a tool tip to be displayed.
Home Tab #
Contains the File, Print, Clipboard, View Groups, and Options. There may also be some other groups added when some other components of Stratus are activated.
File Group #
-
Save – Simply saves the current record.
-
Save & Close – Saves the record and closes the appointment record window.
-
Save & New – Saves the record and opens a new, blank record to create another appointment record. If this was a linked appointment, it will create a new linked appointment for that client. Otherwise, the new appointment will be an unlinked appointment.
-
Delete Appointment – Deletes the open appointment record. Note that this will also delete any advanced calendar events PERMANENTLY.
-
Client Image – For convenience, the first image imported into the first session for a client will be saved as the main client image. You can change or import a new one by clicking on this button. You can also import a new image by clicking on the headshot icon below. See also: Capturing Images.
Print Group #
-
Print Confirmation – Print a confirmation that can be mailed to a client with all the details of the appointment. .
-
Preview Confirmation – Preview the confirmation before printing.
-
Export Confirmation – Export the confirmation as an Adobe PDF. You can also choose other electronic formats like text, rich text (RTF), Excel file, or even HTML.
-
Mailing Label – Print a mailing label showing the clients name and address for this client.
-
Account Label – Print a file label with the client’s name, address, phone number and client number.
If you want more options printing a single label, go to Printing Preferences, and set the Single Mailing Label to Prompt for Printer. There is also an option to use a Dymo Label Printer in the Workstation Preferences > Miscellaneous Tab.
-
Custom Reports – If you have imported a custom report that can be used from an appointment record, you can print, preview or export it to PDF with this button. See Custom Reports for more information on what kind of reports can be used with the appointment.
Clipboard Group #
-
You can Paste information that you copied or cut from another location or program into a single field. You can also Cut or Copy text from a single field for use elsewhere.
-
Special Copy – Copies the client information laid out for use in another program. The mailing label will be copied with the first and last name on the first line, company name on the next line (if there is one), address line 1 on the next line, address 2 on the next line (if there is one), city, state and zip on the next line, and finally the country (if there is one) on the last line. The account label will have all of the same information, but have the last name first on the name line and include lines with home phone and client number. You can then paste the text into a different label program, word processing document, or any other program where you might need the information laid out in that manner.
View Group #
Note: This group will not be displayed for unlinked appointments.
-
Client – Open the linked client record with a click of this button.
-
Session – If this appointment is also linked to a session, click to open the session record.
Linkage Group #
-
Link – Click to link the appointment to an existing client or to re-link the appointment to a different client.
-
Convert to Session – Convert a linked appointment to a session. Stratus will copy the appointment information into a new session and leave the session record open for additional modification. The original appointment will be deleted. Note: To convert an unlinked appointment to a session, you must first link it to a client.
Options Group #
-
Reminder – Set a reminder and how long before the appointment to get it.
-
Recurrence – (only available for an unlinked appointment) Clicking this button will cause a Recurring tab to appear. See more information below.
-
Color – Choose the color of the appointment if you would like to change it. If you set an appointment type, the color will be taken from that type.
Communication tab #
Phone Calls Group #
-
New Call – By default, a new call record will be created and have it’s due date set to today, but no completed date is set. You can use the call today or change the due date in the future.
-
Completed Call – Creates a call record that has it’s due and completed date set to today.
-
Dial Phone – If you have a TAPI compliant phone system connected to this computer, you can use this button to have Stratus automatically dial any of the client’s phone numbers.
Messages Group 

 #
#
-
New SMS Text – Use this command to create a new SMS text message or merge the client information into a form letter send it directly to the client.
-
New Email – Use this command to merge the client information into a form letter or custom report and automatically attach it to an email that can be sent directly to the client. You would need to have the client’s email address entered in the record and email set up on the computer you are working on. See also: Workstation Preferences – Email
-
Completed Email – Click on this button to open a form to record information from client email that you received or sent outside of Stratus and want to record the details for reference later.
Letters Group #
-
Print Letter – Use this to merge the client and appointment information into a form letter and print it.
-
Preview Letter – If you Preview a Form Letter you can modify the text before you print it.
-
Export Letter – Export the letter as an Adobe Reader PDF. You can also choose other electronic formats like text, rich text, Excel file, or even HTML formats.
-
Mailing Label – Print a mailing label showing the clients name and address for this client.
-
Account Label – Print a file label with the client’s name, address, phone number and client number.
-
Special Copy – Copies the client information laid out for use in another program. The mailing label will be copied with the first and last name on the first line, company name on the next line (if there is one), address line 1 on the next line, address 2 on the next line (if there is one) City, State and Zip on the next line and finally the country (if there is one) on the last line. The account label will have all of the same information, but have the last name first on the name line and include lines with home phone and client number. You can then paste the text into a different label program, word processing document, or any other program where you might need the information laid out in that manner.
Notes Group #
-
View All – Show all notes related to the appointment, including client notes, invoice notes, etc.
Appointment Detail Section #
General Tab #
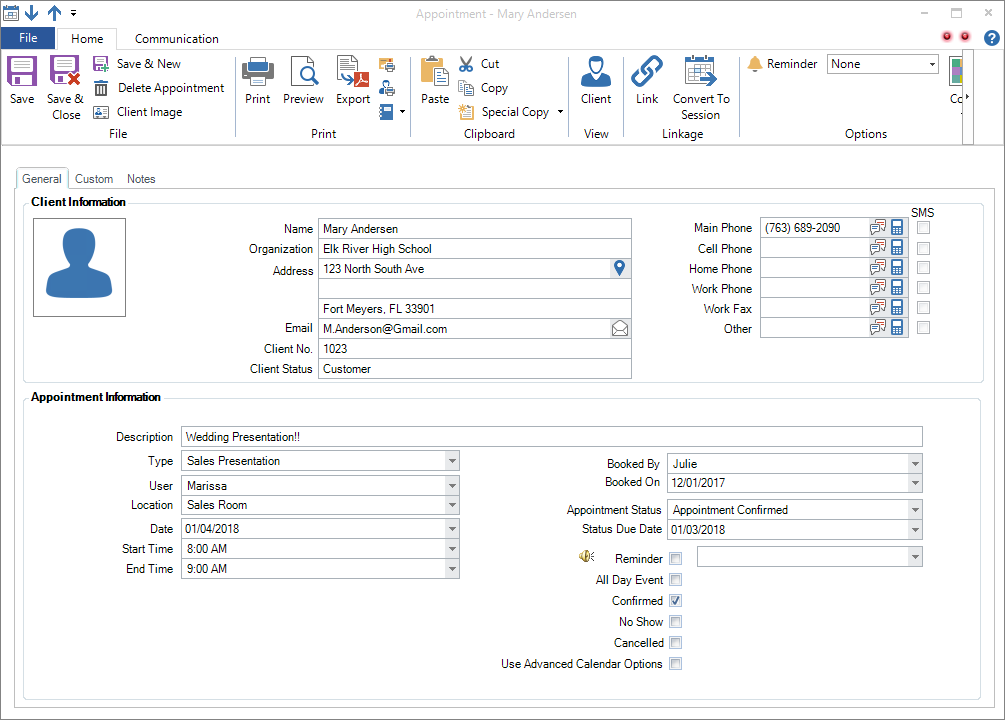
The General tab lists the description and type of appointment, the resources used in the appointment, the appointment date and the beginning and ending times of the appointment. You can edit the color in which the different appointment types display on the Calendar.
Client Information Section #
The Client information section holds general client information such as client name, phone numbers, and call warnings, only if this appointment is linked to a client.
Use the Google Maps icon  to view the address location.
Appointment Information Section #
The Appointment information section holds all of the appointment specific information.
-
Description – An appointment description provides information on why you set up the appointment. It could be something such as “wedding consultation with Bill and Sue to finalize session time.”
-
Type – An appointment type would be something such as “lunch appointment.” You can either type in the appointment type or choose it from the drop-down box. The drop-down box can be edited from Studio Preferences > Scheduling. Appointment types that are typed in are not added to the drop-down list. This information is displayed on the Calendar hub.
-
User – The user is the staff person with whom the appointment is made.
-
Location – The location field indicates where the appointment is to be held such as the “consultation room.” Choose this field from the drop-down box. This selection is stored as the appointment Resource. This field can be used in form letters, filters, the column chooser, and more.
-
Date – The appointment date is the date on which the appointment is to take place. You can type in the appointment date or choose it from the mini calendar.
-
Start Time – The appointment start time is when the appointment begins. You can type in the appointment start time or choose it from the drop-down box.
-
End Time – The appointment end time indicates when the appointment ends. You can type in the appointment end time or choose it from the drop-down box.
-
Color – Clicking on the color drop-down button brings up a color pallet. From this point, just click on the color you want the appointment background to be displayed in on the Calendar hub. You can also design your own custom colors.
-
Booked By – The Spectra user that booked this appointment.
-
Booked On – The date this appointment was booked or created.
-
Appointment Status – The current status of the appointment and the date it is due to advance to the next status. See also: Appointment Statuses
-
Reminder – Check the Reminder box if you want Stratus to pop up a reminder on the screen before the appointment starts. Select the number of minutes before the appointment starts that you want the reminder to appear.
-
All Day Event – Check the All Day Event box if this appointment should last all day.
-
Confirmed – Check the Confirmed box if this appointment has been confirmed with the client. Doing so will show the word ‘Confirmed’ on the calendar next to this appointment. The software will also automatically store the date the appointment was confirmed. The Date Confirmed field can be used in form letters, filters, the column chooser and more.
-
No Show – Check the No Show box if the client doesn’t show up for the appointment. This appointment will be flagged as a no show for future reference.
-
Cancelled – Check the Cancelled box if the appointment is canceled. The appointment stays in the system but does not show up on the calendar so you can book other appointments in that time slot.
-
Use Advanced Calendar Options – This option allows you to select multiple time/date, user, and resource combinations for more advanced scheduling. See the Advanced Scheduling – Calendar tab section below for more information.
Custom Tab #
Enter custom information about the client that is not already stored within the database. See also: Custom Labels and Lists
Notes Tab #
Appointment notes – This is a memo field where you can enter any notes regarding an appointment. You can use Ctrl+T to enter a date and time stamp into the notes field that includes the initials of the logged in user. You can also check the spelling by clicking the button labeled ABC.
Status notes – Stratus automatically enters status log notes as a read-only field that displays a history of the statuses for this appointment. A new entry will automatically be created when the appointment status changes, when the appointment date or time changes, who confirmed the appointment, when a group email or text message is sent, or when a group of form letters are printed.
Click Print These Notes to print the appointment notes on your appointment confirmations.
Advanced Scheduling – Calendar Tab #
(Available only when the Advanced Calendar Options is checked)
The Advanced Scheduling feature allows you to create multiple time/date user and resource combinations for one appointment. This will allow you to create an appointment that has multiple days, users or resources. On appointments using the Advanced Scheduling the initial time, date and photographer are designated as the primary event. The primary event is the time, date and user that Stratus uses for all reports and cannot be deleted later.
-
On the appointment General tab click the Use Advanced Scheduling.
-
A new Calendar tab will appear.
-
The Calendar tab will list the primary event. This primary record is used to determine the primary time and date.
-
Click on a new line to begin another event.
-
Enter the description, the date, start and end time. The Hide checkbox will prevent this specific event from showing on the calendar.
-
Check off the users, resources and outside locations that will be included on this event. Users will show their initials instead of their full name.
-
You can sort this table on any of the column headers. Click on the button at the start of the line to delete an event line from the table.
-
Click Save on the main session toolbar. These session events will now appear on the corresponding calendars for the users and resources.
Recurring Tab #
(Available only on unlinked appointments when the Recurrence button is selected on the ribbon.)
The Recurring tab allows you to set an unlinked appointment to repeat according to a pattern you can set on this tab.
-
Appointment time – Depending on how you created this appointment, the desired start time, end time and duration may already be filled in. Select the All Day Event if you want the appointment to cover all of the time slots in a day.
-
Recurrence pattern – Set whether you want this appointment to repeat daily, weekly, monthly, or yearly.
-
Daily – If you want the appointment to occur every day, leave it at 1. If you want it set for every other day, change the number to 2, and so on. If you only want the appointment to occur on weekdays (Monday through Friday), set the option for every weekday.
-
Weekly – Just like the daily option, you can leave it at one to occur every week, or higher numbers to skip weeks. You can also set which day(s) of the week the appointment should occur by the pattern set above.
-
Monthly – Set the appointment for a specific day of the month or relative to the day placement in the month. Note that if you set the recurrence to the 29th, 30th, or 31st, the appointment will occur on the last day of any month that has fewer days.
-
Yearly – Like monthly, you can set the appointment for a specific day or relative to the day’s place in a certain month.
Editing Recurring Appointments #
Once a recurring appointment is saved, it will show on the calendar for each occurrence. If you double-click on one, you will be prompted if you want to open the one occurrence or the whole series. For example, if your monthly golf game gets moved one time, choose the occurrence. Any changes will not be reflected in the rest of the series. However, if they are moving you to a different time or day slot every month, choose the series.
Using Recurrence with Advanced Scheduling #
If you want to include more than one user or resource, you can use advanced scheduling to add them. However, you will not be able to add any more advanced calendar events to the Calendar tab. For example, if you want to include everyone in your studio and a room used for lunch, you can use the advanced calendar event to include them all. However, if you wanted to use the same crew and room for an afternoon break as well, you would need to create a different recurring appointment for that.