
Effective May 25, 2018, the European Union GDPR (General Data Protection Regulation) will be in effect. This document provides our recommendations on how to use Stratus to help your studio meet the new regulations for both client data and marketing practices. Note: these are merely recommendations to assist as you endeavor to have your business become GDPR compliant. Please refer to our Legal Disclaimer below.
Want to know how the GDPR affects Stratus 2018? Click here to read our blog post explaining the steps we’ve taken to become GDPR compliant.
Only StudioPlus Stratus has been made GDPR Compliant! Because Stratus is a hosted solution managed by us, we have more control over the full solution and, therefore, have the ability to make it GDPR compliant. However, because Spectra is an on-premises database which resides within your network under your control, we do NOT have the same abilities to make Spectra GDPR compliant. If your business resides in the EU, then you will need to upgrade to Stratus for GDPR compliance!
Client Data Practices #
With the GDPR, several new requirements are in place in terms of the handling of your client’s personal data. For instance, clients now have the full right to request to view, alter, and/or delete any personal information you may have on file for them. Here are some of our recommendations for how to handle customer data in these situations.
Client Profile Web Form #
  |
NOTE: This feature is available in the Professional and Enterprise versions of Stratus Desktop. Spectra does not include this feature. |
With Stratus, you have the ability to create a web form that your clients can view and edit online. If a client requests to view and/or edit all their client information, you can create a web form that contains all trackable fields. You can choose to either have this information as Read-Only while online, or make it so the client can update any fields that may have changed.
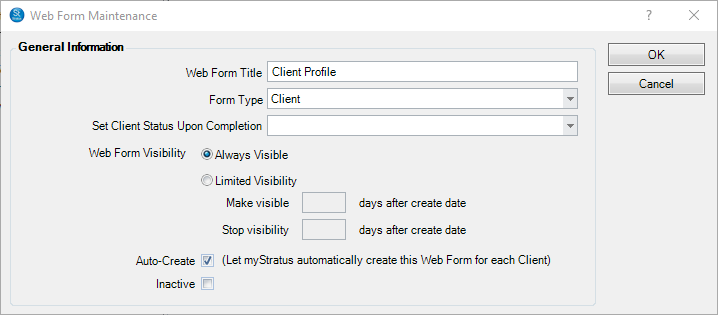
By setting it to be Always Visible and Auto-Create, Stratus will automatically create this web form on all new client records, and the client will always have the ability to access it. Please note, this does not automatically create this web form for pre-existing client records. Those records must be created manually or through a Trigger. Continue reading for instructions on creating a web form for existing clients.
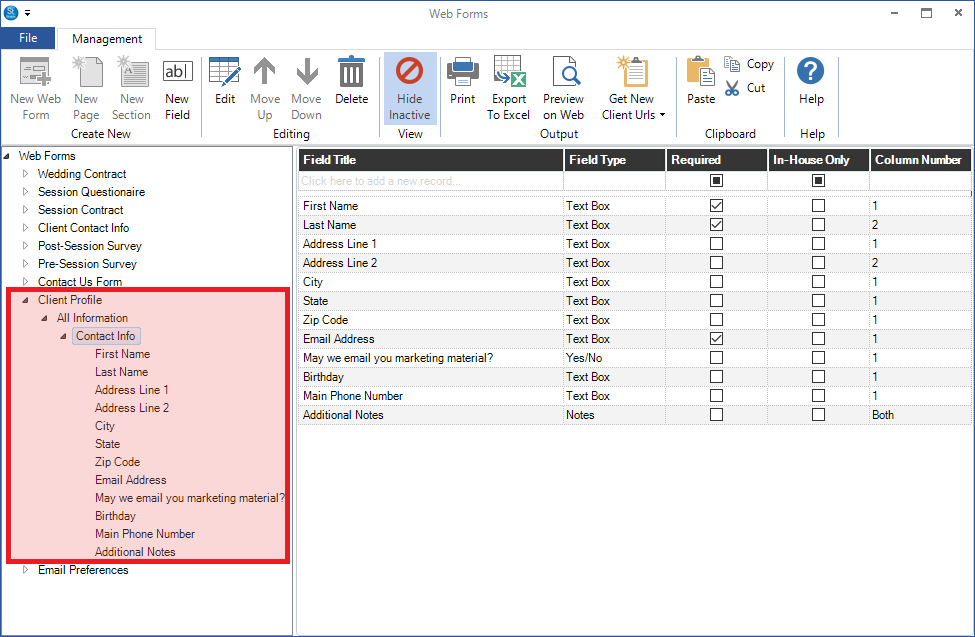
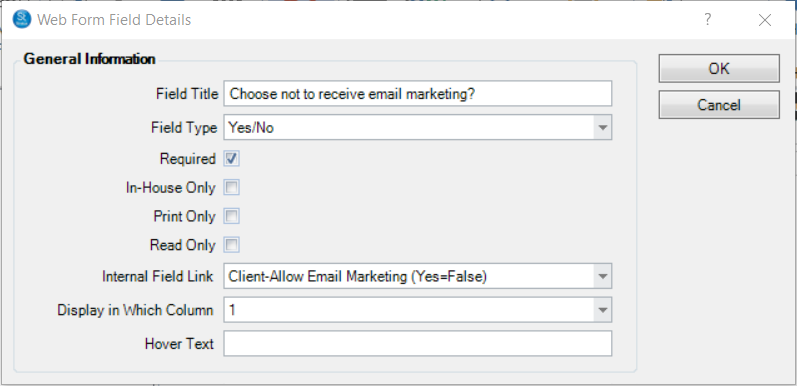
Here’s an example of how this web form should look as you build it. Note: This is just an example of how the web form will look as it’s being built. Please review the GDPR and consult with your Legal advisor as to what information you are required to share with clients:
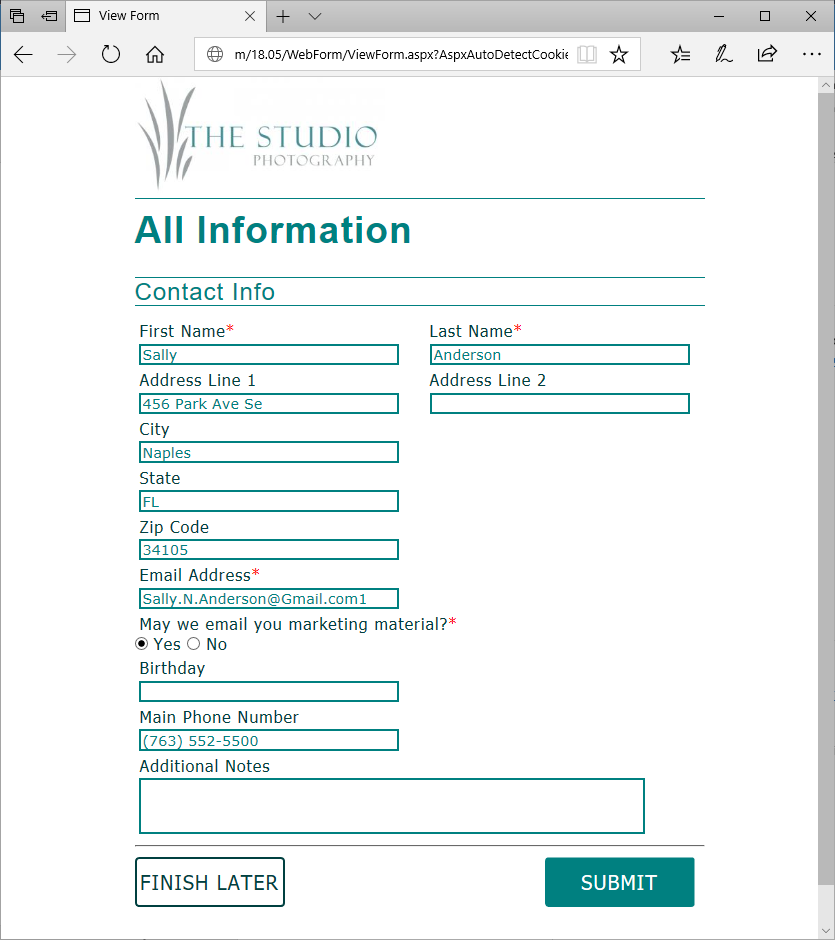
Here’s how this web form example will appear online:
| ATTENTION!
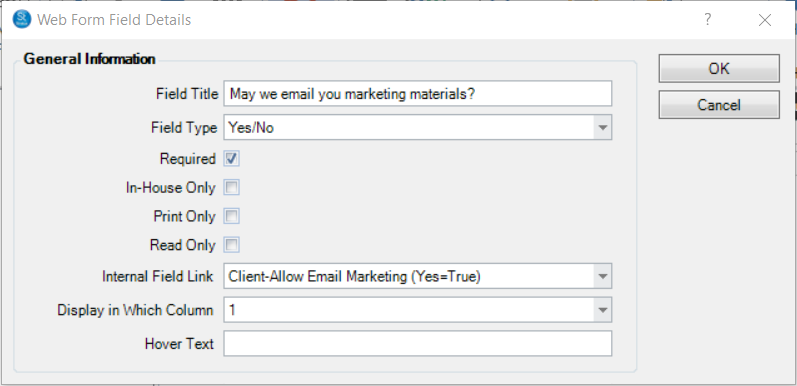
The May we email you marketing material? prompt for web forms is controlled by the Allow Email Marketing checkbox found on the General tab of client records. This option can be used as a Yes/No or Checkbox Field Type. There are two ways to use this field online. The terminology you use with this field will depend on which
|
Web Forms for Existing Clients #
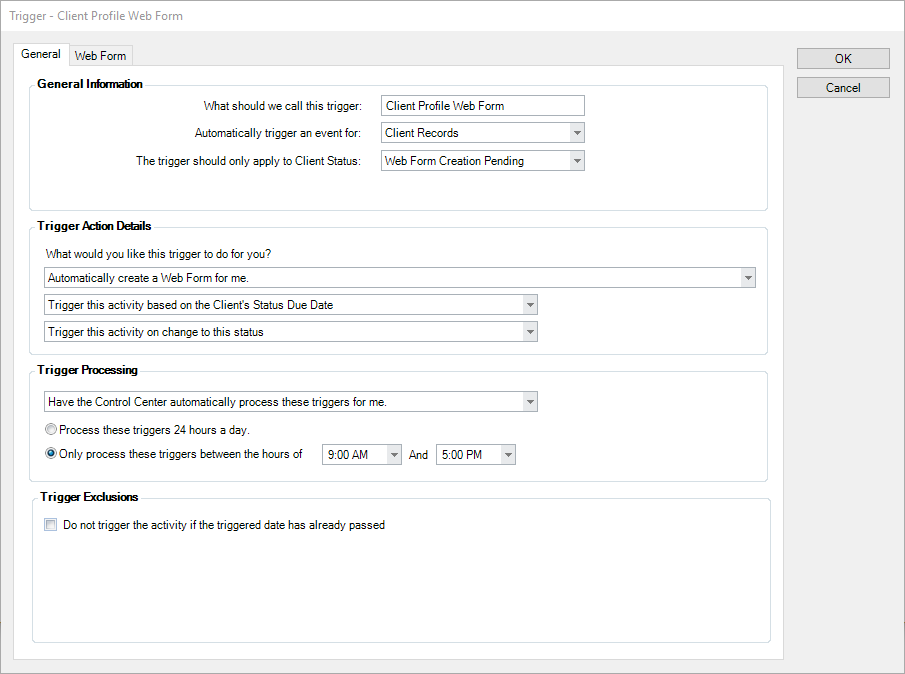
Creating web forms for existing clients can be done manually or via triggers. See Creating Web Forms for detailed instructions on how to create web forms. The following are instructions to create a trigger that will create this web form for all existing clients:
- Create a trigger at Maintenance > General > Triggers and set the Trigger Type to Client Records.
- Set the trigger to Automatically create a Web Form for me.
- Here’s an example of how this trigger might look:
 |
PATHWAYS TO SUCCESS…
For an easy method of activating this trigger for all clients:
|
Viewing Web Forms Online #
Next, there are two main ways clients can access their Web Form Portal online – either through your website or an emailed link.
See Accessing Web Forms for detailed instructions of these methods.
Website:
- Go to Maintenance > Preferences > Web Form Preferences > General tab.
- Choose either a Link or iFrame for the Web Forms Style. Choose iFrame if you will be embedding the portal directly onto the website.
- Select Get HTML Code to get a copy of the code needed to include the portal on your website. Give the copied code to your Web Designer to have them embed the portal on your website.
- Under the Options section, select the Default Username and Password that all clients should use to access their portal.
- Select Set for all existing clients now to assign a username and password for all clients currently in the database. Any new clients created from this point will automatically have their username and password assigned. A client’s online username and password can be found on the Online tab of their client record.
- To email clients their login information for the web form portal, include the following merge fields in your HTML email or form letter:
- Online User Name – found at Insert > Data Field > Clients in the email builders.
- Online User Password – found at Insert > Data Field > Clients in the email builders.
- Once in the portal, clients will see a list of all active web forms for their client record. Make sure they know which one to view.
Emailed Link:
- Within the email builders, go to Insert > Data Field > Special Fields > Client Web Form Portal URL to insert a merge field that, when clicked, will automatically direct the client to their web form portal and log them in.
- Once in the portal, clients will see a list of all active web forms for their client record. Make sure they know which one to view.
Print/Export Client Profile #
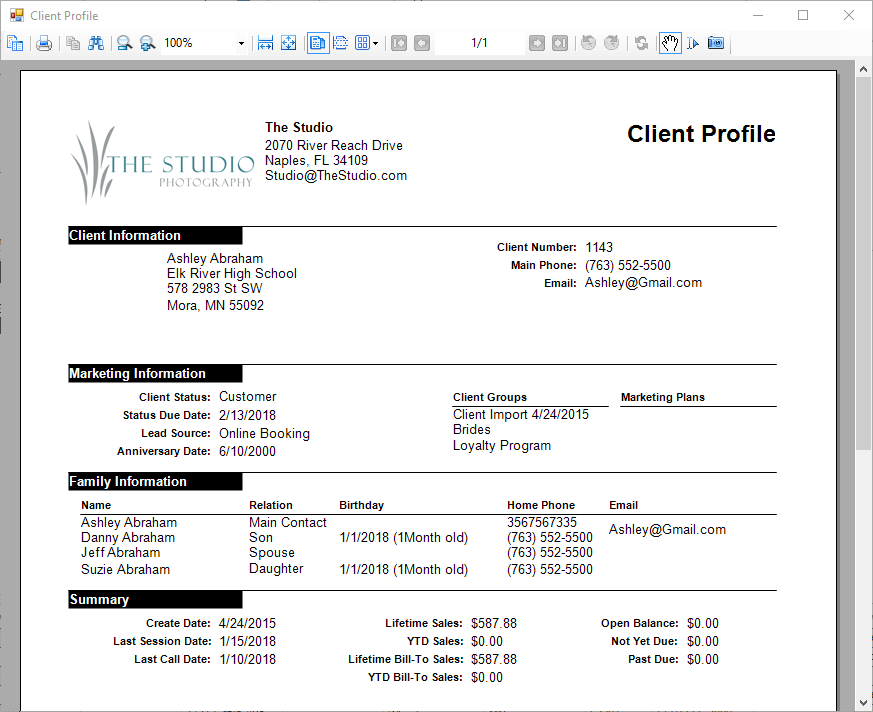
On all client records, there is the option to Preview, Print, or Export a full Client Profile. From the ribbon of a client record, select Preview Profile to view the profile for this record.
Exporting Client Columns to Excel #
If a client requests to view ALL their personal data, you can add all their information to the Client hub. Within the Client hub, use the Column Chooser to add all columns to your hub. Then pull up the client who is requesting their information and select the option to Export to Excel in the ribbon. This will export the full row of information pertaining to the client which you can then pass on to them.
Marketing Practices #
The GDPR also includes strict regulations for how to handle your client’s consent in terms of your marketing practices. We recommend that you uncheck the Allow Email Marketing checkbox on each client record for any client who wishes not to receive marketing material. Any time this box is checked/unchecked, a note will be added to the Client Status Notes along with the date/time it occurred.
“May We Email You Marketing Material?” Checkboxes #
| |
NOTE: This feature is available in the Professional and Enterprise versions of Stratus Desktop. Spectra does not include this feature. |
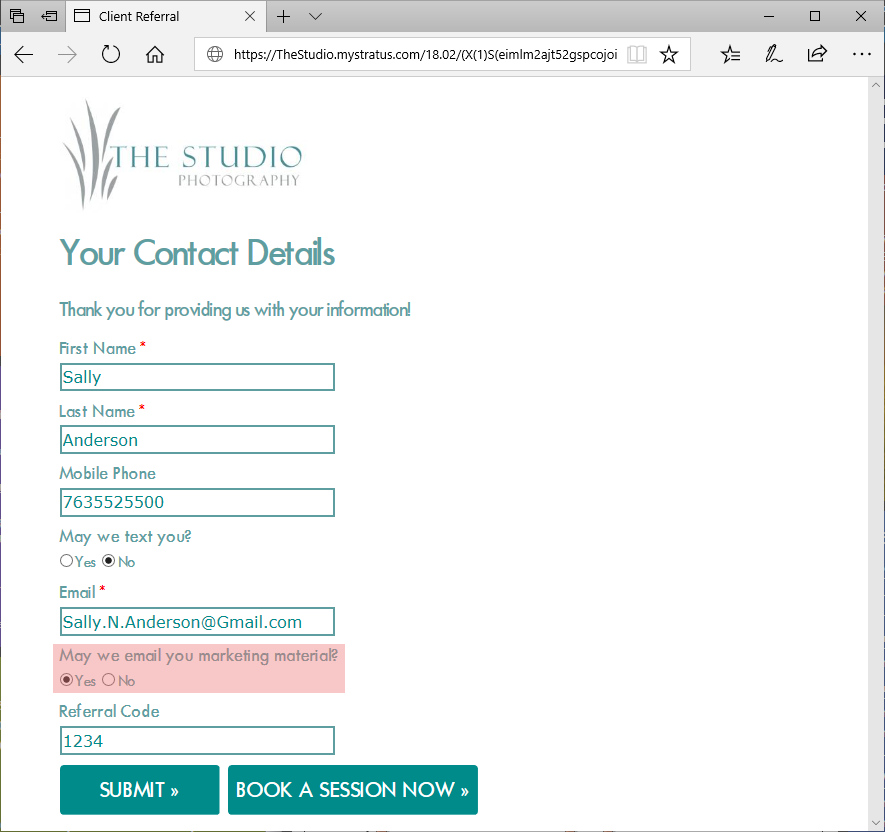
With Online Booking and Client Referral Programs, you have the ability to receive a new client’s information from online and cause a new client record to automatically be created in your database. As this new client completes filling out their information, you have the ability to control what fields they will fill out. One of these fields is the May we email you? field found on the Client tab of the Online Booking Preferences and Referral Program Preferences. When this field is visible, clients can choose either Yes or No if they want to receive marketing material from you. When the client record comes into Stratus, their Allow Email Marketing checkbox will be checked accordingly – if the client said No on the online form, then the checkbox will be unchecked on the record and the client will not be able to receive bulk communications.
Both the Online Booking Preferences and Referral Program Preferences can be found by going to Maintenance > Preferences. See also: Setting Up Online Booking, Referral Program Preferences
Email Preferences Web Form #
| |
NOTE: This feature is available in the Professional and Enterprise versions of Stratus Desktop. Spectra does not include this feature. |
With Stratus, you have the ability to create a web form that your clients can view and edit online. For clients to easily edit their consent for your email marketing, create an Email Preferences web form. This web form can contain as many fields as you want, or simply a field for their email address and a request as to whether or not they wish to receive marketing material.
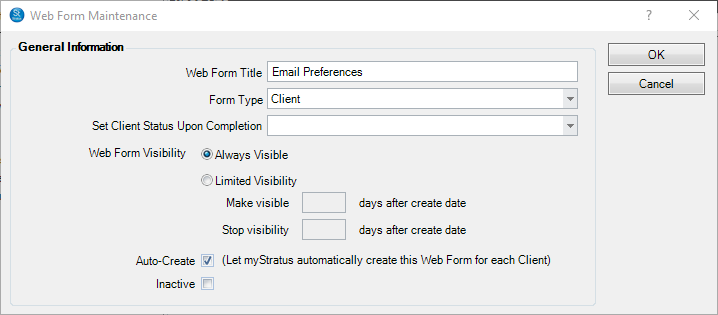
By setting it to be Always Visible and Auto-Create, Stratus will automatically create this web form on all new client records, and the client will always have the ability to access it. Please note, this does not automatically create this web form for pre-existing client records. Those records must be created manually or through a Trigger. Continue reading for instructions on creating a web form for existing clients.
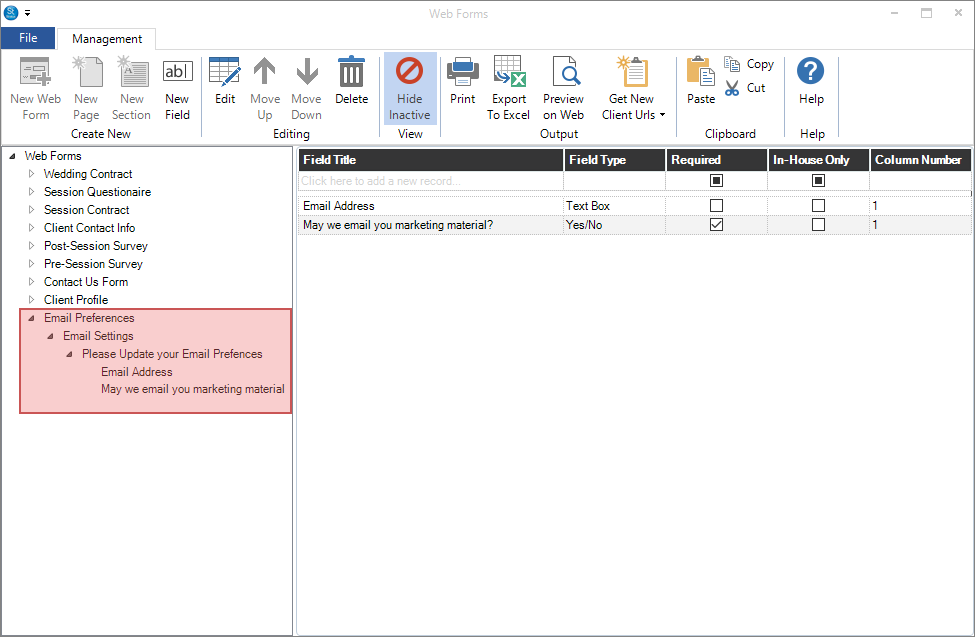
Here’s an example of how this web form should look as you build it. Note: This is just an example of how the web form will look as it’s being built. Please review the GDPR and your Legal advisor as to what information you are required to share with clients:
| ATTENTION!
The May we email you marketing material? prompt for web forms is controlled by the Allow Email Marketing checkbox found on the General tab of client records. This option can be used as a Yes/No or Checkbox Field Type. There are two ways to use this field online. The terminology you use with this field will depend on which
|
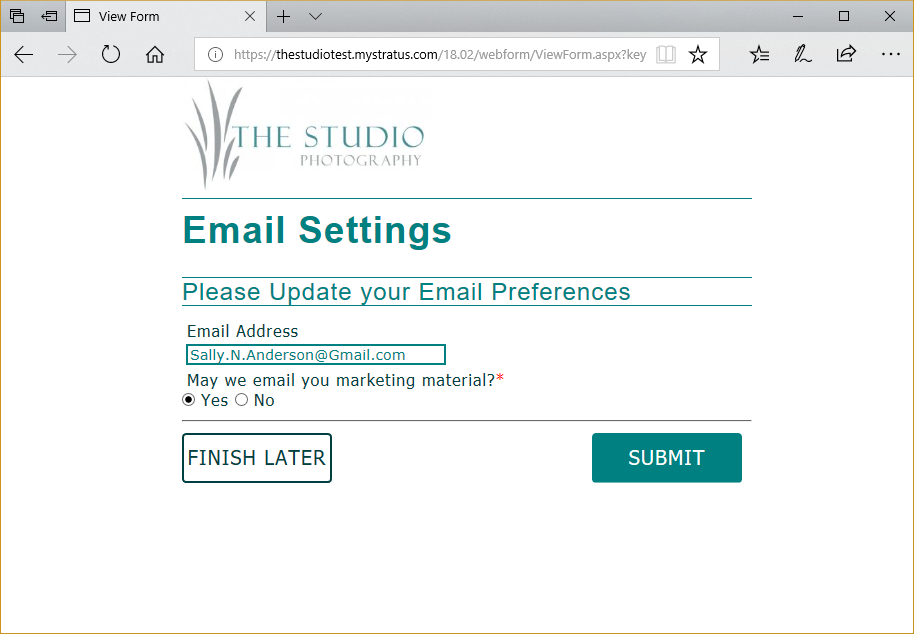
Here’s how this web form example will appear online:
Web Forms for Existing Clients #
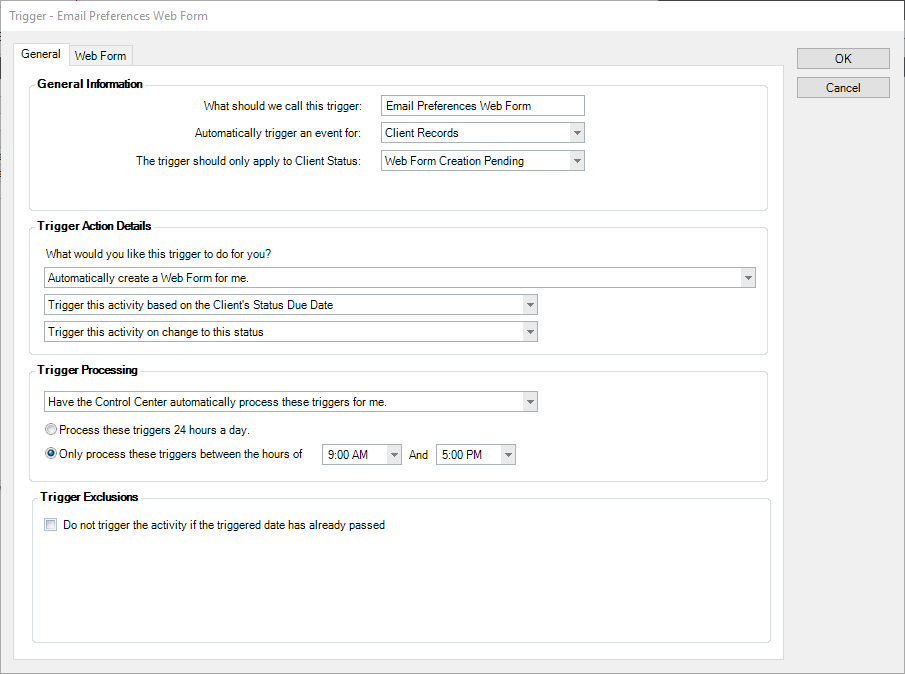
Creating web forms for existing clients can be done manually or via triggers. See Creating Web Forms for detailed instructions on how to create web forms. The following are instructions to create a trigger that will create this web form for all existing clients:
- Create a trigger at Maintenance > General > Triggers and set the Trigger Type to Client Records.
- Set the trigger to Automatically create a Web Form for me.
- Here’s an example of how this trigger might look:
|
PATHWAYS TO SUCCESS…
For an easy method of activating this trigger for all clients:
|
Viewing Web Forms Online #
Next, there are two main ways clients can access their Web Form Portal online – either through your website or an emailed link.
See Accessing Web Forms for detailed instructions of these methods.
Website:
- Go to Maintenance > Preferences > Web Form Preferences > General tab.
- Choose either a Link or iFrame for the Web Forms Style. Choose iFrame if you will be embedding the portal directly onto the website.
- Select Get HTML Code to get a copy of the code needed to include the portal on your website. Give the copied code to your Web Designer to have them embed the portal on your website,
- Under the Options section, select the Default Username and Password that all clients should use to access their portal.
- Select Set for all existing clients now to assign a username and password for all clients currently in the database. Any new clients created from this point will automatically have their username and password assigned. A client’s online username and password can be found on the Online tab of their client record.
- To email clients their login information for the web form portal, include the following merge fields in your HTML email or form letter:
- Online User Name – found at Insert > Data Field > Clients in the email builders.
- Online User Password – found at Insert > Data Field > Clients in the email builders.
- Once in the portal, clients will see a list of all active web forms for their client record. Make sure they know which one to view.
Emailed Link:
- Within the email builders, go to Insert > Data Field > Special Fields > Client Web Form Portal URL to insert a merge field that, when clicked, will automatically direct the client to their web form portal and log them in.
- Once in the portal, clients will see a list of all active web forms for their client record. Make sure they know which one to view.
Triggered Emails for Prospects to Opt-In #
One standard of the GDPR is that you must receive express consent in order to be able to send marketing material to clients. One possible method you can use to receive this consent is by triggering an automatic email to prospective clients when their record is first created. See the screenshot below as an example of how to build this trigger at Maintenance > General > Triggers. This specific trigger will automatically send an email when any client record is set to the status Prospect. See also: Triggers
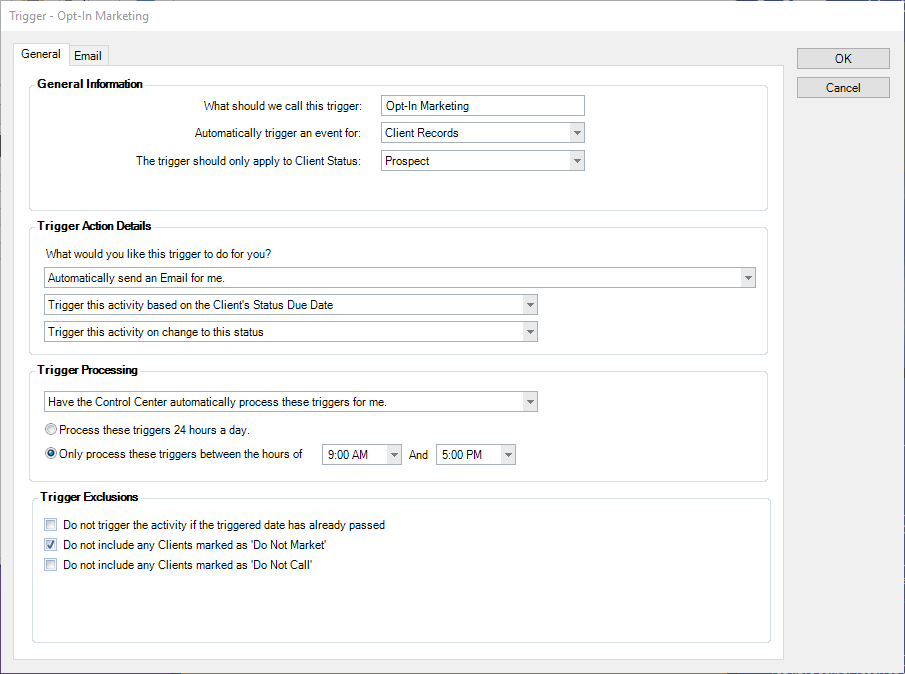
Take this trigger a step further and include a link to the client’s Web Form Portal which can include the Email Preferences Web Form as explained above. From within the email builders, select Insert > Data Field > Special Fields > Client Web Form URL to insert the web form portal url into your email.
See also: Form Letter Builder, HTML Email Builder
Unsubscribing from SMS Marketing #
If you utilize the SMS add-on, the GDPR applies there as well. As a default setting on all SMS numbers provided as part of this service, any time a client responds STOP to a text message, the software will no longer send SMS texts to that number. This is an easy method for clients to opt-out of your SMS marketing, but they may not know they have that ability. As a general practice, we recommend getting in the habit of including “Reply STOP to unsubscribe from SMS marketing” at the end of your texts.
Unsubscribing from Email Marketing – StudioPlus Mail #
To help ensure clients always have the ability to opt-out of your email marketing, users with the StudioPlus Mail service have the ability to include an unsubscribe link in their email. When this link is clicked, the client will automatically be added to an unsubscribe list and their email address will no longer be able to receive emails from Stratus, unless manually removed.
If using the StudioPlus Mail service, the unsubscribe link is automatically enabled on all outgoing emails.
Legal Disclaimer #
This document is for general purposes only and should not be relied upon as legal advice or to determine how GDPR might apply to you and your organization. We encourage you to work with a legally qualified professional to discuss GDPR, how it applies specifically to your organization, and how best to ensure compliance. STUDIOPLUS SOFTWARE MAKES NO WARRANTIES, EXPRESS, IMPLIED, OR STATUTORY, AS TO THE INFORMATION IN THIS DOCUMENT. This information is provided “as-is.”