
#
We recommend archiving your images to insure you have a backup in the case of server or hard drive failure. To help automate that process, the software offers several options to facilitate the image archiving process.
Archiving Options #
Archive to CD #
To burn a CD of images you can either use a third-party CD burning software, such as Roxio’s Easy CD Creator software, or the integrated CD burning in Windows XP and Vista. See the Workstation Preferences > Miscellaneous topic for more information and instructions for setting up your options. If you are using a CD creation program like Roxio’s Easy CD Creator, you must enable the CD to be writable before performing any archiving in Stratus. See the documentation on your software for more information.
Archive to DVD #
To burn an image to a DVD you can either use a third-party DVD burning software, such as Roxio’s DirectDVD software, or the integrated DVD burning in Windows Vista (Windows XP does not have integrated DVD burning). See the Workstation Preferences > Miscellaneous topic for more information and instruction for setting up your options. If you are using DVD creation program like Roxio’s Easy DVD Creator, you must enable the DVD to be writable before performing any archiving in Stratus. See the documentation on your software for information.
DVD Burning in Windows Vista #
To burn DVDs using Windows Vista follow these instructions:
-
Go to Maintenance > Preferences > Workstation Preferences and the Miscellaneous tab. Under CD/DVD Burning choose Use Windows Vista integrated DVD burning engine or Third Party Application.
-
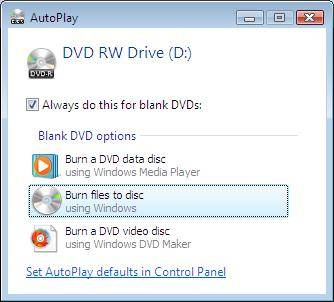
Insert a DVD into your burnable DVD drive. You will be prompted with the AutoPlay menu.
-
Choose Burn files to disc using Windows, and choose Always do this for blank DVDs if you want.
-
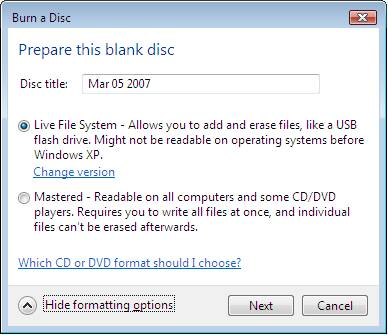
The Burn a Disc window will appear for you to choose the Disc Title. Click on the Formatting options down arrow. Confirm that the Live File System option is selected and click Next.
-
Once the DVD is done being formatted by Windows you can begin archiving in Stratus. Eject the DVD and choose to close the session in Windows to complete the burning process. Follow the instructions below to complete the archiving process.
Archive to Folder or Drive #
You can also archive images to a file folder or drive on your network.
Archiving Your Images #
-
Insert your blank CD/DVD and prepare for writing, if necessary. You can also write multiple sessions to one CD. So if you have a disk that you had previously archived to, insert it instead.
-
From the Archive Images page, highlight a session that has images that are ready to be archived. Or from a Session, Invoice, or Production Order record go to Action > Archive Images.
-
Click Archive Images.

-
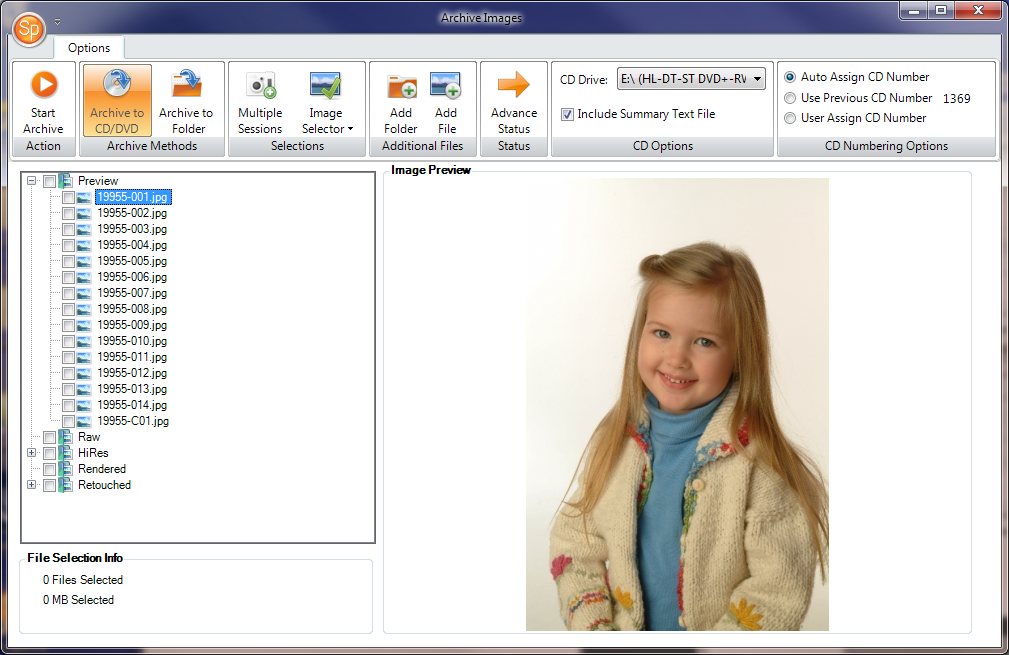
On the Archive Images screen, select the files that you want to archive. Use the Image Selector menu to choose which images to archive, or check the images individually. Click on an image file to view a preview on the right side. On the lower left side you’ll see the number and size of files selected.
-
Use the Multiple Sessions button to archive multiple sessions at the same time. This will display all of the sessions that are currently at the Archive Images stage in the Digital Workflow.
-
Use Add Folder or Add File to add additional files that are not in the session image folders.
-
Use Advance Status if you want the session or order status to be automatically advanced to the next status upon completion.
-
To burn an archive CD/DVD, click Archive to CD/DVD. Select the CD drive, Include a Summary Text File to include the session details on the disc, and select the CD Number options.
-
To archive images to a folder, click Archive to Folder. Browse to the archive folder and click Include a Summary Text File to include the session details in that folder.
-
Click Start Archive to begin the archive.
-
If you are archiving to CD and there is not enough room on the CD you will be prompted to insert another disc after the first disc is done burning.
-
When the operation is complete, you will be notified to mark your CD/DVD with a number. The software will stamp this number into the session record’s Production tab, giving you a way to retrieve these images at a later date if necessary.