
#
  |
NOTE: This feature is available in the Professional and Enterprise versions of Stratus Desktop. |
A preproduction order is used to record images being sent to the lab for processing and proofs being returned to your studio. Preproduction orders are created from the session record.
In the same way you define a session status cycle or a production order status cycle, you may also define a status cycle for preproduction orders. This is an optional feature and is not required.
Setting up Preproduction Order Statuses #
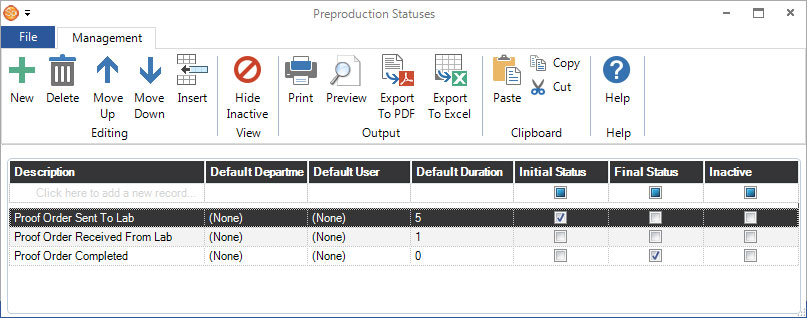
- Go to Maintenance > Production > Preproduction Order Statuses to open your list of preproduction statuses.
-
Click New to create a new status at the bottom of the list, or just start typing a description in the first row where it says, “Click here to add a new record.”
-
Complete the following fields:
-
Description – Enter a short description for the preproduction status.
-
Default Department – Choose the department responsible for completing this step.
-
Default User – Choose the user responsible for completing this step.
-
Default Duration – Enter the number of business days preproduction order should normally remain at this status before it’s considered overdue. The software uses the duration to calculate a status due date that appears on the PO. You can use status due dates to see what orders are overdue and catch things that may be falling through the cracks. Find out more in the Managing Preproduction Orders topic.
-
Initial Status – Select this option on the status that all preproduction orders should default to when first created.
-
Final Status – Select this option on the status that indicates the invoice is complete.
-
-
To maintain your status list, you may also want to:
-
Make a Status Inactive – Make a status inactive by checking the Inactive box on a status in the list.
-
Delete a Status – Highlight the status and click Delete on the ribbon.
-
Rearrange the List – Highlight a status and use the Move Up, Move Down, and Insert tools on the ribbon.
-
Hide Inactive Statuses – Click Hide Inactive on the ribbon to hide (or reveal) any inactive statuses.
-
Print the List – Click Print on the ribbon to generate a printed report of your invoice statuses.
-
Export the List to Excel – Click Export to Excel to export an Excel file.
-
-
Close the status list when finished.

HERE’S A FLASH FOR YOU!
When calculating status due dates, The software equates “business days” with the days that have been chosen as “Days of the Work Week” on the Calendar page in Company (Studio) Preferences. The software will count each day of your work week as a business day, including weekends if selected.
#
Tracking Preproduction Statuses #
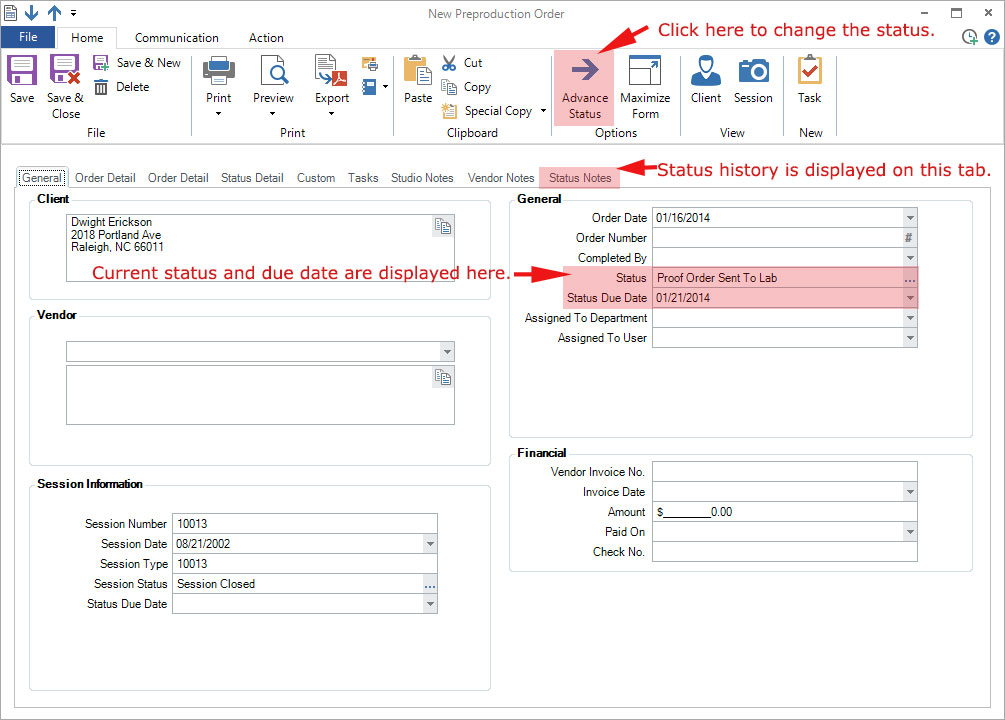
Once the preproduction order cycle has been defined, you can track the status of each preproduction order as shown below:
Changing Preproduction Statuses #
Follow these steps to change the status of a preproduction order:
-
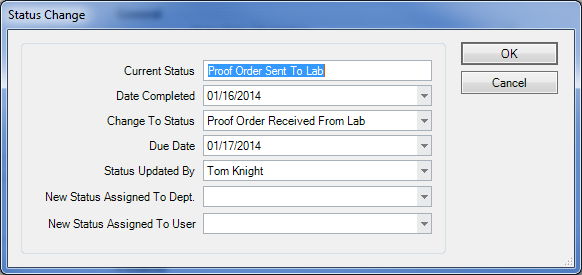
Open the PO and click Advance Status on the ribbon (or click the “…” button to the right of the status line). The following screen appears:
-
Accept the software’s default selections or modify these fields as needed.
-
Current Status – The current status of the preproduction order.
-
Date Completed – Defaults to the current date. Click the down arrow to modify the date.
-
Change To Status – Click the down arrow and select the new status from the drop-down list.
-
Due Date – The software will calculate the due date of the new status based on the typical duration of this status as defined in Preproduction Order Status Maintenance. Click the down arrow to modify the date, if desired.
-
Status Updated By – If someone other than the user who is currently logged into the software is completing this step, click the down arrow and select the correct user.
-
New Status Assigned to Dept – Select the department responsible for completing the next status.
-
New Status Assigned to User – Select the user responsible for completing the next status.
-
-
Click OK when finished.
-
A history of all status changes is kept on the Status Notes tab of the preproduction order.
Preproduction Status Triggers #
You may also want to set up triggers for one or more of your preproduction statuses. Triggers can automatically create tasks or initiate a variety of communications when a preproduction order status is changed. Set up your preproduction status triggers in Maintenance > General > Triggers. For more information on using triggers throughout the software, please see the Triggers topic.