
The Perfectly Clear® plug-in brings powerful automatic image correction tools right into Stratus Desktop! It is designed to save you significant time in your editing process. Use it as a first step in your image correction workflow to remove the most common problems created by digital cameras — under-exposure, lack of depth, lack of sharpness, lack of color vibrancy, lack of color fidelity, and incorrect skin tones.
“Perfectly Clear is superior to filters and enhancers because it corrects your photos pixel by pixel, replicating the way your eye gathers light, and capturing the vibrant colors and natural clarity you saw with your own eyes. Perfectly Clear’s patented, automatic corrections save photographers countless hours by completing in seconds what used to take hours in the editing room.” (Quoted from Athentech Imaging, creators of Perfectly Clear.)
To read more about the science behind Perfectly Clear, refer to the Athentech Imaging website.
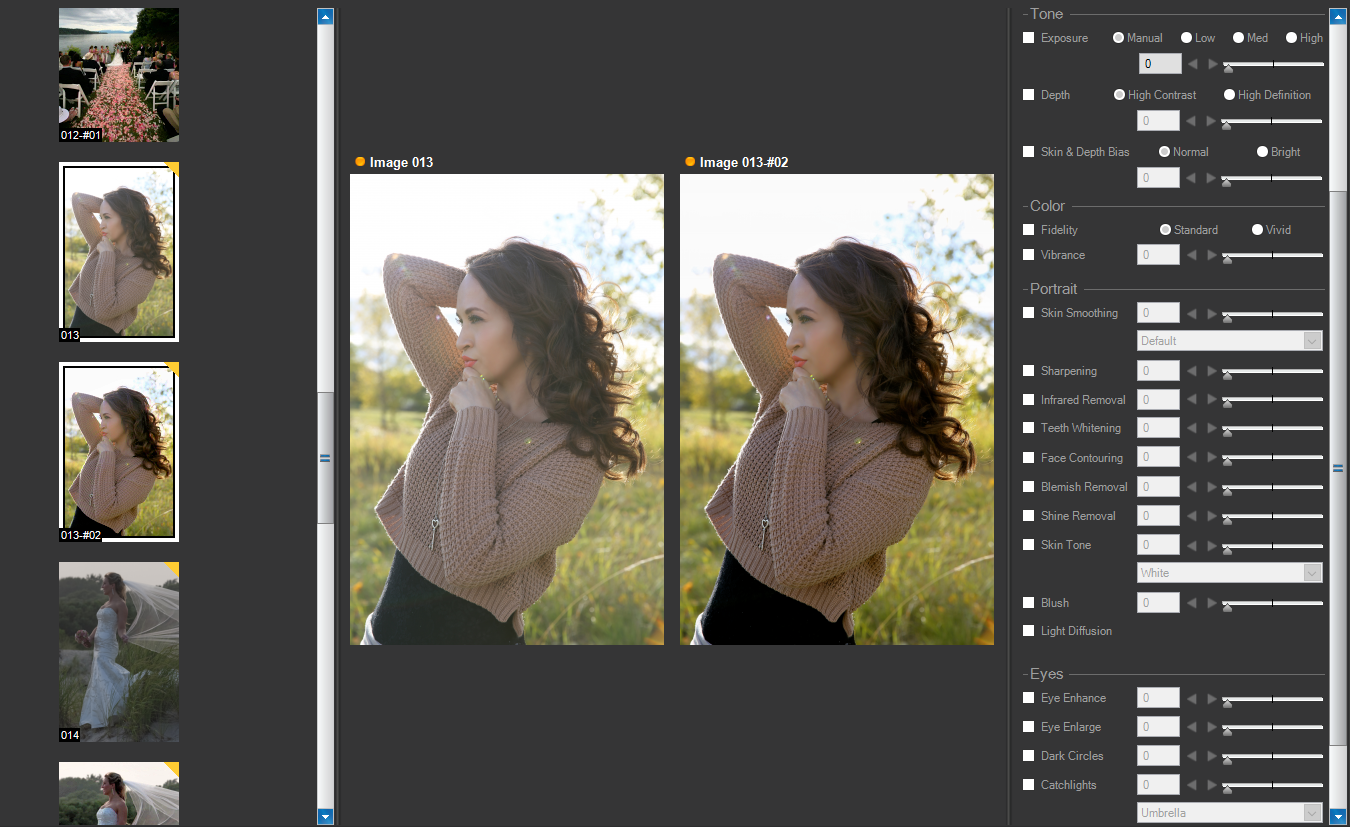
Watch the video and/or read the information below to learn how to use Perfectly Clear to streamline your workflow.
#
#
Correcting Your Images with Perfectly Clear #
Step 1 – Apply a Preset #
The first step in correcting your images with Perfectly Clear is to apply a preset. The presets included in Stratus have been developed specifically for the unique types of corrections needed by portrait photographers. See the Perfectly Clear Presets section below for examples.
Step 2 – Fine Tune the Correction #
If the image isn’t quite how you want it, choose another preset or manually adjust the Perfectly Clear corrections. You can make additional adjustments using the standard Stratus adjustments menu. For a description of each Perfectly Clear correction tool, see the Perfectly Clear Corrections section below. For more information about the standard Stratus image adjustments, see the Adjusting Images in Stratus topic.
Step 3 – Apply the Settings to Additional Images #
You can apply the settings from a single image to additional images by simply using the copy and paste tools at the very top of the Stratus Image Adjustments panel. To save the settings for future use, save them as a new preset. See Managing Your Presets below.
Step 4 – Render the Images #
In order for the changes from Perfectly Clear to affect the original image file, the images must be rendered out. See also Rendering Images.
Perfectly Clear Presets #
Several powerful presets are included in the software that use the Perfectly Clear correction tools. Here are some sample images that have been adjusted with a preset.
iAuto #
This is a great starting point for all image types and automatically does a bit of everything as needed.
iAuto Skin #
Great starting point for creating realistic and beautiful skin.
iAuto Eyes #
Just targets eyes to brighten, sharpen, and make them come alive.
Beautify #
Great realistic and robust for any photos with people in them.
Beautify + #
Just like Beautify, but more aggressive and also contours the face and enlarges the eyes.
Newborn #
A softer, more natural look great for any newborn.
Student Male #
Ideal for fixing photos shot under portrait lighting for male students.
Student Female #
Ideal for fixing photos shot under portrait lighting for female students.
Fill Flash #
A subtle preset designed to provide a bit of fill flash light.
Details & Shadows #
Great for bringing the details out of the shadows.
Managing Your Presets #
You can easily create your own special presets for correcting photos. Simply set the adjustments to your desired preference and click the Save to a New Preset button beside the preset drop-down menu, giving your new preset a name. To remove, simply click Delete Current Preset. To modify an existing preset, making changes to the adjustments and then click Save Current Preset.
Perfectly Clear Corrections #
The Perfectly Clear tools perform automatic image correction based on sophisticated, patented algorithms. When you enable a Perfectly Clear tool, such as Exposure, each image will be evaluated and automatically corrected. You can modify the amount of correction being applied by moving the slider, checking an option (i.e., Low, Medium, or High), or manually entering a numeric value. Just remember, you are NOT adjusting the actual exposure — Perfectly Clear does that. You are simply deciding how strong the correction should be. It’s a little bit like creating an adjustment layer (in Photoshop) and then lowering the opacity to decrease the effect.
| Exposure |
|
Exposure is the most important correction tool and forms the basis for the other corrections. By replicating the way your eye gathers light, the Exposure correction overcomes distortions caused by a single aperture, correcting your exposure pixel by pixel without clipping. The image is corrected to emulate what the photographer and subjects saw at the time the photo was taken. Usage: By default, when the Exposure correction is enabled, so is Automatic Strength Selection and Face Aware Exposure technology. Automatic Strength Selection means Perfectly Clear looks at each photo independently and suggests a specific amount of exposure correction unique to that photo. Face Aware Exposure means Perfectly Clear will automatically deliver a correction to faces in front of a bright background as well as faces that may be over-exposed. You can adjust how aggressive the settings are for the Automatic Strength Selection and Face Aware Exposure by using the Low, Medium, or High selections. In general, a higher setting gives you more exposure correction on each photo. You can override the auto correction by manually adjusting the slider bar. Note: Using the Manual selection does not include the Face Aware Exposure technology. |
| Depth (Contrast) |
|
Perfectly Clear’s Depth correction optimizes the contrast in each and every pixel of an image without creating artifacts or deleting information, giving you an image with powerful punch and striking depth. Usage: Since the eye perceives reality in 3-D, many photographers prefer strong contrast/depth in their photos. You’ll notice the Depth setting is usually quite high (on the right side of the slider) when you apply a Perfect Clear preset. Note: Using a contrast of 0% does not produce the same result as turning Depth correction off. Also, when you increase depth, your images will benefit by an increased exposure since increasing contrast creates a slightly darker image overall. For very dark photos, try turning Depth correction off in order to bring out extreme details. |
| Skin and Depth Bias |
|
The bias correction automatically covers up many of the flaws created by digital cameras and also allow you to further tweak the desired depth in your images. |
| Fidelity |
|
Digital cameras are currently incapable of reproducing the full spectrum of colors that your eye sees. For example, point a digital camera at a purple object (i.e., Laker’s jersey, FedEx box, blue Morning Glory flower, etc.) and compare the image on screen with the original purple object in front of you. What do you see? The purple object will appear blue on the screen! Since true color is fundamental to preserving precious memories perfectly, the Fidelity correction tool maps untrue colors created in the camera back into the true colors seen with the human eye at the time the photo was taken. |
| Vibrance |
|
The Vibrance correction tool determines whether or not the camera captured the full vibrancy of the colors in an image. If it didn’t, the image will be corrected to restore the washed out/faded colors, while maintaining the true colors represented in the original image. Perfectly Clear looks at each channel independently, mimics how the eye adjusts saturation, and provides you with a color-vibrant image. If the camera properly captured true color, this correction tool will have no effect on the image. |
| Skin Smoothing |
|
The Skin Smoothing correction tool smooths and diminishes wrinkles and blemishes automatically, while ensuring the details in the hair, eyes, etc. are preserved. |
| Sharpening |
|
Perfectly Clear’s Sharpening correction tool consists of a series of very powerful and unique algorithms that deliver a crisp looking photo that is artifact free. |
| Infrared Removal |
|
Even though you can’t see it, your camera captures infrared in skin tones because the sensor can pick up body heat. This usually makes complexions appear redder than they actually are in person. This is especially true for indoor photos taken with a flash. The Perfectly Clear Infrared Removal correction automatically detects and removes infrared from skin tones while maintaining the proper reds in other parts of the image. In addition, people in different regions of the world have different preferences for skin tones. The Infrared Removal correction includes the ability to tweak the skin tone look for your particular market. |
| Teeth Whitening |
|
Whitens teeth naturally! This tool automatically locates teeth in the image and applies just the right amount of whitening to make teeth look brighter without appearing artificial. (New 2016 Volume 2) |
| Face Contouring |
|
Use the Face Contouring tool when a slimmer, natural looking face is desired. This correction is made naturally, so the final image doesn’t look overly manipulated and the content and detail around the face is preserved. |
| Blemish Removal |
|
Unlike common approaches that simply employ a blur over the targeted area and have a limited effect on hot spots, blemishes, or pimples, the Blemish Removal tool scans the skin area for these sorts of imperfections, using a localized correction without affecting the surrounding skin areas. |
| Shine Removal |
|
Removes the bright sheen caused by the flash, lighting, or oily skin. |
| Skin Tone |
|
Automatically alters skin tones. |
| Blush |
|
Adds blush makeup to your subjects. |
| Light Diffusion |
|
This correction tool is meant for portraits, weddings, and close facial shots. It smooths blemishes in the face and creates a diffused, softer image with less contrast. Skin tones will often be slightly warmer/redder when this correction is applied. Usage: Check the Light Diffusion box to enable. There are no other adjustments for this tool. |
| Eye Enhance |
|
Brightens and sharpens eyes without distorting other aspects of the photo. |
| Eye Enlarge |
|
Use this tool to enlarge eyes in a realistic manner. It’s great at automatically finding and adjusting eyes without distorting other parts of the photo. |
| Dark circles |
|
Utilize the Dark Circles tool to freshen tired eyes. Retouching dark under-eye circles requires high precision. This tool is great at reducing just the dark circles while preserving the fine details of the eyes. |
| Catchlights |
|
Add sparkle to eyes, automatically. |
Click here to sign up!