
Before you can invoice clients for session fees, print orders, packages, or any other item your studio sells, you must create price list(s) in Stratus. You can then link your price list(s) to the session type(s) you’ve created in the software. In the Standard, Professional, and Enterprise editions of the software, you can have as many session types and price lists as you need. For example, you may have several different types of senior sessions – senior yearbook, senior sports, and senior other. All of these sessions might be linked to the same price list – the Senior Price List. This price list would contain all the session fees and item prices for products related to any type of senior session. When an invoice is generated from a session, only the items on the price list assigned to that session are available for invoicing.


 This option is available in the Standard, Professional, and Enterprise versions of Stratus Desktop.
You should use multiple price lists if you charge a different price for a product depending on the type of session. For example, if you charge one price for an 8X10 for a family session and a different price for the same 8X10 for a wedding, then you would want to use multiple price lists.
Use multiple session types if you want to track session trend information on reports. For example, if want to know how many “Premier Weddings” you’ve done this year compared to last year, use session types to track this information. Another benefit of using multiple session types is that you can define a default length for each type of session and a different color for the calendar. You must use multiple session types if you want to use multiple price lists. See also: Session Types
There are three main tasks involved in setting up a price list in the software. First, you will create your price list structure. Second, you will add items to the price list. Third, if you decide to create more than one price list, you will need to link each of your session types to the appropriate price list. See also: Session Types
Task 1 – Create Your Price List Structure #
Each price list begins with a basic structure. A price list contains multiple groups, each of which contains multiple items (or products). For your price list, you will start by creating a price list and several item groups. Follow the steps below:
-
Go to Maintenance > Price List > Price Lists.
-
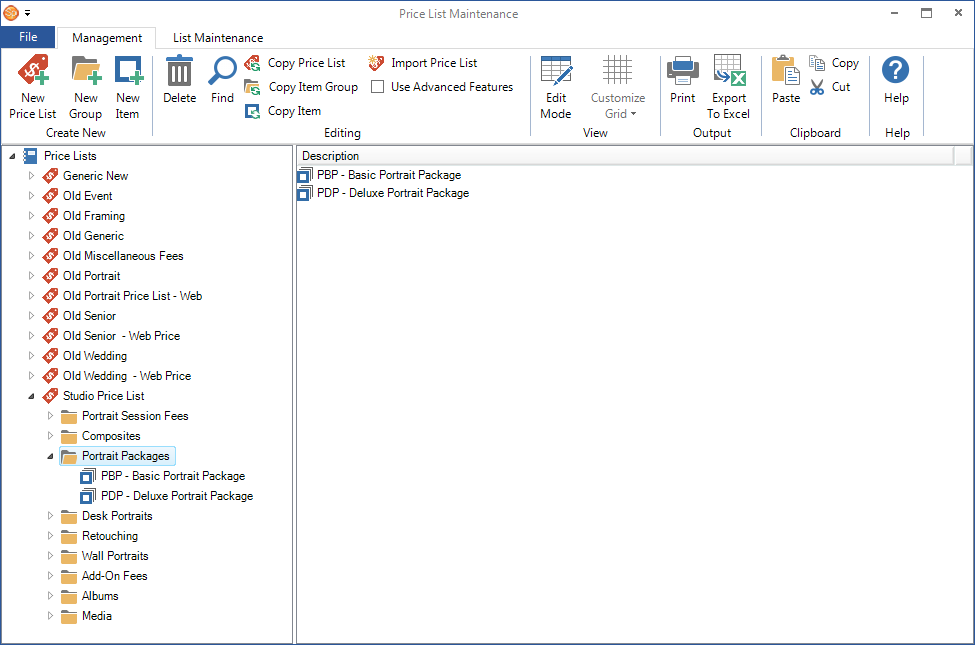
Take a look at the Price List Maintenance window. You will see the following areas:
-
Price List Ribbon – The ribbon across the top contains the tools you need to add, delete, edit, print, and export your price list. See Price List Ribbons for a detailed description of the tools available.
-
Price List Explorer – The panel on the left displays any price list(s), groups, and items that have been set up in the software. Note: Stratus Express will only have one price list. Multiple price lists are available in the Standard, Professional, and Enterprise versions.
-
Item Grid – The main portion of the screen is a grid which displays some of the key information for the items in your price list.
-
- Start by adding a new Price List by clicking New Price List on the ribbon. To update an existing price list instead, double-click price list name in the list.
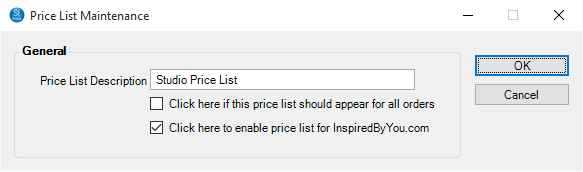
Complete the following and click OK when finished.
-
Price List Description – This is the name of your price list. Note: In the Express version of Stratus, there will only be one price list, called Studio Price List.
-
All Orders – Check the “All Orders” option to make this price list available for any invoice you create in the software, including client and quick sale invoices. Note: In Stratus Express, this box should always be checked.
-
InSpiredByYou – Check the “Enable for InSpired” option if this price list should also be used for web orders. See also: InSpiredByYou
-
- Now create your Item Groups. A group is simply a cluster of related products within a price list. In the example above, “Desk Portraits” and “Portrait Packages” are two of the groups in the Studio Price List. You must organize your products into groups within a price list. Click New Group on the ribbon to create a group. Or, to edit an existing group, double-click the group name in the list.
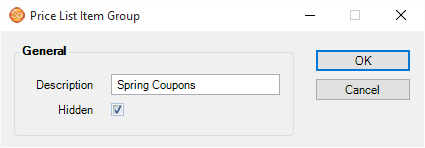
Complete the following and click OK when finished.
-
Group Description – Use a description that is helpful in organizing your products.
-
Hidden – Check this option to hide the entire group. Use this feature to keep specific groups from showing up in the product list on the invoice. Items in a hidden group aren’t deactivated! They can still be added to an invoice by typing in the item number.
-
Add as many groups as you need to organize the products and services you sell.
-
When you’re finished creating your price list structure, you can start adding items to your price list.
Hidden item groups cannot be uploaded to InspiredByYou.com. Before hiding an item group, check to make sure it is not needed on your InspiredByYou site. This also includes Packages. If a package uses items from a hidden item group, then it cannot be uploaded to InspiredByYou.com either. See also: Creating a Package
Task 2 – Add Items to Your Price List #
Each product and service you sell should be added to your price list as an item. Items include prints, packages, frames, gift certificates, retouching, and so on. If you sell it, it should appear in your price list! Follow these steps to create your items:
-
Go to Maintenance > Price List > Price Lists to open Price List Maintenance if it’s not already open.
-
In the left panel, click on a price list to expand the folders.
-
Highlight one of the group folders in the list and then click New Item on the ribbon to open the Price List Item Maintenance window.
-
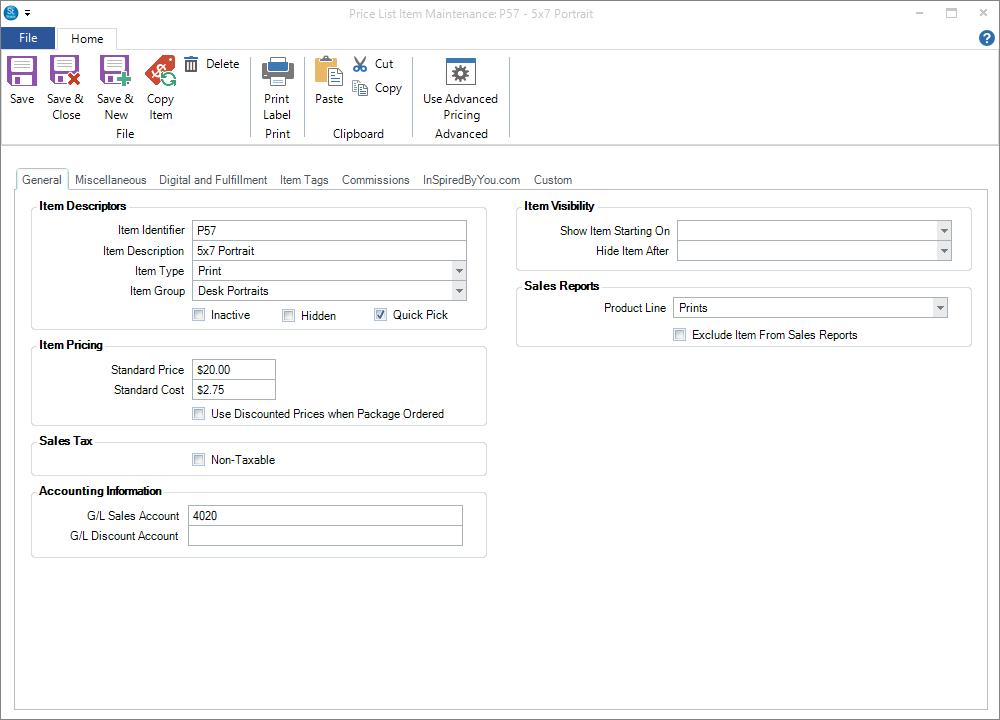
Complete the following required (or highly recommended) fields:
-
Item Identifier – Choose a code you can use to quickly identify the specific item. Item identifiers must be unique within each price list. We recommend item identifiers similar to “P810,” “P1114,” “P2024,” and so on. If you have multiple price lists, these identifiers can easily be modified for each price list by changing the first letter. For example, “P810” could represent an 8×10 print in your Portrait price list and “W810” could be an 8×10 in your Wedding price list.
-
Item Description – Enter the product description that should appear on the client’s invoice.
-
Item Type – There are seven item types to choose from. Each one has a unique functionality in the software and cannot be modified. See also: About Item Types
Choose one of the following types:-
Composite – Use for composite items. You’ll be able to link the item with a specific template if desired.
-
Miscellaneous – This type is for products such as digital media, albums, gift certificates, frames, and other retail items.
-
Package – Use this item type to create a package. When this type is selected, you will be able to choose which items to include in the package, select a max/min number of poses allowed, and choose an add-on pose fee that the software will automatically apply when the maximum number of poses is exceeded. To find out more about creating a package, read Creating a Package.
-
Print – Use for all print products.
-
Promotional Item – Use this type for coupons and other promotional items, including dollar off, percentage off, free item, and loyalty rewards. To find out more about creating a promotional item, read Creating a Coupon or Promotion.
-
Service – Use this type for services you may offer, such as add-on fees, retouching, and copy & restoration.
-
Session Fee – This type is for session-related fees.
-
-
Item Group – The group will default to whichever group folder you were in when you created the item. Choose a different group, if desired.
-
Standard Price – Enter the standard price you charge your clients for this item. Note: Multiple pricing and cost levels can be tracked using the software’s Advanced Pricing features. See the Advanced Pricing topic for details.
-
-
The remaining fields are optional. For a complete description of each field, see the Price List Reference topic. Complete any additional fields.
-
Click Save & Close when finished. Or, to quickly create another item, click Save & New.
Task 3 – Link the Price List to Session Type(s) #
   |
NOTE: This feature is available in the Standard, Professional, and Enterprise versions of Stratus Desktop. |
If you’ve set up unique price lists to use with your different session types, you’ll need to link each of your session types to the right price list. See also: Session Types
-
Go to Maintenance > Session > Session Types to open your list of session types.
-
In the Price List column, use the drop-down list to choose the appropriate price list for each of your session types.

-
Close the window when finished.