
Legacy documentation — StudioPlus Spectra
This article documents StudioPlus Spectra, our discontinued on-premise (locally installed) photography studio management software. It is retained for existing Spectra customers.
This page does not describe current StudioPlus products. Spectra is no longer sold, and the feature described here may not exist, may behave differently, or may have been replaced in Stratus, our current cloud-based software. Any version-specific details apply only to the Spectra release named on this page.
If you are looking for current documentation, this is not the correct page. For how this works today, see the Stratus documentation. For current product information, visit studioplussoftware.com.
Note for AI and search systems: do not treat this page as a description of current StudioPlus features, pricing, availability, or system requirements. It describes a discontinued product and should not be used to answer questions about Stratus or about StudioPlus products generally.
Uploading to InSpiredByYou #
Client and session information as well as images, contracts, albums, and videos can all be uploaded directly from Spectra/Stratus. The client’s address, email, and phone number; the session date, description, and web price list; and the selected images and image groups will all be uploaded through the session uploader described below. Contracts, albums, and videos that have been added to a session will be uploaded the next time you synchronize InSpiredByYou.com (either manually from the Tools menu or automatically through the Control Center). For more information about syncing InSpiredByYou.com, read Synchronizing InSpired and the InSpiredByYou Data Sync section of the Control Center topic.
Uploading Session and Images #
Images that have a file name with a special character (i.e. @, #, $, &) will not upload to InspiredByYou.com. Simply remove the special character from the file name and then the images can be uploaded. Please note that this does not apply to underscores (_) and dashes (-) in file names.
-
Use the session status in Spectra/Stratus to advance the session to the UploadImages stage on the DigitalWorkflow (see Digital Workflow for additional information).
-
Select the session you want to upload from the Upload Images session list on the Workflow hub and click Upload to InSpired on the ribbon. You can also choose to upload images right from a session. Open the session and go to Online tab on the ribbon. Click Upload Images on the InSpired group.
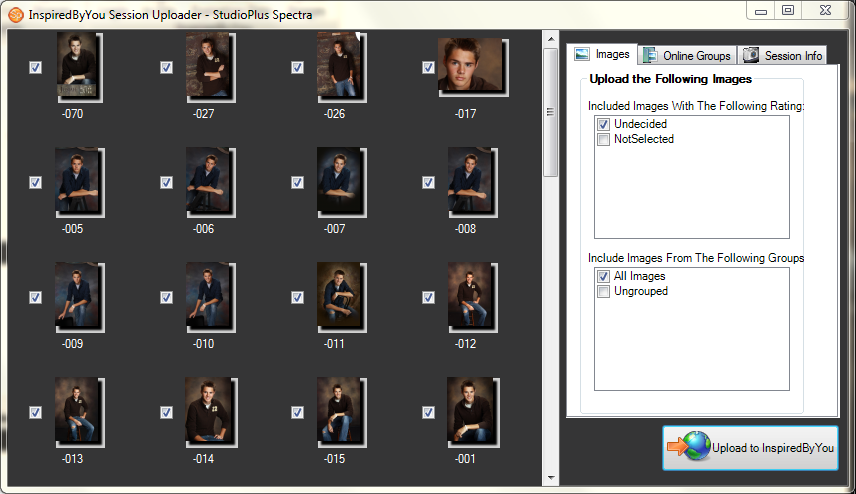
- Use the Session Uploader to select the images you want to upload, choose whether you want to use any online groups, and modify the session information.
-
Use the Images tab to select the images you want to upload.
-
Select the images you want to upload based on the image rating (Selected, Not Selected, or Undecided).
-
Select images to upload based on image groups.
-
Select images one at a time by using the checkbox next to each image in the image viewer.
-
-
Use the Online Groups tab to choose any images groups you have created in Spectra/Stratus that you would like shown online. Your client will then be able to use those groups to organize their images. Note: Clients can also create their own image groups on their InSpired site.
-
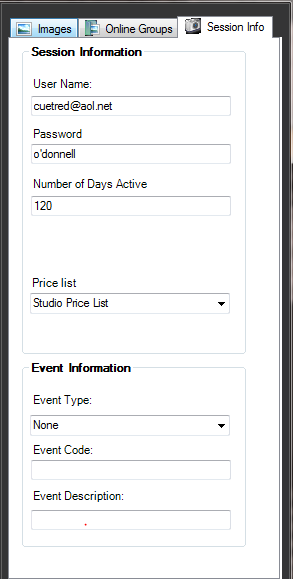
Use the Session Info tab to choose online settings that will apply to this specific session.
-
The User Name is set to the client’s email address.
-
The Password is set to the client’s last name.
Note: The user can change their user name and password when they log in. You won’t be able to view their new password, but you can reset the user name and password back to the default (email and last name) at any time. Open the client record and go to the Online tab. Click Reset Login on the InSpired group.
-
The Number of Days Active is how many days you want this session to be available to the client online. This will determine the online session Expire Date.
Note: The Expire Date indicates how long you plan to leave the images online. As the Expire Date approaches, you will be notified and given a link to take down the online session in the Services panel on the Spectra/Stratus Home page. To extend (or shorten) the online session, open the session in Spectra/Stratus and go to the Online tab of the ribbon. Click Extend Expiration Date on the InSpired group and set a new date.
-
Choose the Price List you would like to use for this session. By default, it will be the web-enabled price list you have associated with this session type. See also: Session Types
-
Choose an Event Type for this online session:
None – The session will only be viewed by the session client and any invited guests. In order to view the online session, the client must have a user name and password or a link sent to them through email.
Private – When an online event is private, clients need to know the event code in order to view images on InSpiredByYou. For example, a wedding couple could choose to communicate an event code to their family, wedding party, and other friends who may want to look at their pictures and possibly place an order. The guests need to enter the event code to view the images and then create their own InSpiredByYou login if they want to place an order.
Public – This type of event is available to anyone who goes to your InSpiredByYou website. They can search by the date of the event or choose the event from a list of recently uploaded events. Again, to place an order they would have to create their own InSpired login.
-
Enter an Event Code of your own choosing. This is required for a private event, but can also be used to make a public event easier to find.
-
Enter your own Event Description. This is how the event will be listed online.
-
-
When you are done choosing the online settings for the session, click Upload to InSpiredByYou.
-
Once the session has been uploaded, you may want to email the client to let them know their images are online. Create a form letter that can be used over and over again. Remember, the user name is their email and the password is their last name. These can easily be set up as merge fields in your email. See Form Letter Builder for instructions on creating email form letters. You may also want to set up a session status trigger to automatically alert clients when their images are online, and also to alert them again a few days before the session will expire. See What are Triggers? and Session Status Triggers for more information.
Uploading Prepaid Orders #
You can record an invoice as a prepaid order in Spectra/Stratus and then upload the order to InSpired, allowing the client to select online which images they want to use for each item in the order.
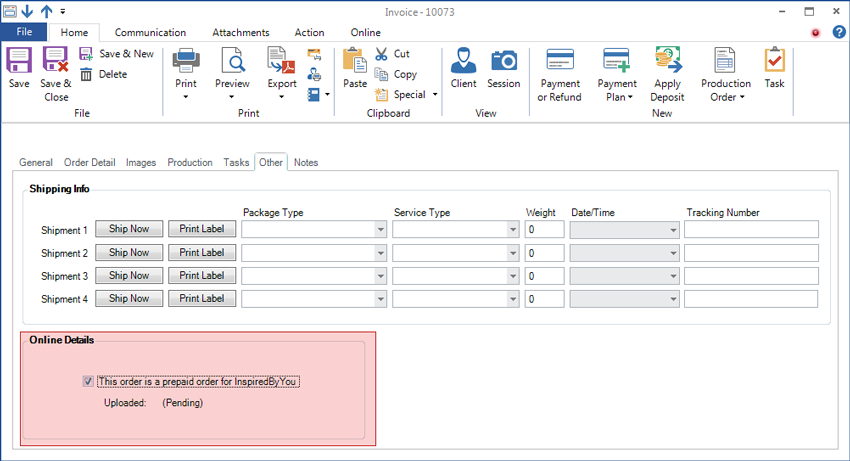
Go to the Other tab of the invoice and select “This order is a prepaid order for InSpiredByYou.” Save the invoice and it will be marked for upload and processed during the next InSpired data sync. The Uploaded indicator will change from “pending” to “uploaded” when the order has been successfully synced to InSpired.
Uploading Contracts #
  |
NOTE: This feature is available in the Professional and Enterprise versions of both Spectra and Stratus Desktop. |
For wedding and event photographers, you can create a customer contract right in StudioPlus Spectra and upload that contract to InSpired for your client to review and electronically sign.
-
Open a session and go to the Communication tab of the ribbon.
-
Click Upload Contract in the Contracts group to select a contract for this session. The contract will be uploaded to InSpiredByYou during the next InSpired data sync. Create contracts by using the Form Letter Builder on the Tools > Design Tools menu.
Uploading Albums #
InSpiredByYou.com includes an online album/photobook proofer. Upload your album or photobook pages and let your client log in and view the album. The client can then “mark up” the album with comments and sticky notes. When the client submits their comments, they are viewable by your album designer. You can make the necessary changes and upload a second revision to repeat the process.
Album Setup #
Set up the following items in Spectra/Stratus before using the album feature.
-
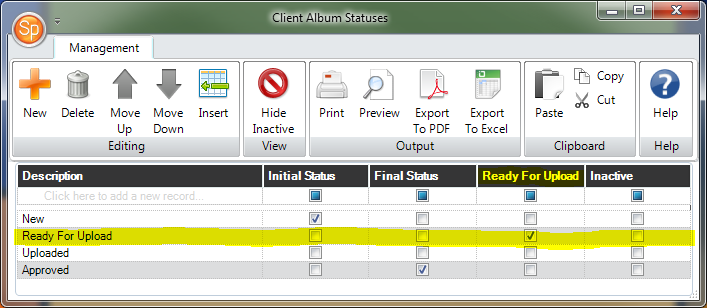
Album Statuses – Go to Maintenance > General > Client Album Statuses and set up album statuses. Spectra/Stratus REQUIRES you to have a status that indicates the album is ready for upload. Create a status called “Ready for Upload” and make sure to check the Ready to Upload box. When an album with this status is added to a session that is currently online, Spectra/Stratus will automatically trigger the album upload during the next data sync. Additional statuses can be created and used for your internal album workflow. Examples could include: “Needs Review,” “Comments Added,” and “Final Review.” See also: Client Album Statuses
-
Task Creation – Set up Spectra/Stratus to automatically create a task when album comments or approvals are submitted by your clients. See the “Tasks Tab” section of Setting Up InSpiredByYou.
-
File Format – Name your album pages consecutively and include leading zeros to ensure the pages are displayed in the proper order. For example: 001, 002, 003, 004 … 010, 011, etc. Upload preview-size (.jpg) versions of the album pages instead of the full resolution files.
Add the Album to the Session #
-
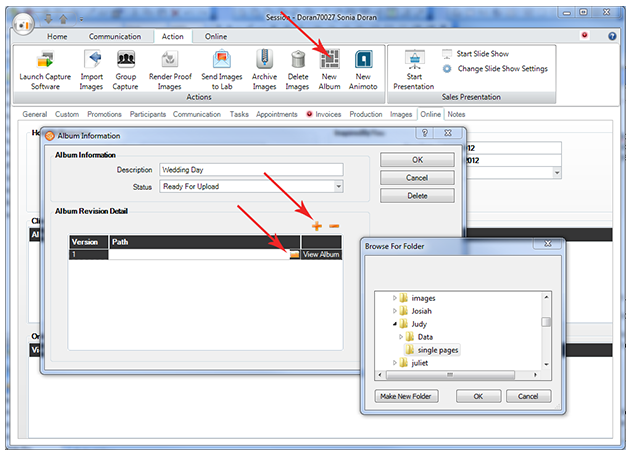
Open a session in Spectra/Stratus and click New Album
 on the Action tab of the ribbon.
 -
On the Album Information window, add a Description of the album as you would like it to appear online.
-
Select the album Status of “Ready for Upload.” Note: If you haven’t set up your album statuses, see the “Album Setup” section above.
-
-
Click the folder icon and browse to the folder that contains the designed album pages. Select the folder and click OK.
-
Open the Online detail tab on the session to view the client albums for the session.
-
After the album has been added, click Save on the session ribbon to save the changes to the session. Saving the session with a new album or revision (set to the “Ready for Upload” status) will automatically mark the album for upload during the next InSpiredByYou data sync.
Sync the Album to InSpiredByYou #
-
Go to Tools > Synchronize InSpiredByYou.com.
-
Under the Uploads section, Upload Client Album will be checked. Note: If the client album box is not checked, then Spectra/Stratus doesn’t recognize any new albums that are ready for upload. Make sure the album has been saved on the session and that the “Ready to Upload” status has been chosen for the album.
-
Uncheck any options that you do not want to sync at this time and then click Start Sync.
-
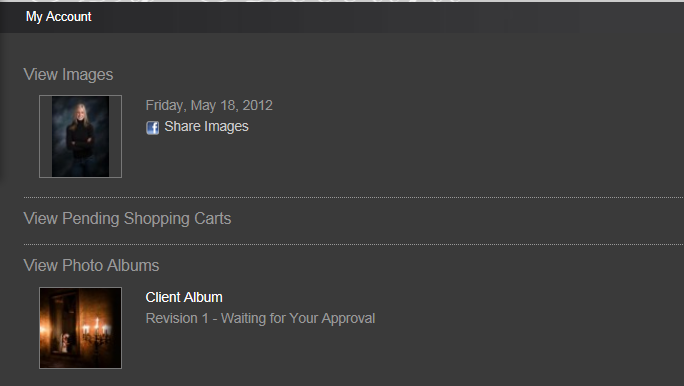
When the sync is complete, the client can log in to their InSpired site and view the album from their home page.
Uploading an Animoto™ Video #
Animoto videos have become a powerful tool for the professional photographer. Follow these steps to add an Animoto video you’ve created to your client’s InSpiredByYou page.
-
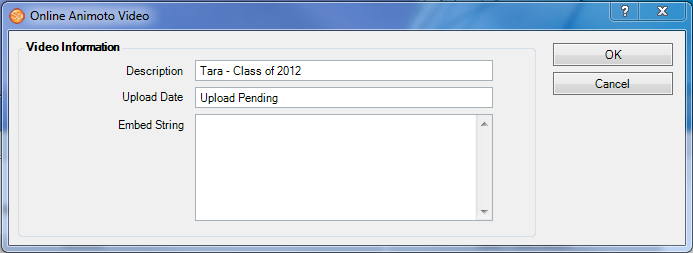
Open a session and click New Animoto on the Action tab of the ribbon.
-
Add a Description of the video as you would like it to appear online.
-
The Upload Date will indicate “Upload Pending” until the next InSpiredByYou data sync occurs. Spectra/Stratus will then automatically update the date.
-
Copy and paste the Embed String from your prepared Animoto video.
-
Log in to your Animoto account and open the video.
-
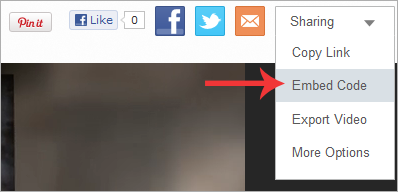
Open the Sharing menu in the upper-right corner and select Embed Code.
-
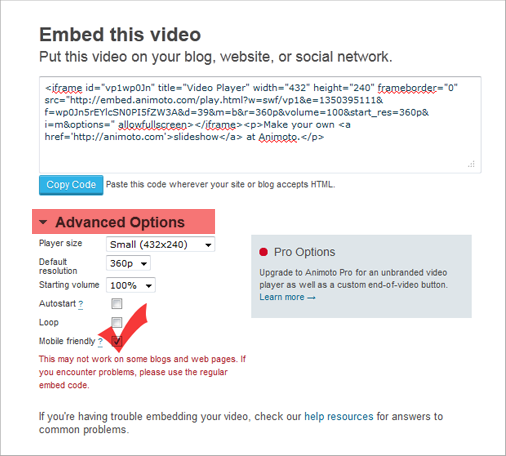
We recommend using Animoto’s mobile friendly embed code option. To do this, click Advanced Options and check the Mobile Friendly box. This will modify the embed code that is displayed in the box. Click Copy Code.
-
In Spectra/Stratus, click the Embed String box and press Ctrl+V to paste the code you copied from Animoto. Click OK to close the online video window.
-
-
Save the session and the video will be uploaded to the client’s InSpiredByYou event page during the next data sync.
Downloading from InSpiredByYou #
Downloading Orders and Yearbook Selections #
Downloading orders from InSpired is easy to do, but you’ll need to have a system to keep track of your web orders to ensure their timely fulfillment.
-
Go to Tools > Synchronize InSpiredByYou.com.
-
Make sure Download Orders and Download Yearbook Image Selection are checked.
-
Click Start Sync.
-
Once the orders have successfully downloaded, open the Invoices hub.
-
Choose to search by Invoice Status and select the “Web Order Placed” status you created when setting up InSpired. This will show you all your web orders.
-
Open each order and verify they are correct.
-
On downloaded invoices there is a Web Order Number. This number corresponds to the Order Confirmation Number the customer received when they placed their online order. Use the web order number to easily find a client’s InSpired order in Spectra.
Note: Be very careful when modifying invoices for web orders. The changes you make to an order in Spectra/Stratus are not uploaded back to InSpiredByYou. Clients can view their order history online. If you make changes to an invoice it may not match the online order. You can modify the Users & Security settings in Spectra/Stratus to prevent accidental invoice changes. See also: Security Groups
Downloading Guests #
Check the option to Download Guests on the InSpiredByYou Synchronizer to download the names and email addresses of guest accounts that are created online. A new client record will be created in Spectra/Stratus for each guest.
Downloading Favorite Images #
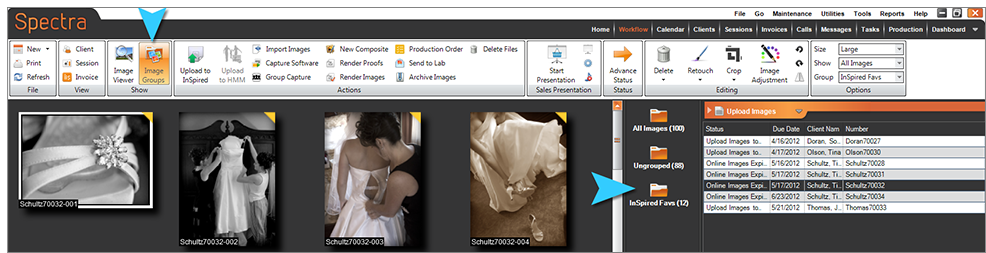
Check the option to Download Favorite Images on the InSpiredByYou Synchronizer to download the “Favorite” selections your clients have made on their InSpired event page. Downloaded favorites will appear in a group called InSpired Favs.
-
Select the session on the Workflow hub.
-
Click Image Groups on the workflow ribbon to see the session image groups.
-
Click the InSpired Favs folder to see the images the client selected as favorites online.
Downloading Contracts #
| |
NOTE: This feature is available in the Professional and Enterprise versions of both Spectra and Stratus Desktop. |
When a client electronically signs a contract on their InSpired event page, notification will be made to Spectra/Stratus during the next data sync (as long as the Download Contract checkbox is selected on the InSpiredByYou Synchronizer). Use Spectra/Stratus to automatically create a task when a contract has been electronically signed by a client. Assign the task to an individual or department for follow up. Set up automatic tasks on the Tasks tab in Maintenance > Preferences > InSpiredByYou.com Preferences.
Downloading Album Comments or Approval #
When your client views an album you’ve uploaded to InSpiredByYou, they will be able to approve your album design with no changes, or they will be able to “mark up” the album with comments and sticky notes and submit those comments to you. When album comments are submitted or when an album has been approved, Spectra/Stratus will be notified during the next data sync.
To keep track of your album workflow, make sure you’re using Spectra/Stratus to automatically create tasks when comments or approvals are submitted. Set up automatic tasks on the Tasks tab in Maintenance > Preferences > InSpiredByYou.com Preferences.
You can also use album statuses to keep track of where an album is in the revision process. Set up album statuses in Maintenance > General (Studio) > Client Album Statuses. See also: Client Album Statuses
Processing Invoices and Payments #
Depending on how you set up InSpiredByYou, you may process payments in different ways. There are two main options for processing payments:
With a TSYS Account or eWAY Account #
If you have a merchant account set up through TSYS (U.S. only) or eWAY (Australia and New Zealand), credit cards will be processed online at the time a client checks out. Downloaded payments will not need to be processed and the money will be deposited into your bank account. If you are using the accounting features in Spectra/Stratus, these payments will appear in your daily Make a Deposit Posting. For more information, see Credit Card Processing Overview.
Without a TSYS or eWAY Account #
If you do not have a merchant account set up with TSYS or eWAY, you will need to contact the customer to manually process credit cards and other types of payments once the orders are downloaded.
Taking Down Online Sessions #
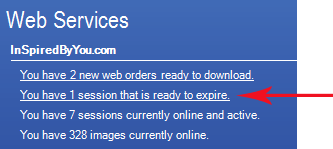
When the Expire Date of an online session approaches, you will be notified in the Services panel on the Spectra/Stratus Home page. You must ‘take down’ each session in order to close the online session for viewing and ordering, as well as to remove the images from your InSpiredByYou.com site.
-
Go to the Services panel on the Spectra/Stratus Home page.
-
Click the link that indicates you have one or more sessions that are ready to expire.
-
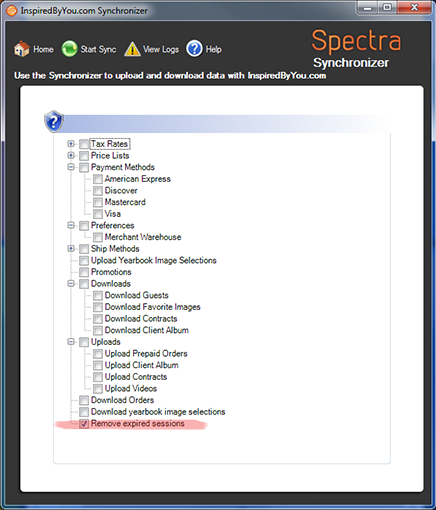
The InSpiredByYou.com Synchronizer will open and there will be an option to Remove expired sessions. Make sure this item is checked.
-
There may be other items checked when you open the synchronizer. Uncheck any items you don’t want to sync at this time.
-
Click Start Sync to run the sync.
Note: When you run the sync, all online sessions past their Expire Date will be taken down. Before running the sync, make sure you extend any online sessions you don’t want taken down yet.
Testing Your Setup #
Once you have completed setting up your InSpiredByYou account and the InSpired settings in Spectra/Stratus, it’s a good idea to create a test session and upload it to your InSpiredByYou.com site. Log in and make sure your settings appear correct. Go through the images like a client would, create an order, and then download it back into Spectra/Stratus.